You are using an out of date browser. It may not display this or other websites correctly.
You should upgrade or use an alternative browser.
You should upgrade or use an alternative browser.
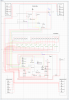
MY Wiring Diagram for 2.5TD (19J)
- Thread starter Aidso
- Start date
This site contains affiliate links for which LandyZone may be compensated if you make a purchase.

dominicbeesley
Well-Known Member
- Posts
- 1,701
- Location
- Hebden Bridge, West Yorkshire
I might be misreading your diagram but are all the X's relays - if so I think you should lose the ones on the stop lamps, indicators, fog lamps, horn, dash lights...just adding something to go wrong and they are fairly low load circuits....
Rear fog light needs a tell tale light either on the switch or dash MOT requirement.
As previous post I agree those relays not required , just complicates job cheaper to buy a good quality indicator relay from "vehicle wiring products"
Also check whether two fog lights legal , they must also be know more than 900m high from road fro memory
As previous post I agree those relays not required , just complicates job cheaper to buy a good quality indicator relay from "vehicle wiring products"
Also check whether two fog lights legal , they must also be know more than 900m high from road fro memory
Last edited:
- Posts
- 7,332
- Location
- Under my landy
shouldn't starter be on position 3 and the relay to the 12v to fuse box on position 2?
I'd personally also put heater plugs on position 2 and use position 1 for things like stereo / cb
Emergency flashes / indicators - defo put them direct to battery ,you don't want them only operating on a key as if you break down you need to leave them on and walk away from the vehicle with the keys on you.
I'd personally also put side and brake lights on permanent live - again side lights for breaking down at the side of the road at night and brake lights... just because i've had a total power failure before and having the brake lights on permanent meant the person behind me could see i was stopping
and as mentioned above - too many relays, you're just adding failure points! sensible for head lights, etc. but not for everything.
Last edited:
- Posts
- 7,332
- Location
- Under my landy
Good thinking. That's why I put it on here to get other ideas. As for the starter I put it where it was on the original diagram.
Ok, i'd double check the ignition with a multimeter just to be sure
")
dominicbeesley
Well-Known Member
- Posts
- 1,701
- Location
- Hebden Bridge, West Yorkshire
I got a new indicator stork from Craddocks recently for a few quid when I broke the wires off the old one. Isn't great but worth buying while you're at it. They should be good for a fair bit of current. New toggle switches are available from plenty of places.
If you want to test lighting circuits a "lamp limiter" isn't a bad idea. Basically put a high-ish wattage lamp (I use a lucas sealed unit) in series with the battery then test the load points with low wattage sidelamp bulbs. If you have a short somewhere the limiter will glow bright and the load lamp will be dull...saves on burnt wiring...
I'd stick in a reverse / work lamp at the back too while you've got it in bits. Depending on the model there should be a hole ready to take a brake light switch on the gear stick base, otherwise a dash toggle - though I'm not sure but you might need a repeater in the cab if its manual. Makes reversing at night a lot easier...
Good work by the way! I'd have a go at trying to keep the wiring colours the same as on an original as it might save you grief in the long run. I've swapped only a few wires in mine but the ones I've replaced for different colours catch me out every time!
D
I have a 200Di in mine was a Sherpa 15J and have used a PDF writer [PDF exchange viewer free software] to create this from the original drawing has all my mods on View attachment My landrover wiring 2013.pdf
dominicbeesley
Well-Known Member
- Posts
- 1,701
- Location
- Hebden Bridge, West Yorkshire
Looks way over complicated to me....far too many fuses.
Aidso
New Member
- Posts
- 500
Looks way over complicated to me....far too many fuses.
That's the spark in me. Separation is the name of the game.
Similar threads
- Replies
- 4
- Views
- 1K
- Replies
- 0
- Views
- 857