Okay, all you fellow Freelander enthusiasts. I’ve carried out a whole load of upgrades to my 2006, 3-door, Td4, and enjoyed all the challenges they brought to me. And from these challenges, I will now relate my experiences, so you might be intrigued enough to want to do the same for your own pride-&-joy.
But before I move on to the jobs-in-hand, and their outcome, I would like to introduce myself and the background that allows me to do such things.
At the age of 15, I was employed in the Radio-&-Television trade, as an apprentice. I worked with valves and all the discrete components you can imagine, except silicon-chips. They were way ahead of me and into the future. However, I soon learned to grasp their benefits. I now build my own computers as well as programming and repairing them. Challenges? I love ‘em!
One of my hobbies was restoring and enjoying old British motorcycles, where ripping them apart to restore them back to their ancient but most crude (headache) beginnings. They were the biggest challenge ever. Finding original parts that were serviceable was a strain at the best of times, so I often fabricated my own parts to suit. Usually from stainless-steel so they would last.
Anyway, there is much more to tell, but as an RAF Technician who specialised in Instrumentation/Electronics/Mechanical/Hydraulic, Pneumatic/Armaments/Weapons/etc, a car is a piece of cake. The things I could install to remove silly motorists from in-front… or behind… you wouldn’t believe. I’m still trying to work out how to miniaturise an EMP generator with a suitable power-supply. I’ll let you know. Lol
Right, the good stuff for our Freelanders follows. And the beauty of it is, my work can be adapted for almost any other vehicle.
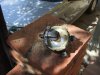
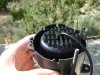
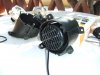
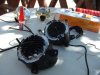
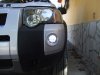
I bought the units shown in the photo’s, on Ebay, fitting them into the Fog Light holders. The original rubber grommets were the right size to hold the replacement LED lamps, utilising a tooth-pick to hold the units in place while superglue set, a bit like a woodruff-key. That was followed by silicon mastic. I used white to show I had sealed the lamps perfectly. Black would have blended too well, where any water leaking gaps might have been missed. The mastic doesn’t look very pretty, but as it’s hidden, who gives? See the photo’s.
This gives you four sensors, each 46cm’s from the other.
The distance down from the upper plastic edge of the bumper, is only four cm’s, and that applies to all four sensors.
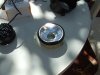
The holes you will drill (using the proper tool you will receive with the kit) will be clean and free from hazard. I will add this though, when you drill through the thick plastic, you must stop as soon as you feel the drill is through. There are wires in the vicinity, but shouldn’t be in the way, if you follow my instructions. See the photo’s.
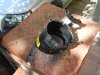
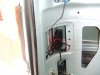
I fed the wires through the rubber-grommet in the rear-left corner of the underside. If you lie beneath car you will see it. I installed the control unit in that corner, inside the car. Close to there, there is a ventilation grill. Again see the photo’s.
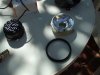
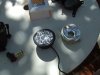
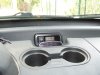
I fitted/stuck the visual indicator onto the dashboard, using the suppkied double-sided sticky pad, immediately before the clock, but not in a way I and everyone else cannot see the time. See the photo’s. The wiring from there to the control unit meant me removing my upmarket JVC Hi-Fi and all the rest of the central console gubbings. It’s not a difficult task, although you might be able to simply drop the Indicator wire down behind the Hi-Fi to feed it backwards, as an easier option. I used the left reversing light as a power-source, which made it selective.
Then it became difficult. I had to thread the wire beneath the carpet between the centre console and the rear seats. I used a wire coat-hanger to work a route beneath the carpet with the wire attached. It took an age, but I managed. What made it easier, from my point of view, was I had already done this previously in order to fit a 12 volt socket into the rear of my car to power all sorts of things, such as an Cool-Box for shopping.
Okay, enough is enough. See the photo’s and work out what is worth doing.
My final word is this. My reversing system works great. I used it today for the first time and it was perfect. The LED running lights as well. Again, perfect. The reduction in noise from my wife’s window, is also perfect. No ejection-seat and judicial murder enquiry required. Lol.
If anyone needs any other info, please ask. I am here to help others have a great car.
I was about to post this, but my wife has just reminded me University Challenge is about to begin. Sorry folks, I gotta go. I’ll post 2moro instead.
Scotty.
I’m back, earlier than expected. I live in a Spanish mountainous area and BBC 2 didn’t want me to watch it. So here is my Landyzone thread, a bit sooner.
But before I move on to the jobs-in-hand, and their outcome, I would like to introduce myself and the background that allows me to do such things.
At the age of 15, I was employed in the Radio-&-Television trade, as an apprentice. I worked with valves and all the discrete components you can imagine, except silicon-chips. They were way ahead of me and into the future. However, I soon learned to grasp their benefits. I now build my own computers as well as programming and repairing them. Challenges? I love ‘em!
One of my hobbies was restoring and enjoying old British motorcycles, where ripping them apart to restore them back to their ancient but most crude (headache) beginnings. They were the biggest challenge ever. Finding original parts that were serviceable was a strain at the best of times, so I often fabricated my own parts to suit. Usually from stainless-steel so they would last.
Anyway, there is much more to tell, but as an RAF Technician who specialised in Instrumentation/Electronics/Mechanical/Hydraulic, Pneumatic/Armaments/Weapons/etc, a car is a piece of cake. The things I could install to remove silly motorists from in-front… or behind… you wouldn’t believe. I’m still trying to work out how to miniaturise an EMP generator with a suitable power-supply. I’ll let you know. Lol
Right, the good stuff for our Freelanders follows. And the beauty of it is, my work can be adapted for almost any other vehicle.
- Daylight Running Lights? I posted a while back on using LED lamps, altering the car’s electrical wiring to suit. The wiring alteration was fine, but I soon discovered the LED lamps I used got very HOT. They burned my Fog-lamp holders!! Ooooerr.
I bought the units shown in the photo’s, on Ebay, fitting them into the Fog Light holders. The original rubber grommets were the right size to hold the replacement LED lamps, utilising a tooth-pick to hold the units in place while superglue set, a bit like a woodruff-key. That was followed by silicon mastic. I used white to show I had sealed the lamps perfectly. Black would have blended too well, where any water leaking gaps might have been missed. The mastic doesn’t look very pretty, but as it’s hidden, who gives? See the photo’s.
- Wind & rain deflectors. Easy to fit (sticky stuff on the edge that contacts with the car). Simple and very effective. My wife insists on having her window open so the noise I used to suffer has all but gone. It was either the deflectors or an ejector seat – and believe me I could easily have fitted/constructed one of them. 007, eat your heart out.
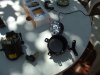
- Reversing warning sensors and associated system. This could so easily have gone wrong. I was faced with either removing the rear bumper to fit the sensors… or just drilling the mounting holes. I lay underneath the rear of my car, shining a torch in order to see as much as I could. My neck still aches! I worked out (I hoped) that the areas I had measured were free from obstruction and wiring, or anything else that could impede the fitting of (4) said sensors. The fitting is thus…
This gives you four sensors, each 46cm’s from the other.
The distance down from the upper plastic edge of the bumper, is only four cm’s, and that applies to all four sensors.
The holes you will drill (using the proper tool you will receive with the kit) will be clean and free from hazard. I will add this though, when you drill through the thick plastic, you must stop as soon as you feel the drill is through. There are wires in the vicinity, but shouldn’t be in the way, if you follow my instructions. See the photo’s.
I fed the wires through the rubber-grommet in the rear-left corner of the underside. If you lie beneath car you will see it. I installed the control unit in that corner, inside the car. Close to there, there is a ventilation grill. Again see the photo’s.
I fitted/stuck the visual indicator onto the dashboard, using the suppkied double-sided sticky pad, immediately before the clock, but not in a way I and everyone else cannot see the time. See the photo’s. The wiring from there to the control unit meant me removing my upmarket JVC Hi-Fi and all the rest of the central console gubbings. It’s not a difficult task, although you might be able to simply drop the Indicator wire down behind the Hi-Fi to feed it backwards, as an easier option. I used the left reversing light as a power-source, which made it selective.
Then it became difficult. I had to thread the wire beneath the carpet between the centre console and the rear seats. I used a wire coat-hanger to work a route beneath the carpet with the wire attached. It took an age, but I managed. What made it easier, from my point of view, was I had already done this previously in order to fit a 12 volt socket into the rear of my car to power all sorts of things, such as an Cool-Box for shopping.
Okay, enough is enough. See the photo’s and work out what is worth doing.
My final word is this. My reversing system works great. I used it today for the first time and it was perfect. The LED running lights as well. Again, perfect. The reduction in noise from my wife’s window, is also perfect. No ejection-seat and judicial murder enquiry required. Lol.
If anyone needs any other info, please ask. I am here to help others have a great car.
I was about to post this, but my wife has just reminded me University Challenge is about to begin. Sorry folks, I gotta go. I’ll post 2moro instead.
Scotty.
I’m back, earlier than expected. I live in a Spanish mountainous area and BBC 2 didn’t want me to watch it. So here is my Landyzone thread, a bit sooner.
Attachments
-
 DSCF0185.JPG277.9 KB · Views: 453
 -
 DSCF0188.JPG281.2 KB · Views: 393
 -
 DSCF0189.JPG161.3 KB · Views: 409
 -
 DSCF0190.JPG143.1 KB · Views: 368
 -
 DSCF0191.JPG151.6 KB · Views: 361
 -
 DSCF0192.JPG149.4 KB · Views: 359
 -
 DSCF0195.JPG258.4 KB · Views: 369
 -
 DSCF0197.JPG162.7 KB · Views: 421
 -
 DSCF0198.JPG177.2 KB · Views: 374
 -
 DSCF0202.JPG246.1 KB · Views: 459
 -
 DSCF0203.JPG329.4 KB · Views: 443
 -
 DSCF0206.JPG295.8 KB · Views: 413
 -
 DSCF0207.JPG169.9 KB · Views: 391
 -
 DSCF0208.JPG323.9 KB · Views: 399