So it’s been a while since I’ve done anything to the Landy but I’m finally gearing up to getting rid of some of the rust and getting it all one colour. I’m thinking Keswick green in either gloss or satin with a black roof. What do people think?
So today I finally got round to the issue of my very rusty door frames….
First things first was a cheeky breakfast to start off on the right foot.
View attachment 246664
So with the doors off one at a time I did the following….
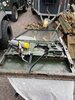
Door clamped to a work bench and the door skin folds heated up and bent out using a wide prybar. Then eased the skin gently from the door frame and separating the dum dum.
I then held the skin away from the frame using a couple of bits of wood.
View attachment 246667
View attachment 246666
Then I used two M8 studs to line up the hinge holes on the new repair section against the old door. I also measured from the mid door frame to the bottom of the door frame. The old frame was marked up for cutting.
The window guide lower fixing was also removed.
View attachment 246668
The old door frame was cut off.
Then I cleaned out all the old tape and corrosion/dirt etc.
View attachment 246670
Next the door skin internal was sprayed with Etch primer.
View attachment 246671
Then I applied closed cell foam tape to act as a barrier between the frame and skin.
View attachment 246672
The repair section was then lined up and tacked on, checked for squareness and straightness and then welded and flapper wheeled. The repair section was slightly bigger than the door frame but enough weld managed to sort it.
Once it had cooled down I then primed the framework and then carefully refitted the door skin before priming it all again.
View attachment 246674
The doors were then refitted. I will be doing further door improvements and painting them properly when I strip the body to paint it all and replace the cappings etc.
I also made a rather funny looking friend today. It’s either young or had a very heavy night out. It flew off and straight into the side of the neighbours van so I’m going for either!
View attachment 246675