Salisbury Nick
Well-Known Member
- Posts
- 826
- Location
- Dorchester
Why?
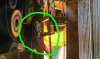
Because the Gearbox Oil Radiator is located low down just behind where you would expect a fog light to be. This is fine unless you are stupid enough to go green laning in a Range Rover P38 in which case it gets caked in mud and stops working.
So - we thought we would move it. 'We' is myself and my friend and co-owner and co-fool - each of us egging the other one to go that little bit further.
This is how we did it.
This is not how you should do it, it is not the best way to do it, this is not how I recommend that you do it. This is just how we did it. And I don't know of it works yet either
This is the offending article in situ.

Step 1
Jack the car and place on AXLE STANDS or other solid supports - I used 3Tonne axle stands.
Remove nearside front wheel and the wheel lining ro gain decent access from the back.
Step 2
remove the fan if you have one. Ours was attached with four bolts - three of which sheared off no matter how gentle I was.
This fan had a botched electrical cable join near the fan so I just cut through that to disconnect the cable.
Step 3
Crimp the hoses leading from the gearbox sump - see below.

Once these are clamped you are ready to cut the hoses/pipes.
I chose to cut the metal pipes because I thought it would be easier to crimp new hoses to the ends of the metal pipes than to connect two rubber hoses together.
I tried to find a pipe cutter to do this with - but there is not room to wield an adjustable cutter and I could not find one for this diameter pipe - so I bit the bullet and used an angle grinder.
This is entertaining - sparks every where and gearbox oil is flammable so you also get a little bit of fire

Because the Gearbox Oil Radiator is located low down just behind where you would expect a fog light to be. This is fine unless you are stupid enough to go green laning in a Range Rover P38 in which case it gets caked in mud and stops working.
So - we thought we would move it. 'We' is myself and my friend and co-owner and co-fool - each of us egging the other one to go that little bit further.
This is how we did it.
This is not how you should do it, it is not the best way to do it, this is not how I recommend that you do it. This is just how we did it. And I don't know of it works yet either
This is the offending article in situ.
Step 1
Jack the car and place on AXLE STANDS or other solid supports - I used 3Tonne axle stands.
Remove nearside front wheel and the wheel lining ro gain decent access from the back.
Step 2
remove the fan if you have one. Ours was attached with four bolts - three of which sheared off no matter how gentle I was.
This fan had a botched electrical cable join near the fan so I just cut through that to disconnect the cable.
Step 3
Crimp the hoses leading from the gearbox sump - see below.
Once these are clamped you are ready to cut the hoses/pipes.
I chose to cut the metal pipes because I thought it would be easier to crimp new hoses to the ends of the metal pipes than to connect two rubber hoses together.
I tried to find a pipe cutter to do this with - but there is not room to wield an adjustable cutter and I could not find one for this diameter pipe - so I bit the bullet and used an angle grinder.
This is entertaining - sparks every where and gearbox oil is flammable so you also get a little bit of fire