htr
Well-Known Member
- Posts
- 1,600
- Location
- Central Otago, Southern New Zealand
Hello one and all.
I thought it was time for an up date on my project.
I took mine car off and I had no idea how to go about going about this, but that's never stopped me! That's the best thing about this, just having a go and learning heaps along the way.
The parts left Rimmers in the UK on Tuesday afternoon and arrived in Auckland early on Thursday. Now I'm waiting for the NZ deliver people to do their thing - could be another week!
Motor is all stripped and cleaned down waiting for parts. I've modded the oil pump as per the K-engine page. Here's a pic of the pump's mod'd back plate. You can see where I've 'flowed' the oil pathways.
 [/URL][/IMG]
I can't remember - can any one tell me - have I got the pump's gears around the right way?
Now I'm busy working on the head. - port matched the exhaust ports and cleaned out the runners to the valves, just a little. Removed the step that is beneath the valve seats by nibbling at the lower edge of each seat. I'll carry on and polish up the exhaust side as best I can. Here's a pic of the exhaust ports, one gasket matched and the other original.
 [/URL][/IMG]
A view through the inlet port and out the valve throat. Compare that to the next pic where it' not been done yet.
 [/URL][/IMG]
 [/URL][/IMG]
Inlet - not doing much to that side again just cleared up the runners - removing casting lines and smoothing the step below the valve seats. When I'm done I'll give the area a rough sand to leave it near original. Interesting the ports don't match - the plastic inlet set-up is slightly smaller than the head's runners - I feel that each pulse in is a bit like a shot at the respective cylinder. I'll try to find out more about that difference and see if it should be matched too. I also removed all the plastic 'flash' left from the moulding process in the plastic inlet section.
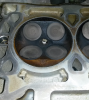
I've also 'unshrouded' the valves in the combustion chamber by shaving about a millimetre of the sides of each cylinder as well as removing the lip that's formed by each seat's slight recession into the head. And then I've also opened up the water gallery entrances to make them even - exhaust side is larger than the inlet side but all inlet side are the same and ditto for the exhaust side. Finish off with a serious clean out of the swarf - sanding debris and than a skim to true it up and raise comp ratio back to near what it was - it will be lower due to the enshrouding ...
This pic shows the valve seat recessed into the head. You can also see the water gallery openings too.
 [/URL][/IMG]
Oil thermostat #2 is due in from the US any day now- #2 as I ordered the wrong kit and the thread didn't match the oil filter - bugger! Hope to sell that one on TradeMe. Saw a very nice modern oil cooler on there too - I've been in contact with its seller and he has several more about $35 for a cooler - Setrab - a VG swedish brand & well respected in motor sport circles.
Exhaust manifold - Nodge68 PM'd me some good info about these and I've contacted a fabricator in the Nth Is - waiting to hear back. I'll tinker with the set on it, just a clean up of any welding splatter... The weld where the manifold meets the port plate forms a venturi - sadly two of mine are not properly formed - just a little mig welding needed to correct this and some careful grinding will sort that out.
This cutting and grinding work has been done with my trusty Dremel - it's slow being so small and you can't remove a lot by accident which is very good. I've also had the advice from a race engine rebuilder here in Cromwell - he works at the new Highlands Park race circuit. Check it out on Google / YouTube
I've so many questions to ask people. I try to search LZ but often get side tracked! So often the searches don't find what I'm wanting to Know.
My really big worry is that I'll get it all together and overcome any motor gremlins [ electrical nightmares we read about on LZ] only to find that the bloody VCU/IRD are stuffed!! You will hear my anguished screams from there!!!
A question then - spark plugs - which ones / type 'normal' or iridium? Brand - NGK, Bosch, Champion, AC Delco [didn't know they still existed!]...
More to follow -
HTR
I thought it was time for an up date on my project.
I took mine car off and I had no idea how to go about going about this, but that's never stopped me! That's the best thing about this, just having a go and learning heaps along the way.
The parts left Rimmers in the UK on Tuesday afternoon and arrived in Auckland early on Thursday. Now I'm waiting for the NZ deliver people to do their thing - could be another week!
Motor is all stripped and cleaned down waiting for parts. I've modded the oil pump as per the K-engine page. Here's a pic of the pump's mod'd back plate. You can see where I've 'flowed' the oil pathways.
I can't remember - can any one tell me - have I got the pump's gears around the right way?
Now I'm busy working on the head. - port matched the exhaust ports and cleaned out the runners to the valves, just a little. Removed the step that is beneath the valve seats by nibbling at the lower edge of each seat. I'll carry on and polish up the exhaust side as best I can. Here's a pic of the exhaust ports, one gasket matched and the other original.
A view through the inlet port and out the valve throat. Compare that to the next pic where it' not been done yet.
Inlet - not doing much to that side again just cleared up the runners - removing casting lines and smoothing the step below the valve seats. When I'm done I'll give the area a rough sand to leave it near original. Interesting the ports don't match - the plastic inlet set-up is slightly smaller than the head's runners - I feel that each pulse in is a bit like a shot at the respective cylinder. I'll try to find out more about that difference and see if it should be matched too. I also removed all the plastic 'flash' left from the moulding process in the plastic inlet section.
I've also 'unshrouded' the valves in the combustion chamber by shaving about a millimetre of the sides of each cylinder as well as removing the lip that's formed by each seat's slight recession into the head. And then I've also opened up the water gallery entrances to make them even - exhaust side is larger than the inlet side but all inlet side are the same and ditto for the exhaust side. Finish off with a serious clean out of the swarf - sanding debris and than a skim to true it up and raise comp ratio back to near what it was - it will be lower due to the enshrouding ...
This pic shows the valve seat recessed into the head. You can also see the water gallery openings too.
Oil thermostat #2 is due in from the US any day now- #2 as I ordered the wrong kit and the thread didn't match the oil filter - bugger! Hope to sell that one on TradeMe. Saw a very nice modern oil cooler on there too - I've been in contact with its seller and he has several more about $35 for a cooler - Setrab - a VG swedish brand & well respected in motor sport circles.
Exhaust manifold - Nodge68 PM'd me some good info about these and I've contacted a fabricator in the Nth Is - waiting to hear back. I'll tinker with the set on it, just a clean up of any welding splatter... The weld where the manifold meets the port plate forms a venturi - sadly two of mine are not properly formed - just a little mig welding needed to correct this and some careful grinding will sort that out.
This cutting and grinding work has been done with my trusty Dremel - it's slow being so small and you can't remove a lot by accident which is very good. I've also had the advice from a race engine rebuilder here in Cromwell - he works at the new Highlands Park race circuit. Check it out on Google / YouTube
I've so many questions to ask people. I try to search LZ but often get side tracked! So often the searches don't find what I'm wanting to Know.
My really big worry is that I'll get it all together and overcome any motor gremlins [ electrical nightmares we read about on LZ] only to find that the bloody VCU/IRD are stuffed!! You will hear my anguished screams from there!!!
A question then - spark plugs - which ones / type 'normal' or iridium? Brand - NGK, Bosch, Champion, AC Delco [didn't know they still existed!]...
More to follow -
HTR
Last edited: