Installing Eberspacher Airtronic and Hydronics in a Defender 90

This site contains affiliate links for which LandyZone may be compensated if you make a purchase.

markb_777

New Member
Posts
15
Location
Alberta, Canada
My first post! Hopefully it will be usefull to some.

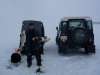
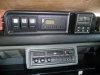
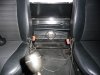
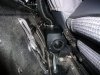
In the Canadian winter the defender needs an engine pre-heater to start, especially in Northern Alberta where -40 is common. SOOO a pre-heater is not a luxury, it's essential...but then once you get the engine going, the interior is still frigid (if you are reading this, you know about the diesel defender's heating issues).

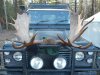
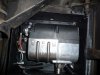
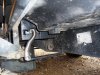
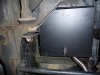
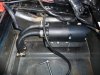
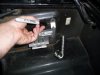
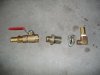
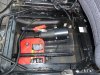
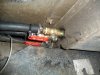
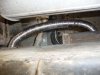
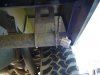
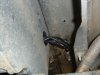
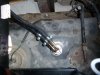
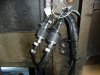
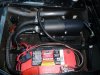
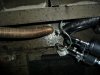
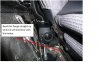
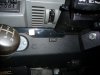
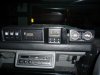
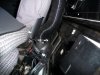
I installed an Eberspacher Hydronic D5WSC and an Eberspacher Airtronic D2. On a 90 there are very limited places for these heaters and, after much thinking, research, and trial and error (more on that one later!) the solution for my 90's heating issues is finally sorted.

The intent of this post is to follow-up and document the Airtronic and Hydronic installation to give you some ideas for installing your own. More to follow...
 
Last edited:
Eberspacher Hydronic Installation

Where to install? Must be installed below engine minimum coolant level, but the lower the better.

Need to consider:
  • length of coolant lines for loss of efficiency;
  • protection from road grime
  • wading ??
  • ease of access for removal for cleaning / repair;
  • fuel line routing
  • electircal connection and wire routing;
In America Eberspacher is shortened and called "Espar". The US website is better than the UK's, I found. Refer to espar.com for more installation information, ****especially the installation videos**** Video is available for both the Hydronic and Airtronic heaters. Espar Heater Systems | A World of Comfort |Technical Manuals, Operating and Instruction Guides

So back to where to locate. Candidate locations include:
  • under bonnet (most likely spot is mounted on inner fender under the turbo hose)
  • in cab (will likely be kicked by your passengers or otherwise damaged. Also, you will need to cut your floor for the coolant lines)
  • Under the defender, on the chasis, or mounted to underside of floor
  • Inside the battery box
I installed my first Hydronic under the passenger's floor in a modified mailbox to protect from road grime. My thought was that it was tucked up out of the way and I would never wade that deep anyway. Pictures are below.

This installation worked well for the Defender's first Canadian winter. The next summer, however, as I pushed water over the bonnet the sickening thought occured to me... "what about my heater?" The ECU was fried. Costs to replace are nearly the same as a whole new Hydronic kit! On to the new heater then. Costly mistake.
 

Attachments

  • P1000087.jpg
    P1000087.jpg
    102.9 KB · Views: 5,002
  • P1000088.jpg
    P1000088.jpg
    147.7 KB · Views: 12,446
  • P1000090.jpg
    P1000090.jpg
    117.3 KB · Views: 4,123
Hydronic Installation... continued

By the time my new heater came in the post I had already done a lot of looking around the truck for a better spot to install it. The battery box was looking better and better. I sized it up and with carefull installation I could still get the heater plus a double battery system in the box.

Eberspacher Hydronic in Defender Battery Box

Battery box installations are recommended by Espar / Eberspacher but I wouldn't attempt it with the petrol version of the heater, for obvious reasons.

Mounting the Heater

The inner wall of the battery box was selected for mounting. The heater is supplied with a stainless steel mounting bracket. Locating the bracket was done with the heater installed on the bracket then marking the holes for drilling.

Coolant Connections

I used bulkhead fittings to cleanly route the coolant into the battery box. While I was at it, ball valves were installed to shut off coolant if needed (for heater removal). These valves were later zip-tied so that they were locked in the open position to prevent inadvertent closing. With the valves installed, I wouldn't have to deal with coolant leaking in the battery box when removing the heater. I considered a by-pass but opted against it for simplicity. I'll just connect the two barbed fittings with a length of coolant line if I need to use the truck without the heater installed. Finally, ninety degree elbow fittings finished the coolant connection through the battery box. All that was left to do was run the 5/8 inch coolant lines.


Attachments

  • P1020663.jpg
    P1020663.jpg
    119.8 KB · Views: 4,168
  • P1020659.jpg
    P1020659.jpg
    86.4 KB · Views: 2,380
  • P1020661.jpg
    P1020661.jpg
    121.6 KB · Views: 2,303
  • P1020654.jpg
    P1020654.jpg
    144.4 KB · Views: 6,822
  • P1020664.jpg
    P1020664.jpg
    136.6 KB · Views: 3,156
Last edited:
Hydronic Installation... Continued

Eberspacher Exhaust


A 1" hole saw is required to cut the hole in the battery box for the exhuast exit. The most likely place to run the exhaust is straight down through the floor of the battery box. DON'T DRILL ANY HOLES THERE! I started to and then (luckily) came to the realization that the chassis is located DIRECTLY under where I put the heater.

The heater exhaust must go through the battery box sidewall somewhere, not the floor. You must mount the heater high enough to account for the exhaust being able to bend 90 degrees towards the battery box side. If you run the exhaust out towards the middle of the floor it may melt your wiring / batteries / or whatever other accessories you cram in that battery box. It's best to get that hot exhaust pipe out of the battery box as close to the heater as possible.

Once out of the box, I ran it towards the tubular outrigger and straight through the outrigger to the side of the truck. (NOTE: The heat may exacerbate the outrigger rusting problem, but it is a nice way to route it to the exterior).
 

Attachments

  • P1020681.jpg
    P1020681.jpg
    93.2 KB · Views: 1,937
  • P1020682.jpg
    P1020682.jpg
    81.5 KB · Views: 1,672
Last edited:
looks good mate , ive just been given an Eberspacher D3 L C , but need the pump and control box for it . Been wondering where to fit it tho as its big ?
 
Hydronic Installation... Continued

Diesel Fuel Supply

Note: Most hydronic heater have an internal fuel pump - unfortunately mine did not so I that is one extra thing to install. If yours has the internal fuel pump you can skip to the fuel stand-pipe installation below.

Fuel Pump

I already had one fuel pump for my Airtronic heater so I mounted the Hydronic one in the same location. I used the middle seat bolt (driver-side at back) to attach the mount for the fuel pump. Conveniently, the mount will accept a back-to-back double fuel pump as illustrated in the photo attached. Note: the exhaust and inlet shown in the first picture are not related to the hydronic installation - they belong to my Airtronic heater which is located behind the middle seat.

Fuel Stand Pipe Installation

Fuel stand pipes go directly into your diesel tank. They are available with installation kits or on eBay. For the dual heater installation (hydronic and Airtronic) the double outlet stand-pipe seems preferable to a Tee in the fuel line... however, both work. Holes need to be drilled in the tank as per the instructions.

Some tank drilling tips:
  • Use a magnet while drilling to collect the metal filings from falling in the tank.
  • Grease your hole saw so the cut-out sticks to it, otherwise it falls in the tank
  • Finally, if you're unhappy with how much metal filings got in the tank, use an extendable magnet to collect them - it works really well.
Fuel connections

Routing the fuel line is the easiest part of the job. I routed it inside the cab (through rubber grommets and in together with the fuel pump electrical wires) to reduce the possibility of fuel gelling in exteme temperatures. In this way, there is little wiring or fuel line exposed under the truck. It runs behind the seats from the tank side to the battery box, then back out through grommets and into the battery box. Use the supplied rubber connectors and jubilee clamps to connect the fuel lines to the stand-pipe, the pump (if you have one), and the Hydronic unit.
 

Attachments

  • P1020671.jpg
    P1020671.jpg
    116.6 KB · Views: 1,660
  • P1020668.jpg
    P1020668.jpg
    103.5 KB · Views: 1,718
  • P1020669.jpg
    P1020669.jpg
    136.8 KB · Views: 2,627
Last edited:
Hydronic Installation... Continued

Wiring and Controller

Note: I won't get into the wiring details too much because the Eberspacher instructions are excellent.

Here are some of my thoughts on wiring:
  • The wiring harness is really long. It can be cumbersome to route so I cut it down to a manageable size (but still way more than I thought required) before pulling the wires.
  • Terminating the wires with the supplied quick connects is pretty straight forward if you follow the instructions.
  • Routing from the battery box to the dash was the hardest part since I had to take the stereo out and fish the wires up through the ashtray.
  • Depending on your wiring harness, you will have at least one fuse box. Fixing the fuses to the inside of the battery box is a good idea to stop them from rattling around.
  • Use rubber grommets when you run wires through sheet metal
7-Day Timer (Controller)

Several controllers are available through eberspacher but I strongly recommend the 7-Day Timer since you can program it for 3 starts per day, 7 days a week, and it is very much automated. You don't need to run outside in sub-zero weather to turn it on before work, just program it and turn the program on the night before. It will start up automatically and your truck will be at full operating temperature in about 1/2 an hour. Plus, this controller doubles as a diagnostic unit and will display fault codes if your heater malfunctions.

I used the mud pod available from http://www.mudstuff.co.uk/MUD_pod.shtml to hold my controller.


Finished Hydronic Installation

That just about covers everything. Note I didn't talk about an air-inlet pipe because it isn't necessary if you mount the heater in a protective box.

Have a look at the finished product in the pictures below. Two Optima red tops will still fit if I turn them (90 degrees from standard fitment) but I need to fabricate a tray for them to sit on.

In the controller picture, the mud pod holds all my swithches including (from left to right):
  • Carling rocker switches for spot lights and work light
  • Hydronic controller (7-day timer with diagnostics)
  • Airtonic 7-day controller
That's all for the Eberspacher Hydronic D5WSC installation. Hopefully this will give you some ideas for your own installation. More to follow on the Airtronic heater installation!
 

Attachments

  • P1020674.jpg
    P1020674.jpg
    116.9 KB · Views: 3,298
  • P1020685.jpg
    P1020685.jpg
    122.4 KB · Views: 1,765
Behind Middle Seat

The heater is out of the way behind the middle seat but every installation location will require compromise, it's just a matter of preference. With the heater behind the mid seat, there isn't room for the jack base or the bracket. Remove the jack and drill out the two rivets fixing the bracket. Now the heater will fit, although just perfectly!


Pic is of the other Defender to illustrate installation area, hence the different seats you probably noticed.
 

Attachments

  • P1020724.jpg
    P1020724.jpg
    116.1 KB · Views: 2,180
  • P1020734.jpg
    P1020734.jpg
    64.2 KB · Views: 1,726
Last edited:
Drilling the Holes for the Exhaust, Inlet and Fuel

Because it is such a tight fit, make sure you dry fit every component before drilling. Bending the flanged lip (shown in the photo attached) will give you more room.

Note: two 1" holes are required for the inlet/exhaust, a 1/4" hole for the gas line, and 4 x 1/4" holes for the heater mounting studs. Use the template provided, or just use the heater's rubber seal as a template. An installation plate is not required if mounting directly to metal body panels.

CAUTION - Do not cut a 4" hole as instructed in the video unless you intend to use the optional installation plate (there isn’t room for the plate behind the seats, but it could be used in other installation locations – like the load area)

The second photo shows the underside of the installation with the exhaust pipe, inlet pipe, and fuel line attached (ignor fuel pumps).
 

Attachments

  • P1020731.jpg
    P1020731.jpg
    123.7 KB · Views: 3,491
  • flange to bend.jpg
    flange to bend.jpg
    46.3 KB · Views: 1,947
Finished Airtronic Installation (kind of)

Finsihing the installation requires routing wires for the controller and thermostat (pics 1 and 2 below) and installing the fuel lines and fuel pump. This is the same process as the Hydronic description above so the details are not elaborated again here.

One thing about the thermostat though, it's mounted too close to the truck's driver side heater vent. Heat comes up the dash, hits the thermostat, and tricks it into thinking the cab is warm. The heater then spools down even if it's still freesing in the cab - so the thermostat needs to be relocated. (note: thermostats are not required, you can control the heat output with the controller manually).

The 2 1/2" outlet hose terminates at the top of the bulkheat at about the same height as the middle seat. It's ridgid and holds any shape you bend it into so fittings are not required to route it.

This installation started a year ago and it worked well enough through the winter that I never finalized the details. Two things I'd like to fix:
  • A better heat ducting system would be nice, but where? Remove the mid seat and run the outlet through a cubby box with vents? What about a custom made manifold?
  • Also, the heater air inlet is just tucked up under the truck. I want to run it back into the cab to avoid it sucking snow (using a big grommet), but am afraid it may be noisy.
  • I don't yet have an intake silencer, nor a exhaust silencer for either of the heaters. probably not required.
That's the end of this fella's heating problems and solutions. Again, I hope this is usefull for those of you considering auxilliary heaters and wondering where to put them. These heaters are expensive but absolutely necessary in harsh climates.
 

Attachments

  • P1020738.jpg
    P1020738.jpg
    105.5 KB · Views: 1,874
  • P1020730.jpg
    P1020730.jpg
    96.6 KB · Views: 1,943
  • P1020726.jpg
    P1020726.jpg
    124.5 KB · Views: 6,043
  • P1020727.jpg
    P1020727.jpg
    151.2 KB · Views: 4,312
Last edited:
Now that I am done rambling, feel free to jump in and comment or add your pics and installation details for others to have a look at. I look forward to hearing your ideas!
 
Here`s a little tip you might find useful. Instead of grinding or cutting away at the seat box, DOUBLE UP THE GASKET at the bottom of the heater this will give you an extra 6mm clearence in height. Eberspacher has confirmed this is fine but you are not to use any more than 2 gaskets! :)
 
Here`s a little tip you might find useful. Instead of grinding or cutting away at the seat box, DOUBLE UP THE GASKET at the bottom of the heater this will give you an extra 6mm clearence in height. Eberspacher has confirmed this is fine but you are not to use any more than 2 gaskets! :)

Good point, I never thought of that. Bending the seat box flange was pretty simple too, but your double gasket solution leaves it unmolested. Cheers
 
As possible work around is a trick I learned during my time up in the farms of North Dakota. If it's a really bad winter they just leave the trucks and combines running through the night! If they turn 'em off, they won't start again until the temperature rises...

Another thing is the plug-in connections for an engine heater where you run a mains cable out to your vehicle and keep it warm through the night...
 
Just a quick update: this system performed like magic over the winter. I also installed a mains heater but didn't use it even once - the hydronic heats the engine in about 20 minutes on the coldest of days. It was great not relying on mains power when I was out hunting and fishing. Life is good!
 

Attachments

  • P1010481.jpg
    P1010481.jpg
    60.2 KB · Views: 1,013
  • P1020904.jpg
    P1020904.jpg
    146.2 KB · Views: 1,228
I had a d4w on two discos i owned and they really arent man enough for the job the d5w is much much better.
I also had problem after problem with the d4w, so much so i gave up and sold it and bought a webasto thermotop 5 kw good piece of kit.
Both were mounted slighlty higher than the top of the header tank as this was the factory mounting position.
The airtonics seems much more reliable than the hydronic versions.


Lynall
 
I thought that the strict rules of this forum dictated that a new members first post had to be a daft question about tyres etc. Not a useful post that could help everyone:D
 
Back
Top