You are using an out of date browser. It may not display this or other websites correctly.
You should upgrade or use an alternative browser.
You should upgrade or use an alternative browser.
Ian's 90 300tdi rebuild
- Thread starter Ian Maycock
- Start date
This site contains affiliate links for which LandyZone may be compensated if you make a purchase.
Ian Maycock
Well-Known Member
- Posts
- 474
- Location
- Stafford
Thank you .
Ian Maycock
Well-Known Member
- Posts
- 474
- Location
- Stafford
Thank you all for the compliments they are much appreciated , some of this is not in the order it was done as I'm trying to group stuff together so you don't see things I've done in the background then 2 posts latter I say I've done this . Last year I spent a lot of time faffing about trying to build a custom dash which led me to get very fed up with it and I started thinking , is this how I really want this to be ? And the answer was no so I spent time doing jobs on the 110 , like building a roof rack and a sleeping platform in the rear , also I plated the rear door and built a fold down tray on it as the 4x4 club I am in were doing the NC500 , which I'll do another thread for at some point , and I started enjoying it again . So back to the 90 , first up the doors were re built with new channels and fillers all round , and sound proofing ,


I built these up , then as it had been a while since stripping after an hour ######g about realised I'd done it in the wrong order , oh well I am getting old now ,


also drilled the wing mirror arms to take the wiring for the heater's

new rear door lock ,

then voila all doors fitted along with the spare wheel carrier ,


next the inside was sound proofed with silent coat ,


then some extra on the roof ,

that's it for now next will be roof lining repair and recover and trimming out the inside .
cheers Ian
I built these up , then as it had been a while since stripping after an hour ######g about realised I'd done it in the wrong order , oh well I am getting old now ,
also drilled the wing mirror arms to take the wiring for the heater's
new rear door lock ,
then voila all doors fitted along with the spare wheel carrier ,
next the inside was sound proofed with silent coat ,
then some extra on the roof ,
that's it for now next will be roof lining repair and recover and trimming out the inside .
cheers Ian
Ian Maycock
Well-Known Member
- Posts
- 474
- Location
- Stafford
It'll get muddy Knappster there's no other way that's the only time they look good , I used it on the 110 resto and like you I was impressed . So seats and head lining , first up seats . The back was taken off the bases ,


and the runners rubbed down , that's one in the vice at the start , I left the backs as they looked fine and there not seen once covered , once cleaned they got a lick of gloss black ,


also the bases got a clean and paint ,

that's it for the seats for now , we'll come back to them later . Next up roof lining , rear section wasn't ripped but needed recovering ,


front section was a mess , covering was coming off and it was ripped the back of the sun roof ,


lining comes off as the foam backing on the fabric disintegrates over time parting company with the board part,

so you can either shell out mega bucks on a new one , slightly less on a used one which will probably be in much the same shape or repair it for £50 . I chose the repair as I've done the one on the 110 and that's lasted 4/5 years so far so here we go , first up remove the fabric cover and brush the whole section with a hand brush and hoover off the dust so it's clean ,


then on to the rips , someone on here told me they'd repaired there's this way and I can't remember his name only he came from Shropshire , so thank you to him . I put heavy duty tape on the covering side ,

just to hold it together , if they're only small rips I'll just use the tape , but for big rips I use fibreglass mating ,


and reinforce the bad rips on the front as well ,

I left them over night to dry , then make sure you poke any holes you covered with fibreglass through , to cover it I used this van lining stuff £45ish for 11m square and 6 high temp adhesive and I did more than just the roof lining as you'll see later ,


but what ever you use make sure it's wide enough as most fabrics are sold in narrower widths , so lay the fabric over the roof section then cut too size , leaving enough to wrap round the edges and glue to the rear ,

then cover the back with glue and the lining as well ,and leave to go tacky ,


then lay it central on the lining but don't cut it till you've pushed it into all the nooks and crannies then if you've got one cut the sun roof out but leave a overhang to fold underneath , you'll have to cut and nick it here and ther when you fold it over so it's smooth on the rear ,

and you end up with this ,


this is my rear out off the 110 and its still going strong ,


and all the fabric that I had left did this as well , apart from the floor that's an old bit in there I've got some new to fit later


and I sprayed the sun visors black and they came out okay as well , I've also got some lining left which might cover some other bits ,

I'm going to need to make or buy some corner protectors for the seat box as constantly catching the corners will pull the fabric off but I don't mind that .
cheers Ian .
and the runners rubbed down , that's one in the vice at the start , I left the backs as they looked fine and there not seen once covered , once cleaned they got a lick of gloss black ,
also the bases got a clean and paint ,
that's it for the seats for now , we'll come back to them later . Next up roof lining , rear section wasn't ripped but needed recovering ,
front section was a mess , covering was coming off and it was ripped the back of the sun roof ,
lining comes off as the foam backing on the fabric disintegrates over time parting company with the board part,
so you can either shell out mega bucks on a new one , slightly less on a used one which will probably be in much the same shape or repair it for £50 . I chose the repair as I've done the one on the 110 and that's lasted 4/5 years so far so here we go , first up remove the fabric cover and brush the whole section with a hand brush and hoover off the dust so it's clean ,
then on to the rips , someone on here told me they'd repaired there's this way and I can't remember his name only he came from Shropshire , so thank you to him . I put heavy duty tape on the covering side ,
just to hold it together , if they're only small rips I'll just use the tape , but for big rips I use fibreglass mating ,
and reinforce the bad rips on the front as well ,
I left them over night to dry , then make sure you poke any holes you covered with fibreglass through , to cover it I used this van lining stuff £45ish for 11m square and 6 high temp adhesive and I did more than just the roof lining as you'll see later ,
but what ever you use make sure it's wide enough as most fabrics are sold in narrower widths , so lay the fabric over the roof section then cut too size , leaving enough to wrap round the edges and glue to the rear ,
then cover the back with glue and the lining as well ,and leave to go tacky ,
then lay it central on the lining but don't cut it till you've pushed it into all the nooks and crannies then if you've got one cut the sun roof out but leave a overhang to fold underneath , you'll have to cut and nick it here and ther when you fold it over so it's smooth on the rear ,
and you end up with this ,
this is my rear out off the 110 and its still going strong ,
and all the fabric that I had left did this as well , apart from the floor that's an old bit in there I've got some new to fit later
and I sprayed the sun visors black and they came out okay as well , I've also got some lining left which might cover some other bits ,
I'm going to need to make or buy some corner protectors for the seat box as constantly catching the corners will pull the fabric off but I don't mind that .
cheers Ian .
Attachments
Ian Maycock
Well-Known Member
- Posts
- 474
- Location
- Stafford
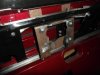
So todays installment , first up the front head lining was installed ,

and sun visors , next reversing camera I have one of these fitted to the 110 ,

£25 off eBay the monitor makes a great rear view mirror and when you select reverse the monitor switches on and the camera shows you a view of what your about to park on . So first up you need to cut your existing mirror up but you need to be careful as you need the inside adjuster bit , so you cut it like this ,

and your left with this ,


the adjuster part is attached to the bit you cut out so you need to gentle take it apart , you then cut a plate 160mm x 65mm which you may need to sand down so you get a snug but not over tight fit ,

and drill some holes to fix the plate to the arm adjuster so I used the bottom slot and drilled 2 holes each side then drilled the plate so they fitted together like this ,


I used m4 nuts and bolts to fix the two together , the plate fits in here ,

and ends up like this ,


with that done a spot of paint was required ,


so back to the roof lining , first up a couple of looms were made up , 2 for the interior lights and one for the reversing camera ,

and they where installed , a bit of closed cell foam was glued onto the back of the plate ,


and a small hole drilled in the roof lining to push the cable through ,


and with the rear in ,


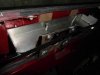
you'll notice the rear interior light is missing , the company I ordered off sent one instead of two it's a week and I'm still waiting ,but not to worry on we go next black mesh Britpart seat re-trim kits and seat heaters and I have to say they aren't bad kits ,


they're not bad quality and went together fine , I would even go as far to say I was impressed . They haven't been installed yet as there is quite a bit of fabrication work to do in the front on the dash which is up next and should bring us up to date , I did strip the heater box to pieces and spray that and the strips from beside the door ,


so that's it for now ,cheers Ian .
and sun visors , next reversing camera I have one of these fitted to the 110 ,
£25 off eBay the monitor makes a great rear view mirror and when you select reverse the monitor switches on and the camera shows you a view of what your about to park on
. So first up you need to cut your existing mirror up but you need to be careful as you need the inside adjuster bit , so you cut it like this ,and your left with this ,
the adjuster part is attached to the bit you cut out so you need to gentle take it apart , you then cut a plate 160mm x 65mm which you may need to sand down so you get a snug but not over tight fit ,
and drill some holes to fix the plate to the arm adjuster so I used the bottom slot and drilled 2 holes each side then drilled the plate so they fitted together like this ,
I used m4 nuts and bolts to fix the two together , the plate fits in here ,
and ends up like this ,
with that done a spot of paint was required ,
so back to the roof lining , first up a couple of looms were made up , 2 for the interior lights and one for the reversing camera ,
and they where installed , a bit of closed cell foam was glued onto the back of the plate ,
and a small hole drilled in the roof lining to push the cable through ,
and with the rear in ,
you'll notice the rear interior light is missing , the company I ordered off sent one instead of two it's a week and I'm still waiting ,but not to worry on we go next black mesh Britpart seat re-trim kits and seat heaters and I have to say they aren't bad kits ,
they're not bad quality and went together fine , I would even go as far to say I was impressed . They haven't been installed yet as there is quite a bit of fabrication work to do in the front on the dash which is up next and should bring us up to date , I did strip the heater box to pieces and spray that and the strips from beside the door ,
so that's it for now ,cheers Ian .
Attachments

Ian Maycock
Well-Known Member
- Posts
- 474
- Location
- Stafford
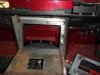
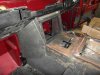
So today it's on to the wiper's , after watching project binky and watching them rework the mini's wiper system I got to thinking a defender could do with that doing and a Plan was hatched after a discussion on another forum I set about it . As you've seen so far as I have touched on it earlier I ovaled the wheel box holes out in the bulkhead to take the later TD5 wheel boxes as they would hold secure in the bulkhead with out any extra help and a Disco 1/2 wiper mechanism was bought of eBay for the backing plate , motor and the operating rods , and as seen earlier I removed the vent mechanisms and fixed them so now on to the fixings . I looked at various positions to mount the motor and thought it took up less room and made less of an obstruction if fitted where the original on was but a bit further in , other side of the square tube that the backing plate fixes too , so first up a mounting plate came up with this ,


to fix it at the bottom I came up with a piece of angle across the bottom fixing through the same holes as the backing plate ,


made up a bit of a test rig to check clearances , and I did run it loosely and it worked

I then bent the plate up at the top to fit the dash and drilled some mounting holes


another person had already done the maths in the previous thread and determined the arms welded to the wheelboxes needed to be 50mm center to center and it was at this point when the sweep wasn't quite rite that the disc ones were different sizes so I made a new one ,

That was last year I got to this stage , I then got fed up and left the whole project to do some work on the 110 , when I came back to it at the start of the lockdown I new I had to sort this . The bracket I made above I shortened and rotated the motor so the body pointed down and fitted some rivnuts to aid fitting ,


I then stripped and cut the center section out of the dash ,

I also tacked the end wiper cover bit to the main part as that doesn't need to be able to be removed separate any more , next cut a small piece of the backing plate away ,

then made a fixing plate to secure the top as there's not a lot of room for fixings at the top of the bulkhead ,


I then ran the system and found various clearance issues which I sorted , I had to alter the plate to give more clearance at the top ,

the original disco backing plate was cut down and a couple of new mounting holes drilled and painted ,

the dash end was welded on and a section at the end removed so the motor would fit ,


a couple of bolts where welded in the angle ,

and the backing plate was strengthened ,

and I cut this up to make mounting rubbers for the motor plate

then assembled for a test run ,


Here's a link to you tube of the wiper's working the screen was very dry but the worked well ,
then everything got a coat of black ,

I also realised at this point I needed to re design the vents there's a pic at the bottom but forgot to post it , next is the dash which should bring it up to date ,
cheers Ian
to fix it at the bottom I came up with a piece of angle across the bottom fixing through the same holes as the backing plate ,
made up a bit of a test rig to check clearances , and I did run it loosely and it worked
I then bent the plate up at the top to fit the dash and drilled some mounting holes
another person had already done the maths in the previous thread and determined the arms welded to the wheelboxes needed to be 50mm center to center and it was at this point when the sweep wasn't quite rite that the disc ones were different sizes so I made a new one ,
That was last year I got to this stage , I then got fed up and left the whole project to do some work on the 110 , when I came back to it at the start of the lockdown I new I had to sort this . The bracket I made above I shortened and rotated the motor so the body pointed down and fitted some rivnuts to aid fitting ,
I then stripped and cut the center section out of the dash ,
I also tacked the end wiper cover bit to the main part as that doesn't need to be able to be removed separate any more , next cut a small piece of the backing plate away ,
then made a fixing plate to secure the top as there's not a lot of room for fixings at the top of the bulkhead ,
I then ran the system and found various clearance issues which I sorted , I had to alter the plate to give more clearance at the top ,
the original disco backing plate was cut down and a couple of new mounting holes drilled and painted ,
the dash end was welded on and a section at the end removed so the motor would fit ,
a couple of bolts where welded in the angle ,
and the backing plate was strengthened ,
and I cut this up to make mounting rubbers for the motor plate
then assembled for a test run ,
Here's a link to you tube of the wiper's working the screen was very dry but the worked well ,
then everything got a coat of black ,
I also realised at this point I needed to re design the vents there's a pic at the bottom but forgot to post it , next is the dash which should bring it up to date ,
cheers Ian
Attachments

Ian Maycock
Well-Known Member
- Posts
- 474
- Location
- Stafford
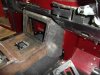
Hi all , last part that brings us up to date and the start of the dash . Center console was done , just needed to tack some tabs on to fix the plates on ,

and they fitted in nicely ,

I reworked the hand brake mount as I wasn't happy and tacked it to the center cover plate , I fitted rivnuts so I could secure it to the seat box ,

then after much head scratching I needed to make the bottom of the dash console , this sort of evolved with the aid of a paper template from this ,


then with the center plate made ,


next center section bent up and cut to fir round the bottom part ,

then bent over at the top and fixed to the top of the bulkhead so other parts could be fabbed ,


then the top cut to fit ,


that's not final fitment and I still might use the original top yet , I left it there as I needed time to think and work my thoughts out so I spayed the wheel arches ,


and sound deadened the battery box and drivers one and sound proofed the footwells ,


Then as the original vents wouldn't fit , which I new about I made the new ones , so take some 50mm tube flatten it and cut it diagonally ,

then weld a piece on the back ,


then make the top ,

tack it on but more over ,


I left them tacked on just in case I need to move them or alter them , so that's as far as I've got , I decided I needed a break so went and did a bit on the 110 but should start On it again tomorrow .
cheers Ian
and they fitted in nicely ,
I reworked the hand brake mount as I wasn't happy and tacked it to the center cover plate , I fitted rivnuts so I could secure it to the seat box ,
then after much head scratching I needed to make the bottom of the dash console , this sort of evolved with the aid of a paper template from this ,
then with the center plate made ,
next center section bent up and cut to fir round the bottom part ,
then bent over at the top and fixed to the top of the bulkhead so other parts could be fabbed ,
then the top cut to fit ,
that's not final fitment and I still might use the original top yet , I left it there as I needed time to think and work my thoughts out so I spayed the wheel arches ,
and sound deadened the battery box and drivers one and sound proofed the footwells ,
Then as the original vents wouldn't fit , which I new about I made the new ones , so take some 50mm tube flatten it and cut it diagonally ,
then weld a piece on the back ,
then make the top ,
tack it on but more over ,
I left them tacked on just in case I need to move them or alter them , so that's as far as I've got , I decided I needed a break so went and did a bit on the 110 but should start On it again tomorrow .
cheers Ian
Attachments
Sting Ray
Well-Known Member
- Posts
- 297
- Location
- Nova Scotia
Jesus, Ian - you've been cracking on exceedingly well since I last read your thread! Loving your work!
Will almost certainly pinch some of your ideas for the sound-proofing; what did you use inside the seatbox?
Will almost certainly pinch some of your ideas for the sound-proofing; what did you use inside the seatbox?
Ian Maycock
Well-Known Member
- Posts
- 474
- Location
- Stafford
Thank you , it’s a cheaper version of silent coat off eBay ,
https://www.ebay.co.uk/itm/113805397333
I’ve used it on the footwells as well it went on okay and hasn’t fallen down, then put some closed cell foam sound proofing over the top .
https://www.ebay.co.uk/itm/113805397333
I’ve used it on the footwells as well it went on okay and hasn’t fallen down, then put some closed cell foam sound proofing over the top .
Ian Maycock
Well-Known Member
- Posts
- 474
- Location
- Stafford
I've had a bit of a break doing a few jobs on the 110 and fitting a CB , also had it's MOT yesterday and passed only slight play in a rear wheel bearing which I sorted today and I've had a few rest days . So back on it , first up the second interior light finally came yipeeeeee which I fitted and I made the seatbox corner cappings from some stainless sill protectors I had fitted to the 110 and didn't like ,


I'd decided to make some HD sills out of 60x30x3 box £45 of eBay , I made the first one ,


and one of the back ,

I need to make the tube supports that fit in the rear out riggers , parts are cut just need to weld them tomorrow ,

and some fixings for the front and rear wings to bolt through , they will probably end up plates with rivnuts fitted , and the recesses on the ends are so the wheel spats sit flush and nice hopefully , as they where a rite PITA to do . Next a few pics of the second one being made , recess on the rear and the two ends ,


I need to make the bits that fit in the ends and weld it all up , I made the first one then realised I needed to step them so the wheel spat fitted nicely .
cheers Ian
I'd decided to make some HD sills out of 60x30x3 box £45 of eBay , I made the first one ,
and one of the back ,
I need to make the tube supports that fit in the rear out riggers , parts are cut just need to weld them tomorrow ,
and some fixings for the front and rear wings to bolt through , they will probably end up plates with rivnuts fitted , and the recesses on the ends are so the wheel spats sit flush and nice hopefully
, as they where a rite PITA to do . Next a few pics of the second one being made , recess on the rear and the two ends ,I need to make the bits that fit in the ends and weld it all up , I made the first one then realised I needed to step them so the wheel spat fitted nicely .
cheers Ian
Ian Maycock
Well-Known Member
- Posts
- 474
- Location
- Stafford
Carrying on from above , the rear slot that I cut out the removed piece was turned round and welded in to cover that ,

then the bits I removed from the ends where made to fit the ends and two strips cut for the top bit ,


I then tacked up the out rigger tubes ,

and tacked the ends up ,


then weld them up ,


not the best welding due to the gaps but nothing a flap pad won't put rite , then all sanded up ,


next was a test fit to mark the wing holes and position the out rigger tube , the holes to bolt the wings to the sill are 1/2 on , 1/2 off so made some fixings out of 10mm plate drilled and tapped a 8mm hole cut the sill , knocked the back in and welded them up . Ended up with this ,


and then we had a pair ,

next the fitting ,


will spray them this week but I'm thinking of sanding the boost alloys I've got and primering the lot at the same time as I think I may be back at work next week or the week after and I might go fishing now they've opened that up , and to finish off I modified the gauges loom so I can fit TD5 gauges also ordered a raptor binnacle and backing plate today and that should be here tomorrow .

cheers Ian
then the bits I removed from the ends where made to fit the ends and two strips cut for the top bit ,
I then tacked up the out rigger tubes ,
and tacked the ends up ,
then weld them up ,
not the best welding due to the gaps but nothing a flap pad won't put rite , then all sanded up ,
next was a test fit to mark the wing holes and position the out rigger tube , the holes to bolt the wings to the sill are 1/2 on , 1/2 off so made some fixings out of 10mm plate drilled and tapped a 8mm hole cut the sill , knocked the back in and welded them up . Ended up with this ,
and then we had a pair ,
next the fitting ,
will spray them this week but I'm thinking of sanding the boost alloys I've got and primering the lot at the same time as I think I may be back at work next week or the week after and I might go fishing now they've opened that up , and to finish off I modified the gauges loom so I can fit TD5 gauges also ordered a raptor binnacle and backing plate today and that should be here tomorrow .
cheers Ian
Sting Ray
Well-Known Member
- Posts
- 297
- Location
- Nova Scotia
Nice work, and thanks for sharing!
Ian Maycock
Well-Known Member
- Posts
- 474
- Location
- Stafford
Cheers Sting Ray .
Ian Maycock
Well-Known Member
- Posts
- 474
- Location
- Stafford
As I'm waiting for some flap pads to arrive the last few days have been short ones doing bits here and there , don't like to do to many unfinished jobs as I forget where I am and I really need some thinking time and internet search time looking for bits for a few mods I'm doing . Same with the exhaust had to make a rear hanger for the center silencer and move the rear one round a bit so it fit better and I'm waiting for some new rubber hangers , sadly no pics of that I forgot , but on to the bits I have done . The new vents I made got test fitted ,


as you can see none of the welds have been cleaned , the idea is they will meet in a "Y" piece in the middle then a hose to the bulkhead hole . Also planning a demister vent for the side windows if possible . Next was the bumper mod to take 2 small fog/spot lights , holes cut ,


then cut some "U" channel I got from B&Q a while ago to go round the edge ,

welded in place ,


and I test fit for the light ,

as you can see flap pads holding me up from spraying it but hopefully they'll be here tomorrow . Then my Raptor binnacle and backing plate came yesterday , only ordered it Tuesday , so had a play with the dash . This is how far I got ,


and last up made the brackets for the reversing camera mount ,

Once I get me pads I can clean and sand them all up and spray the and fit them , think I'll carry on with the dash tomorrow .
as you can see none of the welds have been cleaned , the idea is they will meet in a "Y" piece in the middle then a hose to the bulkhead hole . Also planning a demister vent for the side windows if possible . Next was the bumper mod to take 2 small fog/spot lights , holes cut ,
then cut some "U" channel I got from B&Q a while ago to go round the edge ,
welded in place ,
and I test fit for the light ,
as you can see flap pads holding me up from spraying it but hopefully they'll be here tomorrow . Then my Raptor binnacle and backing plate came yesterday , only ordered it Tuesday , so had a play with the dash . This is how far I got ,
and last up made the brackets for the reversing camera mount ,
Once I get me pads I can clean and sand them all up and spray the and fit them , think I'll carry on with the dash tomorrow .
Ian Maycock
Well-Known Member
- Posts
- 474
- Location
- Stafford
Hi all , pads came so cleaned the welds up on the bumper and painted that and the sills ,

while spraying those cleaned the dash vents up I made and made the fittings for them ,


and did a bit more on the dash front , fill in bits at the bottom and the center , I'll cut the middle out to make it removable ,

then started the covers for the wiring each side the rear doors ,


and today fitted the bumper and sills ,


then fitted the rear wheel arches ,


and the reason for the recess on the ends ,

will hopefully get the dash finished this week and also getting my boost alloys sprayed .
cheers Ian
while spraying those cleaned the dash vents up I made and made the fittings for them ,
and did a bit more on the dash front , fill in bits at the bottom and the center , I'll cut the middle out to make it removable ,
then started the covers for the wiring each side the rear doors ,
and today fitted the bumper and sills ,
then fitted the rear wheel arches ,
and the reason for the recess on the ends ,
will hopefully get the dash finished this week and also getting my boost alloys sprayed .
cheers Ian
Ian Maycock
Well-Known Member
- Posts
- 474
- Location
- Stafford
Thank you @Defwant1 , it’s nice to know people do enjoy reading these . Everything’s fine thank you hope your well , should have another instalment later I just keep forgetting to update it . I’ve had a bit of a break lost interest a bit due to other influences but have started doing a bit again due to the fact that I’ve sold the engine out of the 110 and will be fitting a BMW M57 engine in that and I’ve promised someone they can have the 200tdi after Christmas so I need to get cracking.
Ian Maycock
Well-Known Member
- Posts
- 474
- Location
- Stafford
Not updated for a while with covid and loosing a bit of interest but back on it again as i need it finished for Christmas or soon after so will bring this up to date over the next week . First up boost alloys got sprayed a few months back ,

I also got the rear panels finished to cover the rear light wiring , so as always starts off with a cardboard template and involves ,


to this ,

and on to the other side ,


and a lick of paint , I made brackets that are riveted to the door appeture sides and the panels bolt to them

like so ,


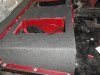
these will house the rear speakers which I'll be fitting later sound proofing will be added to the inside and they'll be covered with the van lining carpet I used on the rest of the truck . Next got the holes drilled and squared off for the TD5 bonnet release ,

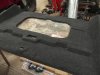
then the load area carpet fitted ,

and both footwells carpet cut but had to wait to fit properly till the dash came out ,


and as there was already 2 holes drilled each side in the roof I found some work lights on ebay and fitted them .

Next part will be finishing off the dash , which is done and being sprayed at the minute ready for me to trim .
cheers Ian
I also got the rear panels finished to cover the rear light wiring , so as always starts off with a cardboard template and involves ,
to this ,
and on to the other side ,
and a lick of paint , I made brackets that are riveted to the door appeture sides and the panels bolt to them
like so ,
these will house the rear speakers which I'll be fitting later sound proofing will be added to the inside and they'll be covered with the van lining carpet I used on the rest of the truck . Next got the holes drilled and squared off for the TD5 bonnet release ,
then the load area carpet fitted ,
and both footwells carpet cut but had to wait to fit properly till the dash came out ,
and as there was already 2 holes drilled each side in the roof I found some work lights on ebay and fitted them .
Next part will be finishing off the dash , which is done and being sprayed at the minute ready for me to trim .
cheers Ian
Similar threads
- Replies
- 9
- Views
- 1K
- Replies
- 35
- Views
- 5K