pardec
Active Member
- Posts
- 993
- Location
- South Manchester- North Devon
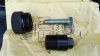
Yep, my bolt is 77mm long. It's also the same colour as the rest of the tool.I will measure mine up in the morning to compare.
As soon as i started using it i knew something wasn't correct with it
Part 2 slides in and out of the knurled bush, so the latter doesn't have any effect on the bolt length. It's just a guide.There are 2 sizes of extractor, a long one and a short one. One is for BMW in general and the other is for Freelanders. I think the Freelander should be shorter because of access (not enough room). Am I right in remembering that the Knurled bush (part 1) is NOT used depending on which BMW engine you are working on (thus converting from long to short)?

The first one was from ****A running low mileage rover****Was it a "rebuilt" pump or just a secondhand unit?
which has now been returned. It was ok at tickover so i suppose it was runningWelcome To LandyZone, the Land Rover Forums!
Here at LandyZone we have plenty of very knowledgable members so if you have any questions about your Land Rover or just want to connect with other Landy owners, you're in the right place.
Registering is free and easy just click here, we hope to see you on the forums soon!