Help required in the Portsmouth area 110 300tdi defender

This site contains affiliate links for which LandyZone may be compensated if you make a purchase.

In over my head

New Member
Posts
8
Hi All,

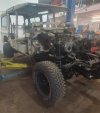
Im a new member to this forum and am looking for some help. Ive always wanted a defender and after some research decided to pull the trigger on what seemed like a good idea at the time 1990s' 110 CSW project.

Im rapidly coming around to the idea that im in well over my head and wonder if there is anybody in the Hampshire that would be willing to give me a hand with my project, im located just north of Portsmouth. I have a nice warm garage, tea, biscuits, beers or cash/hour waiting for anybody with experience working on/restoring a 300tdi 110 who wouldn't mind sharing their knowledge with me. I am enthusiastic but am struggling to get going.

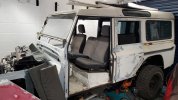
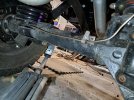
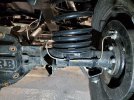
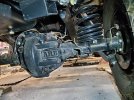
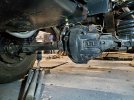
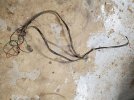
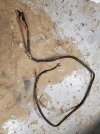
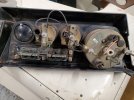
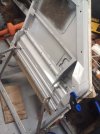
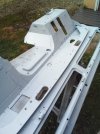
The issue i have is that i didn't take this old thing apart and have no idea where most of the pieces go and am overwhelmed. So far ive removed the bulkhead made most of the repairs, repaired and reskinned the doors and stared painting them. Its now too cold to make any more progress on that front and im looking at the mountain of other things to do.

This defender was bought as an unfinished project, lots of the hard dirty work has already been done.

Anybody fancy getting their hands dirty ??

Regards

Billy
 

Attachments

  • 20240130_212428.jpg
    20240130_212428.jpg
    108.4 KB · Views: 82
I can't help directly but really recommend you watch, and use as excellent technical reference, Mike at Britannica Restorations videos on all things Land Rovers. Go search YT and settle in for the evening/weekend/month/year.

Similarly, use LRWorkshop's diagram link pages. These will show you every exploded diag of near every component for your Land Rover.
 
You removed the bulkhead & replaced it I am assuming.
that is a feat in itself Not to mention reskinning doors.
each part has only one place it can fit it is a puzzle.
 
Welcome.
Don't get overwhelmed, take your time, take little bites and it will all come together eventually.

If you get stuck on something, ask on here.
This one^^

The whole job may seem huge but break it down into smaller jobs and ask all the questions you want on here. I recently rebuilt my 110 after a fire and had a main build thread (LINK) I asked questions on and kept up to date with progress but on top of that I probably had 20ish separate threads asking more specific questions about certain jobs.

If you have repaired and refitted the bulkhead what part are you now stuck with? Is it putting in the wiring loom, assembling the dash, plumbing in the brakes and clutch? Have a skim at my thread above which shows my refitting of the bullhead, and replacement of wiring looms which may help. But if you write up a list of the jobs you have outstanding and more importantly the ones you are struggling with there will almost certainly be write up out there for them, and most likely will have been done by several people on here.
 
Mike at Britannica Restorations is to blame for me buying it. I binged his videos and got hooked !

The bulkhead isnt new, its been repaired. I need to get it and the doors painted before i can move on too much further but painting isn't an option for a few months at least due to the weather. None of them are currently fitted

The bulkhead loom needs repairs as its damaged in places, I've workout where most of it goes and labelled it up. I cant find the rear wiring loom and probably need to buy a new one. I guess its just an overwhelming list of jobs. I'm not sure on the order in which to do them.

I am very interested to learn form somebody who has done it all before in person and am happy to pay for that advice. If nobody is around locally ill ask a bunch of question in separate threads on the forum. I thought there would be somebody out there who's wife wont let them buy another restoration but they still have an itch to scratch !

Maybe ill start with the brake pedal box overhaul.

Thanks for all the reply's and encouragement
 
Until the bulkhead is painted there’s not a lot you can do with a build.
Make a list of what you think is missing
Search some build threads for nuts/bilts/plastic stuff they have used and start purchasing these.(some parts take longer to lead times)

Build the motor in your head after watching Mike videos to help with the process.

Enjoy the build, summer will be here soon
 
Stripped the pedal box down today. What would be the recommended paint be for it and the servo ? Was considering ordering 2k black paint but wonder if the brake fluid will eat through that just as quick as hammerite or rustoleum........
 
This doesn't help with your original question, but, if the bulkhead is off, and repaired, really, dont put it back in. Brace the bottom, get it blasted and hot dipped, and youve instantly solved yourself a load of future bother.


With regards to your actual question, I too am out of range, but -

Your bulkhead loom -

You have close to zero chance of repairing it on the vehicle. You wont even be able to hold a multimeter on both ends of the wires to test as one will be one side of the bulkhead and one may be over by the headlights...

Lay it all out on your kitchen table, with a battery and all the stuff like the lights, horn etc and go through it all. Make sure it's all working with the dash controls as expected. Label it all (mine was just bits of tape and black marker pen - nothing fancy). Don't forget the little black wire with the eyelets on it on the back of the gauges when you put it back in.
 
If nobody is around locally ill ask a bunch of question in separate threads on the forum.
Do that anyway whether someone is local or not!

Until the bulkhead is painted there’s not a lot you can do with a build.
Make a list of what you think is missing
^^ I second this completly. the bulkead is the heart of the vehicel after the chassis. If you are not going to paint in the cold weather do all the little bits while you wait so as much as possible is ready to put back on once it is painted.

Stripped the pedal box down today. What would be the recommended paint be for it and the servo ? Was considering ordering 2k black paint but wonder if the brake fluid will eat through that just as quick as hammerite or rustoleum........
i painted mine with corroless glass reinforced chassis paint but that was more because i had it left over (it is quite expensive). if I hadn't had that I would have painted it all in red oxide primer followed by a machine/tractor enamel top coat.


This doesn't help with your original question, but, if the bulkhead is off, and repaired, really, dont put it back in. Brace the bottom, get it blasted and hot dipped, and youve instantly solved yourself a load of future bother.
^^ this. if it is currently off the vehicle and stripped it would not cost you much at all to get it dipped and you will then have a bulkhead that will never have issues again. Also with th ebulkead make sure you seam seal it before painting and also once painted flip it upside down and pump as much cavity wax into as it will take, that way it really will last forever.
 
The bulkhead has had repairs, a couple of coats of epoxy primer and tiger seal sealer applied to make it look original. its probably too late to get it galvanised at this stage. I've also poured Zink based paint inside the cavities.

I have made a good start on the loom already, ive identified and labelled quite a chunk of it buzzing it through with a multimeter. im not exactly sure which loom i have as its not the same as any of the models stated in the workshop manual ! its close but not identilca to any
 

Attachments

  • IMG-20231012-WA0000.jpeg
    IMG-20231012-WA0000.jpeg
    249.6 KB · Views: 33
  • 20231011_110510.jpg
    20231011_110510.jpg
    363.6 KB · Views: 30
Post a photo of the ends of the loom, you can normally tell if 200/300 as they are different.
Also your clocks (if you have found them)
 
Hi, just finished a nut and bolt restoration of a swb 300tdi, having learned a great deal from my first series resto I did things in a different order which sped up the build. Here are some tips to help, take photos and more photos and some more from a different angle, then once you start taking bits off bag and label and keep in boxes.
I would suggest strip everything down to wherever you deem necessary. It sounds like your basically down to the chassis by now, if your planning on re painting everything then take it off. Get everything painted together if you can, start with sorting the loom, try autosparks for replacement if needed. Get the bulkhead back on then the rear body, roof and doors aligned. Get the dash in test electrics lights ect then get rad on and give the thing a run down the road making sure gearbox etc works and engine temp is ok ect. Then once your happy get floors seat box wings and bonnet on.
Paint everything with a good primer and 2k paint
Anything black Jotul make some good 2k industrial paint.
Another tip is to get a paint marker pen and dot every nut and bolt that you tighten / tourque this way you dont miss anything important like steering ujs track rod end etc.
don’t hesitate to PM me, If I lived closer I’d gladly come and help but unfortunately I like in Anglesey … well someone has to
 
Thanks for all the replies. i Started to dry build it and have booked a mobile mechanic in for the day later this month to get me going. He has suggested starting with the tub alignment. Chassis wiring loom, rear brake lines and fuel lines from the tank to the engine bay before thinking to think about painting anything. He has then suggested getting the engine going and driving it with just the bulkhead fitted before adding the rest of the parts.

@UpandOver your idea was obviously a good one because his recipe is very close to your suggestion :)

To save some time and cost im going to look at getting as much information together for the above prior to his arrival. I immediately have another list of questions.

Is this rear axle the original one for a 1992 110 csw ? are we happy with the brake hoses being held in with zip ties the way they are (im not) the bend are not clean either, there looks to be a kink in the passenger side ? I was going to order a clip set but don't want to order part numbers for the old axle if its been replaced with something different. I wonder this because it has rear disk brakes that maybe were not on it originally.

Pictures attached. Also got a few of the wiring loom parts I've found in a box and the back of the instrument panel. ill go through the looms and try to identify where they go this week.

All in all im now fully negated with this old heap and definitely moving it forwards.
 

Attachments

  • IMG-20240309-WA0007.jpeg
    IMG-20240309-WA0007.jpeg
    247.1 KB · Views: 35
  • 20240311_203700.jpg
    20240311_203700.jpg
    304.5 KB · Views: 42
  • 20240311_203656.jpg
    20240311_203656.jpg
    324.8 KB · Views: 37
  • 20240311_203520.jpg
    20240311_203520.jpg
    331.2 KB · Views: 35
  • 20240311_203500.jpg
    20240311_203500.jpg
    387.6 KB · Views: 38
  • 20240311_203456.jpg
    20240311_203456.jpg
    368.7 KB · Views: 40
  • 20240311_203044.jpg
    20240311_203044.jpg
    416.8 KB · Views: 40
  • 20240311_203023.jpg
    20240311_203023.jpg
    687.8 KB · Views: 37
  • 20240311_203012.jpg
    20240311_203012.jpg
    693 KB · Views: 35
  • 20240311_202854.jpg
    20240311_202854.jpg
    307.7 KB · Views: 34
That rear axle is worth a lot more than the standard axle…. It’s an uprated arb diff

Have you removed the anti roll bar?
You have the brackets on the axle

Brake pipes are zip ties from factory but have little brackets they clip in. Most just put a piece of plastic hose round brake pipe & zip back.
 
Thanks for the info Phil. I can now see the difference. This is the original axle type isn't it.

1710196148431.png


I can see the bracket for the anti roll bar now you point it out. If it looks anything like the below i don't have it in any of the boxes of parts. Do I need one (did it come with one originally) or does it just make it a nicer ride ?

1710196473643.png


Ther is currently 1 p clip fitted on the brake lines and ive just ordered some more.
 
Last edited:
The picture of the axle is for a 90 type. You need a sailsbury just for reference.
Yes that is the anti roll bar, makes body roll less. Check chassis for some brackets where it would bolt to.

If you are unsure what you’re looking for/at a photo will always help us.

The brake pipes could be shortened and made neater.

Your build is coming on well, keep going
 
hanks for the info Phil. I can now see the difference. This is the original axle type isn't it.

1710196148431.png
As mentioned above that is for a 90 or a late model 110. The axle you have will be the original axle but a previous owner has upgraded the diff cover (and I would assume the internals as well), so i would not worry about replacing it or anything like that.

1710239642381.png


If you look at the parts catalogue for the rear brake pipes you can see the clip you have fitted from the factory, the short side you have cable tied is the same as mine done in a similar fashion and have some on the long side as well as even with the clip it is still a long unsupported run. the issue is where you can mount the clips and as they use small bolts they tend to shear when being removed so there is nowhere to mount a new clip.

I do not think the brake pipes look particularly bad I have certainly seen a lot worse, they look like hand bent cunifer pipe to me rather than machine bent steel, so they look as expected and i do not think whoever fitted them has done a bad job.
 
Back
Top