jointlywise1
Member
- Posts
- 19
- Location
- essex
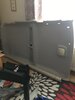
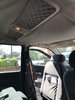
Thought i would just add a thread giving insight into replacing the head liner of my freelander. 2020 high temperature completely finished off the headliner and the foam was disintegrating in front of me leaving a brown dust all the time. I finally decided to take advantage of the shut down and found some nylon headlining material from Martrim that did match very close to what i had. The glue i went for was 3M 76 , which was researched and was the best choice. This was expensive but worth it. Once removing the head liner board from the vehicle I was lucky that the liner was deteriorated so much that all it needed was a stiff brush for most of the removal with only a few difficult areas where i needed a little elbow grease. Tried a scraper but ended up going through the board so stuck with a wire brush. Once thoroughly clean recovered with only a few dodgy areas where the material was not stretchy enough to push into the contours. However very pleased with the outcome and a vast improvement on my old liner. All in all it took me about 3 days (weather was perfect ) and while it was out i wired in some USB cables and power supply as well ready for dash cam ect photo of before and after. hope this encourages others to do theirs as it was as great improvement for £120. I also replaced the clips that is used to hold the liner up as they broke on removal which LR still did. May have a go at the seats and door cards in the future.