Getting ready to Hand Paint

This site contains affiliate links for which LandyZone may be compensated if you make a purchase.
Yer amazon in a spray can next day delivery....
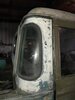
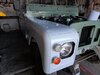
Looked at your pics now pick the beading out the kidney window seals & remove the seals n glass.
Theres a good boy. :D
If I do that I will never get them back in intact without breaking them. might try and just work around them.
 
If I do that I will never get them back in intact without breaking them. might try and just work around them.

Haha my mate says the same ive done hundreds of windows in boats its easy for me to say.:oops:
I have a tool for putting the beads back in too.
 
Haha my mate says the same ive done hundreds of windows in boats its easy for me to say.:oops:
I have a tool for putting the beads back in too.
Will mask them up best I can and do my best, what are they wood or fibreglass , dont think they are metal.
Cost a fortune in spray cans to do the whole truck,
 
Will mask them up best I can and do my best, what are they wood or fibreglass , dont think they are metal.
Cost a fortune in spray cans to do the whole truck,

They corners from the tub & the truck cab look like they have been filled in with something
your missing the drip rail under the window.
 
They corners from the tub & the truck cab look like they have been filled in with something
your missing the drip rail under the window.
I know I am missing some do
Not sure what you mean kev, but will take more pics tomorrow, where should the drip tray be, under door window or the window on cab ?
I know I am missing some of the door rubbers but will deal with them later.
 
I know I am missing some do
Not sure what you mean kev, but will take more pics tomorrow, where should the drip tray be, under door window or the window on cab ?
I know I am missing some of the door rubbers but will deal with them later.

The corners from the tub to the truck cab directly under the kidney window.
Is it filled in with something ??
 
The corners from the tub to the truck cab directly under the kidney window.
Is it filled in with something ??
Not sure wouldnt know as it was in bits when I got it.
pic of other side.
 

Attachments

  • 20220927_184236.jpg
    20220927_184236.jpg
    288.6 KB · Views: 67
Im sure I fitted a new rubber seal along the bottom of cab when I fitted it to the tub.
 

Attachments

  • 20220430_154548.jpg
    20220430_154548.jpg
    299.8 KB · Views: 59
Hours of fun ahead. If you see bare aluminium, primer won’t adhere to it very long without an acid etch primer. If you hit paint around the bare alli with some acid primers it crackles and lifts it.
Good luck.
 
Hours of fun ahead. If you see bare aluminium, primer won’t adhere to it very long without an acid etch primer. If you hit paint around the bare alli with some acid primers it crackles and lifts it.
Good luck.
Can only try my best, never done this before. Managed to order this, 1 x 2.5 Litres Heat Resistant Etch Primer Paint - Grey. Brush Or Spray On | eBay was only one I could find that was guaranteed to be delivered before weekend. Just hope it does the job.
Had a go at the doors, the 400 dint do much, tried a heavier grit, still not dure, should I get more off ? or prime it as it is ?
 

Attachments

  • 20220927_191315.jpg
    20220927_191315.jpg
    250.1 KB · Views: 52
Last edited:
Can only try my best, never done this before. Managed to order this, 1 x 2.5 Litres Heat Resistant Etch Primer Paint - Grey. Brush Or Spray On | eBay was only one I could find that was guaranteed to be delivered before weekend. Just hope it does the job.
Had a go at the doors, the 400 dint do much, tried a heavier grit, still not dure, should I get more off ? or prime it as it is ?
I would prime as is and then reassess if you need to go any more. I am currently using hammarite special metals primer on mine as an etch primer. I like this because it is red and my top coat is massai red, (by having a red base coat i only need two top coat layers), it is available in homease/B&Q if you run out, and although hammerite is not what it used to be I have happily painted both land rovers using this previously with no issue. That being said it is not a high build primer, my technique is usually sad it down as you have, prime it so it is all an even colour and imperfections show again (see pic three between front window and door pillar) and then re-sand the imperfections before giving it its final primer coat. I am however not going for a concourse finish so I am just looking for smooth enough and no hard edges. i am also applying everything with gloss rollers and quality paint brushed for places a roller cannot reach.

2664BDDE-ED6F-4B34-B73B-F95E5571CC41.jpeg 042DB8D3-AF3E-42A7-9286-D2978EC7D9C2.jpeg DC229D80-D312-43DC-A594-8931FC6AB745.jpeg FAE482FF-8540-4F04-B8FC-104FAFDCF0B0.jpeg
 
I would prime as is and then reassess if you need to go any more. I am currently using hammarite special metals primer on mine as an etch primer. I like this because it is red and my top coat is massai red, (by having a red base coat i only need two top coat layers), it is available in homease/B&Q if you run out, and although hammerite is not what it used to be I have happily painted both land rovers using this previously with no issue. That being said it is not a high build primer, my technique is usually sad it down as you have, prime it so it is all an even colour and imperfections show again (see pic three between front window and door pillar) and then re-sand the imperfections before giving it its final primer coat. I am however not going for a concourse finish so I am just looking for smooth enough and no hard edges. i am also applying everything with gloss rollers and quality paint brushed for places a roller cannot reach.

View attachment 275019 View attachment 275020 View attachment 275021 View attachment 275022
Great Job there Mate.
Think im just about ready to start priming not, Looking at yours think Ive gone a bit to far in places, but there was 3 or 4 coats on it so had to use some pressure to get it smooth, Not got much light in the shed so will do front first at door then turn it round and do the sides.
Might start on the wings tomorrow night if I have time.
Dont have much confidence, but I will try my best.
 
Great Job there Mate.
Think im just about ready to start priming not, Looking at yours think Ive gone a bit to far in places, but there was 3 or 4 coats on it so had to use some pressure to get it smooth, Not got much light in the shed so will do front first at door then turn it round and do the sides.
Might start on the wings tomorrow night if I have time.
Don't have much confidence, but I will try my best.
The prep work is down to personal preference and how much effort you want to put into it. There have been parts where I have taken it back to bare metal but where I can get away with feathering the edges I have done. The 110 pictured I painted about 10 years ago with the same method but am now repainting after the engine fire. The series similarly I have done twice with about a 10 year gap.
You don't need that much confidence because if it goes wrong you can always sand it back down and try again. When you actually start painting you will very quickly work out the amount of paint you need on the roller and how much pressure to apply and the technique will be different for the primer and the top coat. When doing the enamel the easiest technique I have found it apply paint to the roller and cover an area applying moderate pressure the roller (not so much you get the lines at the edges of the roller) and then once the paint has been used off the roller go back over the same area with the lightest pressure possible (just less than the weight of the roller) to burst the bubbles and smooth the finish. It sounds very complicated but in practice is very easy and with a little trial and error is easy to do and get the hang of. But once again i will stress I am not going for concourse (see wing below and before and after of the series) but with this technique I have managed to get some very reasonable results. Also by not taking all the dents out the paint job does not have to be quite so perfect as the eye sees the dents, which are "meant to be there" rather than the imperfections in the paint job.

9B965D33-0E78-4D0D-8C9E-9251ECBC888A.jpeg 086C5751-705B-43EF-948F-4F8DB0196F53.jpeg F8B8E191-3C8E-428F-818E-8C6C1D19F90E.jpeg
 
Had a go tonight does not seem to bad can see a few bits that might need a light sanding again, shall I use wet and dry for that and what grade ? The primer is quite thin although there is no thinners added, it states that it is ready to brush or roll straight from the tin, so think it will need maybe 3 coats depending what the second is like.
 

Attachments

  • 20220930_185510.jpg
    20220930_185510.jpg
    229 KB · Views: 51
  • 20220930_185558.jpg
    20220930_185558.jpg
    211.2 KB · Views: 52
  • 20220930_185642.jpg
    20220930_185642.jpg
    285.7 KB · Views: 50
Had a go tonight does not seem to bad can see a few bits that might need a light sanding again, shall I use wet and dry for that and what grade ? The primer is quite thin although there is no thinners added, it states that it is ready to brush or roll straight from the tin, so think it will need maybe 3 coats depending what the second is like.
Looking good, primer will be thin, especially if it is water based. The grade you sand to depends on how perfect you are looking for the finish to be. I don't sand past 320grit on a mouse sander, I do not bother with wet and dry and do not bother with hand sanding. You should only need to sand the areas that you can still see imperfections after priming, it should not need a full sand between coats unless you are trying to achieve a really high quality perfect finish. An enamel paint will smooth the finish to certain extent but any hard edges or obvious imperfections need dealing with at this stage.
 
3 coats of primer, Can anyone notice the stupid mistake though?
Sanded a few bits here and there , there is one or two dents but it s good enough for me , will look brand new from a 100yards :)
Gonna start with top coat tomorrow, still got the roof to sand down should have really done that before I started priming body. going for limestone white for roof and bits on cab.
 

Attachments

  • 20221001_173801.jpg
    20221001_173801.jpg
    278.5 KB · Views: 50
  • 20221001_173813.jpg
    20221001_173813.jpg
    354.9 KB · Views: 54
  • 20221001_173829.jpg
    20221001_173829.jpg
    246.4 KB · Views: 51
Back
Top