Karls
Active Member
- Posts
- 508
- Location
- Gloucestershire
I’m building up the front doors at the moment, bit the bullet and went for replacements from SP4x4 but will rebuild the old ones and sell them on at a later date.
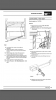
I’m just wondering about the screws that are used to retain everything to the door frame. How many are you supposed to use (my Land Rover exploded view says 11 per door?) and are there certain positions or is it just a case of even spacing based on common-sense? It’s no good me referring to the old doors as reference because they’ve got random holes everywhere! The SP doors do have holes in the frames here and there but but they look to be on centre line rather than offset to one side for the glass U-channel and they’re at least 6mm diameter.
I assume with the small self-tapper retaining screws, you drill a pilot hole through the assembly and into the frame and then screw in?
 I looked through my pictures and can't find any of use. However, I think I disconnected the glass from the mechanism. Do you have two connection points, from the scissor, with two little bolts on each one (trying to picture it) Wiggled the glass in to the two channels, bolted the mechanism back on to the door, then connected the glass back to the scissor part of the mechanism.