No, don't undo the staked nut, and, if you want to avoid a whole possible mess of trouble with the
sensor, leave it on the hub and disconnect it under the bonnet.
Take the disc off, and all the calliper gubbins, which you seem to have done, from what I can see in the pics, Take the wire from the sensor and its plug away from the inside of the bonnet and follow it down through under the wheel arch removing it from the clips as you go.
Separate the ball joints to the steering stuff, 2 on the nearside, 1 on the offside, to make it easier to get spanners etc onto the hub bolts, and to get the bolts back in, unless you want to put the hub back on with the bolts already inserted.
If you haven't got the splash plate off you'll really need a 5/16ths 6 sided socket to undo them to not risk rounding them off.
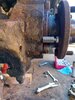
Undo
a bit the 4 bolts holding the hub on, the two top ones of which you can see in the photo.
Then go round all 4 diagonally smacking them with a hammer until the hub starts to move away from the mount.
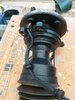
Then with a combination of this, gentle levering, preferably away from the bolt "eyes" and de-seizing liquid, once the hub is on the move, you can go back and undo the bolts a bit more until eventually the whole hub comes away.
By carefully feeding the sensor wire through where the shaft and CV joint go, you will be able to get the whole lot off.
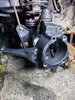
You should/may be able then to get tjhe seal out and a new one back in.
If not you will need to separate the steering knuckle from its two ball joints, and get that off and out of the way.
I found i needed a 24mm and a 22mm ring spanner and a set of star keys amd Allen keys to get the 2 ball joints off, on the nearside. I don't have a 24mm ring spanner so I had to use an adjustable

!
I started them off with a socket but them once the ball joints started rotating with the nuts was when i had to use the other bits in the end of the threaded part to hold them still. I used a ball joint separator at its absolute max to separate the 2 big ball joints from the knuckle, so i really hope you don't have an issue with getting the seal out without this.
Once the seal is replaced, just reverse all this.
I don't work fast but I put it all back together yesterday afternoon and the sensor wire went through the hole for the hub, in the knuckle no problem.
The biggest pain was getting the sensor wire grommet back in at the wheel arch!
Oh and I needed my bigger torque wrench to tork up the 12 sided bolts that hold the calliper carrier on.
Best of luck
Stan