Flat Bed Disco 2 Project - Anderson Connector Finally Fitted.

This site contains affiliate links for which LandyZone may be compensated if you make a purchase.
Awww and there was me thinking you were getting much better ;)

Here's the bit of my left rear Sill I did earlier this week before MOT soon on the 8th Feb ....
clickable:-


I fabricated the repair section in 16 gauge. To be fair I have been welding up rusty sh 1 t for 46 years now, there is a bit of an art to it, over and above just welding new metal together :rolleyes:
A bit gutted it needed doing now, as I plan to replace the pair of Inner and Outer Sills plus Body Mounts in December this year, prior to fitting a new Chassis ;)
 
Nice work. Sills are nice to have. Hopefully I'll have some in the next few weeks. That's my welder away for a few weeks now so no more progress on the body for a while.
 
Last edited:
I'm actually thinking of buying two lengths of 3mm wall 120 x 60 Steel Rectangular Box 1500mm long and then fabricating my own 3mm Body Mounts for my own version of the Sills :D:D:D

That way, if I'm still driving D15KOE at 75 to 80 years old they will still be good along with the Galvy Chassis .....................
 
Unsurprisingly at this point, more floor had to be repaired. Removing the floor soundproofing to get at the sill spot welds revealed more horrific rust lurking underneath. Might as well do it all properly while it's easy to get at.

I made some small brackets to weld to the backs of the B posts for internal panel fixing and some brackets with welded nuts that have been bonded to the inside lower corners of the rear cab panel. These are for the extended wheel arch fixings where they overlap between the bed and the body.

That's it for the bodywork for a while until I can get my professional back for more work so I'm going to turn my attention to making internal trim panels for the back of the cab. Part of the sound system will be integrated into them in the form of twin 10" bass speakers, powered by a dedicated amp, and a pair of 6x9s wired up to the existing sound wiring. It'll make a pleasant break from all the noise and dirt of bodywork for a while.

278.JPG


279.JPG


280.JPG


281.JPG


282.JPG
 
I've had this since the mid 90s and it's been installed in a considerable number of vehicles since then. It's still going strong but now I'm going to dismantle it and adapt it to fit in the back of the Disco, where it will hopefully live a long and happy life.

bbox1.JPG


bbox2.JPG
 
Adapting the old bass enclosure to fit in the Disco was a bit too ambitious. There was no way it was going to fit, even after some serious butchering. So I've had to build one that will fit. This is where I'm at with the rear interior panels so far. I've made a small perimiter frame out of 20x20 box steel and welded it to the backs of the B posts on either side. This supports the panel that will be a shelf just under the back window. The front panel of the bass enclosure is full width and the "wings" either side will have 6x9 3 way speakers set into them. When I've completed all the panels they will be covered in anthracite 4 way stretch fabric, as favoured by camper van builders.

283.JPG


284.JPG


285.JPG
 
LOL, you're worse than me with my single Active Sub and Android install, but why not ;)

They do sound good though, being a part time DJ for many years i do enjoy my Music :D
 
Been plodding on with small jobs while I wait for the welder. He was supposed to be here this week but he's ill. Hopefully he'll be here next week. I've seam sealed, primed and painted the interior of the rear frame. When that's dry I can fit some of the panels I've made. The bass box is complete and I've covered all the panels I've made so far. This 4 way stretch fabric is really easy to use and looks pretty good. Have also welded in more captive nuts for panel fixings and finished tidying up the wiring. Couldn't resist fitting one panel just to see how it looks even though the paint is still tacky.

289.JPG


290.JPG


291.JPG


292.JPG


293.JPG


294.JPG


295.JPG
 
MASSIVE progress update. LOTS of pictures.

Where do I start with this latest update, there’s been so much work done? Lists are good, so I’ll do that.
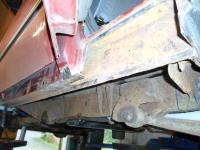
Bodywork:
Both sills completed.
Passenger side body mounts completed.
Rear drivers side body mount completed.
Front drivers side body mount tacked in.
Floor repairs completed.

Chassis:
Complete drive train removed from old chassis along with remaining electrics and fuel lines.
New polybush pressed into drivers side front trailing arm (old one damaged on removal).
New centre polybush fitted to watts linkage. (Old one bodged and completely useless).
Old chassis cut into manageable pieces ready to scrap.
Engine split from gearbox to facilitate clutch inspection and replace rear main oil seal.
Hi/Lo and diff lock selector mechanism on transfer case removed, repaired and adjusted.
Engine refitted to gearbox.
Complete drive train fitted to new chassis. (Used all the old parts in the interest of speed as I wanted to get it rolling and back into the garage as quickly as possible. Lots of new parts will be retrofitted soon).
Front prop stolen from my daily Disco to fit to new chassis as it’s almost like new, unlike the one I’ve just taken off, which went back on my daily.
Handbrake drum removed to inspect brake shoes and replace snapped bolt on output drive. This was much more complicated than it first appeared.
Body test fitted on new chassis. Body mounts lined up! Result! Body removed again.
Fuel tank drained of fuel, pump removed/cleaned/refitted.
Fuel tank cleaned (again, but better this time).
Shiny new Dirt Monkey fuel tank cradle/guard fitted.
Fuel tank fitted.
Seam sealed/primed/painted the rear of the cab ready for fitting the fibreglass panels.
Rear panel bonded/bolted into place.
Roof panel bonded into place. (Extra fixings will be used to fix the roof and rear panel together once the adhesive has set).
Re-engineered the body lifting sling as it wouldn’t now be able to be used with the rear panel fitted.
Made a start refurbishing all the towbar steels and front spring seats.
Tidied up the towbar wiring and bought a new socket and mounting plate.
Lots more parts ordered to replace more knackered stuff found while stripping the chassis. (All spring isolators, rear spring seats, front turret rings, brake pipe clips, fuel line clips).


296.jpg


297.jpg


298.jpg


299.jpg


300.jpg


301.jpg


302.jpg


303.jpg


304.jpg


305.jpg


306.jpg


307.jpg


308.jpg


309(1).jpg


309(2).jpg


310.jpg


311.jpg


312.jpg


313.jpg


314.jpg


315.jpg


316.jpg


317.jpg


318.jpg


319.jpg


320.jpg


321.jpg


322.jpg


323.jpg


324.jpg


325(1).jpg


325(2).jpg


326.jpg


327.jpg


328.jpg


329.jpg


330.jpg


331.jpg


332.jpg


333.jpg


334.jpg


335.jpg


336.jpg


337.jpg
 

Attachments

  • 338.jpg
    338.jpg
    105.3 KB · Views: 99
New rear suspension components fitted today.
New spring seats with +1.5" lifting blocks.
Britpart HD +2" springs with new spring isolators.
Terrafirma +3" adjustable shocks.

New bump stops also fitted.

339.JPG


340.JPG


341.JPG
 
Massive credit to u mate and plus 1 with regards to the chassis , at least u now know you’ve got a solid base to build from

May i ask where did u get the panel grey material from please

thks for sharing and look forward to the progress , once again hats off to u for taking on such a very interesting project

PS, very jealous with the workshop you’ve got :D:D
 
Thanks chaps, always nice to get some encouragement.

@gstuart: https://www.ebay.co.uk/itm/175106855272?var=474291051078
This was the most reasonable priced stuff I could find on ebay. I bought 8 square meters and it came with some tins of adhesive. I'll need to get some more adhesive though, it's nowhere near enough for that amount of fabric. It's easy to work with and looks pretty good. I intend to redo the headliner and the back of the cab around the window with it as well.
 
This afternoon's work. I started stripping down the front PS hub to rebuild with all new parts. I couldn't get the remains of the caliper bracket off so I thought I'd take off the knuckle so I could get it into a vice and give me easy access to the bolts. What an absolute pig to get off. Once I had the knuckle loose and just on the ball joints it was incredibly stiff to turn left and right. So I think it's time the ball joints were changed. Looking into this job I see I'm going to have to order a special tool to remove them. Oh well.
Anyway, I did manage to get the caliper bracket off so while the knuckle is off I thought I'd clean it up a bit and zap it with Kurust. Waiting on more parts now. The other side will get the same treatment tomorrow.

342.JPG


343.JPG
 
Back
Top