You are using an out of date browser. It may not display this or other websites correctly.
You should upgrade or use an alternative browser.
You should upgrade or use an alternative browser.
Dom's 109" (re)build
- Thread starter dominicbeesley
- Start date
This site contains affiliate links for which LandyZone may be compensated if you make a purchase.
aaronmorris
Head's a shed
- Posts
- 6,369
- Location
- Doncaster
Very nice Dom.
You got me thinking about screwing things into the chassis. I was hoping all holes woud be pre-drilled, no?
On my chassis they wasn't any holes for the brake/fuel pipes.
Albeit mine is a 90, But I'd assume they do the same throughout. Oh and it was from Richards.
dominicbeesley
Well-Known Member
- Posts
- 1,701
- Location
- Hebden Bridge, West Yorkshire
It's drilled for all the big stuff but not for self tappers (which is what hold the brake line clips down) nor for some of the optional extra stuff like the brake balance switch - not sure how the plate for that is held on but suspect its on tappers too...
dominicbeesley
Well-Known Member
- Posts
- 1,701
- Location
- Hebden Bridge, West Yorkshire
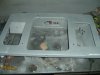
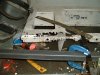
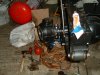
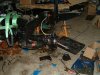
A bit more progress yesterday. I painted up a lot of bits and bobs like the water pump, a brake back plate and some random bits that I'm not sure where they go back!
I also started stripping the front axle down ready for new (****part) swivel balls - I know a lot of people don't rate these but I've had em on mine for a couple of years now and they were ok to fit and no sign of pitting so far. The ones that are being replaced look to have been replaced fairly recently but are shot to buggery. I suspect that regular use helps...
One thing I'm not sure about is the gearbox seal, it looks like it has leaked a tiny bit but I'm not convinced its enough to warrant replacement. Clutch looks fairly new and so I think I'll just stick it back together and see how it fares. After all I did pay the £20 extra for a bolt up x-member, it would be most disappointing if I never got to use it!
Attachments
dominicbeesley
Well-Known Member
- Posts
- 1,701
- Location
- Hebden Bridge, West Yorkshire
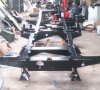
Not got a lot further with this. Given the new chassis another coat of Black and it's looking good, even though I managed to drop it when a ****ty Halfords (6 ton my arse) axle stand buckled under it and dropped the lot on the concrete floor.
I've spent a good few hours stripping down the front axle and painting up all the bits. Just the springs, axle case and diff to tart up then it can all go onto the new chassis.
I'm off to Le Mans in the other Landy so _if_ I make it back next week next two big jobs will be rebuilding the front slam panel (bottom rotted away and held together with pop rivets) and the badly repaired bulkhead which I'll be stripping and welding in new foot wells.
D
Attachments
dominicbeesley
Well-Known Member
- Posts
- 1,701
- Location
- Hebden Bridge, West Yorkshire
I've been pretty busy with work recently so not got a lot done. However the missus is 6 and a half months up the spout so I need to get this finished pretty soon before my time gets eaten up with kids!
I've bought a set of Rocky Mountain springs and shocks this time - I'm not unhappy with the GBSprings that I've got on the other truck - just wanted to give the RM ones a go - also they come with all the bits included so I thought it would be easier....I thought it would but my stupid torque wrench made me ruin one set of u-bolts by over-tightening and bending them..
.I've got a new torque wrench and some new u-bolts, though they came in a blue packet and look decidedly weedy compared to the RM ones, so I might get some replacement ones from RM...
I've also fitted a set of new swivels, these are the Britpart kit ones - I got a set of them for the other truck and they seem to have lasted ok so I gave them a go again. After a lot of cocking around setting the preload I got them fitted this weekend.
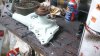
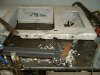
Also, I've been doing a bit of fixing up of body parts. First up is the radiator panel to get my eye in before doing the bulkhead.
I took the rad panel down to the local powder coaters to get it blasted and it came back with most of the bottom missing as expected.
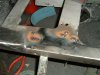
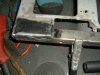
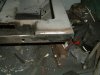
I replaced the bottom rail with some 3mm angle stock and then filled in the bigger gaps with some 2mm plate off cuts. The smaller holes and more fiddly bits I spent a long while building up with weld. It looks ok from the front but is a bit of a pigs from the back! I've given everything a good coat of Rustoleum Hard Hat Zinc I probably could of got it hot galv dipped but not sure its worth it for the rad panel.
I'll probably tidy up the few pock marks and welding scars with some filler before painting with brush and roller.
I'm sure a proper welder would be horrified with my work but its strong enough where it matters and looks not too bad from the front!
I've bought a set of Rocky Mountain springs and shocks this time - I'm not unhappy with the GBSprings that I've got on the other truck - just wanted to give the RM ones a go - also they come with all the bits included so I thought it would be easier....I thought it would but my stupid torque wrench made me ruin one set of u-bolts by over-tightening and bending them..
.I've got a new torque wrench and some new u-bolts, though they came in a blue packet and look decidedly weedy compared to the RM ones, so I might get some replacement ones from RM...
I've also fitted a set of new swivels, these are the Britpart kit ones - I got a set of them for the other truck and they seem to have lasted ok so I gave them a go again. After a lot of cocking around setting the preload I got them fitted this weekend.
Also, I've been doing a bit of fixing up of body parts. First up is the radiator panel to get my eye in before doing the bulkhead.
I took the rad panel down to the local powder coaters to get it blasted and it came back with most of the bottom missing as expected.
I replaced the bottom rail with some 3mm angle stock and then filled in the bigger gaps with some 2mm plate off cuts. The smaller holes and more fiddly bits I spent a long while building up with weld. It looks ok from the front but is a bit of a pigs from the back! I've given everything a good coat of Rustoleum Hard Hat Zinc I probably could of got it hot galv dipped but not sure its worth it for the rad panel.
I'll probably tidy up the few pock marks and welding scars with some filler before painting with brush and roller.
I'm sure a proper welder would be horrified with my work but its strong enough where it matters and looks not too bad from the front!
Attachments
-
 s-DSCF0239.JPG51.4 KB · Views: 211
 -
 s-DSCF0238.JPG91.2 KB · Views: 197
 -
 s-DSCF0237.JPG100.1 KB · Views: 189
 -
 s-DSCF0235.JPG115.8 KB · Views: 211
 -
 s-DSCF0232.JPG98.9 KB · Views: 178
 -
 s-DSCF0229.JPG108.6 KB · Views: 192
 -
 s-DSCF0228.JPG105.1 KB · Views: 189
 -
 s-DSCF0226.JPG106.2 KB · Views: 222
 -
 s-DSCF0224.JPG103.3 KB · Views: 213
 -
 s-DSCF0223.JPG111.6 KB · Views: 190
dominicbeesley
Well-Known Member
- Posts
- 1,701
- Location
- Hebden Bridge, West Yorkshire
honolulujoe
Well-Known Member
- Posts
- 6,137
- Location
- richmond surrey
pretty smart job on the front panel imho, can't see anyone not being pleased with that, damned sight better than I could do.
dominicbeesley
Well-Known Member
- Posts
- 1,701
- Location
- Hebden Bridge, West Yorkshire
Cheers joe, lets see what sort of a ball I can make painting it...
aaronmorris
Head's a shed
- Posts
- 6,369
- Location
- Doncaster
pretty smart job on the front panel imho, can't see anyone not being pleased with that, damned sight better than I could do.
+1 Looks good
")
dominicbeesley
Well-Known Member
- Posts
- 1,701
- Location
- Hebden Bridge, West Yorkshire
Cheers Herb, I can usually be persuaded though I'm not allowed to get too smashed now that our lass is 7 months gone just in case!
Thank Aaron
Did another few hours this aft - cleaned and painted a few more parts and stripped down and rebuilt the free wheeling hubs and put together the brakes hub, bearing etc on one swivel....then remembered the half shaft and did it all again! What a pillock!
Thank Aaron
Did another few hours this aft - cleaned and painted a few more parts and stripped down and rebuilt the free wheeling hubs and put together the brakes hub, bearing etc on one swivel....then remembered the half shaft and did it all again! What a pillock!
ronsealdeath
Sagging Member
- Posts
- 1,851
- Location
- Swansea, Wales
Congratulations on your missus being pregnant. Commiserations that you won't have time to do anything on your landy for at least 2 years.
dominicbeesley
Well-Known Member
- Posts
- 1,701
- Location
- Hebden Bridge, West Yorkshire
Well after three months of parenthood I actually got something useful today (no pictures I'm afraid).
Slowly over the past couple of months I've:
- rebuilt and refitted front swivels, brakes, hubs, back plates and got wheels on
- fitted rear springs
- fitted rear axle, diff, ubolts
I'm out of shape, getting the rear diff back together and spannering it up has near killed me...
Slowly over the past couple of months I've:
- rebuilt and refitted front swivels, brakes, hubs, back plates and got wheels on
- fitted rear springs
- fitted rear axle, diff, ubolts
I'm out of shape, getting the rear diff back together and spannering it up has near killed me...
dominicbeesley
Well-Known Member
- Posts
- 1,701
- Location
- Hebden Bridge, West Yorkshire
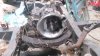
I'm still steadily plugging away at this. I started on the gearbox this weekend which was still fitted to the old chassis. I got the handbrake off and stripped it down, repainted and greased up.
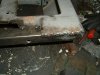
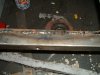
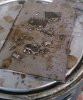
Then I decided to drain the oil out of the gearbox (which I should have had the sense to do before lifting it out)....I found these bits all stuffed in the back of the drain plug. Doesn't look too promising and my plan of shove it in and see if it works might turn into a full gearbox rebuild.
Sod's law, I think I've managed to chip a gear tooth in the SWB on the way to the garage too so I might have two gearboxes to fettle...
D
Attachments
dominicbeesley
Well-Known Member
- Posts
- 1,701
- Location
- Hebden Bridge, West Yorkshire
I think I've identified the bits in the picture. The thicker parts are from the 1/2nd gear in/out which has shattered at the edges where it goes up against the slides.
The thinner parts look to be the Synchro springs for 3rd/4th - there are the parts of one spring and no others fitted so they must have escaped somehow!
Looks like there will be a gearbox rebuild coming soon!
My main question before I start ordering parts - are bearmach ones ok or should I stick to Genuine where I can get them (going to get pricey!) or would I be better just getting hold of a second hand box? I'd quite like it to be "right" and would like to have a go at rebuilding gear as its not something I've done before.
I'd be grateful for advice before I start.
D
honolulujoe
Well-Known Member
- Posts
- 6,137
- Location
- richmond surrey
I would go second hand or recon, but I am not sufficiently competent to try a rebuild yet.
if you have the time and there is no rush to get it on the road a rebuild could be fun.
trouble with recon is you would have to give your old box up, with a second you could maybe mix and match if some bits of yours were better and so on.
some recon boxes on the bay for £595 I was looking at the other day, if you take off labour a self build might not be that expensive, unless these recon people use el cheapo parts of course.
Similar threads
- Replies
- 5
- Views
- 481
- Replies
- 9
- Views
- 726