Discovery rear storage

This site contains affiliate links for which LandyZone may be compensated if you make a purchase.

offroadpyrenees

New Member
Posts
92
Location
Swansea & Pyrenees
Has anyone kitted out the rear of their Discovery for expedition storage? Fridge, boxes, water etc....
If so, can you post some pictures? I lack imagination!!! And would appreciate some pointers.
 
I've done it for off-roading.
First of all taken out the side seats, but remember that you need to get to the rear of your tail lights should you need to change a bulb sometime.
We made it with 3 compartments underneath, but based around the trolley jack that fits into the middle one. spares, tools, compressor go into the right-hand cubby-hole, shackles, chains, pulleys, tow ropes etc in the left-hand side, super long battery jump leads in one side where the seat used to go, and flask & butties etc in the other side.
 

Attachments

  • disco boot.jpg
    disco boot.jpg
    105.8 KB · Views: 8,941
Has anyone kitted out the rear of their Discovery for expedition storage? Fridge, boxes, water etc....
If so, can you post some pictures? I lack imagination!!! And would appreciate some pointers.

I'm building mine up atm, and will put some pics up shortly to give you some inspiration. :) It took me ages to think things through properly and what materials to use. In the end I used aluminium square-section and joiners, with plywood skin covered in marine carpet and finished with aluminium L-section on the edges for protection. Drawers were made of plywood and covered in the same style as the unit.

There's some things I'd recommend thinking of before you start though mate.

  • Measure your fridge up properly, allow plenty of space all around it for ventillation...don't forget to allow for your fridge-slide!
  • Spend the time carefully measuring your tailgate, and allow for your cargo barrier, access to the rear light globes, tailgate & handle, etc.
  • Make a fold-down bench off the inner tailgate door
  • If you're putting in a second battery (good idea for expeditions), air compressor or pipe-work for your water tank, factor into the design for wiring, plumbing, etc and make sure that these are accessible
  • Consider what items you will be carrying (stove, cooking stuff, water tank, recovery gear, etc) and how you wish to group them together. Buy these first so you can design around them, not the other way around.
  • Look carefully into what materials are you going to use? There are ways to keep the units weight down while still having strength.
  • Budget for 20% more than you expect it to cost...there's always something else you forget!
  • Buy your materials from trade suppliers where possible! It's significantly cheaper than the hardware stores.
 
*Just edited this to include some more info* :)

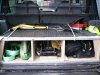
Here's my drawer setup nearing completion. As you can see I've still got to carpet one side panel, finish off the edging around the entire unit (for protection and looks), fit the fridge-slide, paint the left panel where the fridge will sit, and carpet the insides of the drawers. Then I've got to buy some fittings like handles, locks, tie-down points, etc. There's still a bit to do anyway! Haha!

The large top drawer is for cooking stuff. It's partitioned to hold my stove, cookware, utensils and other things, and I'll be getting foam custom cut to hold certain items like the stove securely/not move around. The other drawers are for anything really...food, recovery gear, clothing, camping gear, etc. It all depends on what kind of trip I'm doing!

The unit's been designed to fit in with my cargo barrier, which meant that the unit had to be a little bit narrower than the full width of the tailgate, but that suits me...I need the right side clear for the sub-woofer anyway, and there's still some space on the left for smaller/easier to pack items (like chairs and my table) near the amp. Given the straight back of the drawer unit, and the cargo barrier following the angled profile of the rear seats, there is a void of space behind, which will hold a second battery and a power inverter at a later stage, and be accessible through the open area behind where the fridge goes. It will be mounted to a false floor which will be bolted down. I intend to keep this in the vehicle, but it will be removable should I need to (unlikely as my housemate has a ute!).

IMG_0586.jpg


It's been quite enjoyable making it, and has cost me roughly 1/3rd of what I'd pay for something similar from a manufacturer. The added advantage over them is that it's made exactly to my needs. :D

I don't profess to being a great 'chippy', but as they say, measure twice and cut once. Think things through and it's not hard making your own storage system. The only tools I used were the saw-horses, a handsaw, a hacksaw, mitre box, cordless drill & bits, rubber mallet, tape measure, stanley-knife, sandpaper, and a paint brush...nothing fancy. ;)

Here's a couple of early pics:
IMG_0594.jpg

IMG_0630.jpg

IMG_0629.jpg


And a few of how it is currently (the bottom drawer is pushed up because of the uneven surface of the saw-horse btw):
IMG_0639.jpg

IMG_0635.jpg

IMG_0638.jpg

IMG_0637.jpg

IMG_0636.jpg
 
Last edited:
That setup would do my head in! Nothing seems to have its own place, clutter everywhere, **** clanging around in the back, etc. :doh:

Everything has its own place when I`m driving but when that pic, the only one I have, was taken. I tried to make dinner for 8 hungry guys and girls around. And you are right I always have a mess when I`m cooking.
 
Back
Top