Disco 2 Long Ranger

This site contains affiliate links for which LandyZone may be compensated if you make a purchase.

chu017

Active Member
Posts
85
Location
uk
As suggested by someone in my introducing thread hear is a thread where I will keep my Discovery 2 Long Ranger build notes.

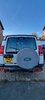
I have a Discovery 2 V8 (white)
From what I know it was built for the Police but for some reason never taken by them.
it is a basic model no electric seats, no air suspension, no sunroofs.

its seats have been replaced at some point by a previous owner along with a new head lining.
LPG was added but didn't work properly when I brought it.

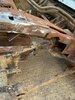
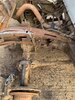
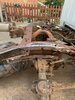
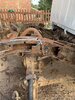
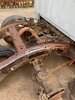
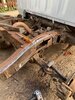
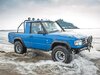
Its destiny is to be something like the attached blue pic. The rest of the Pics are before work started.

I have new suspension and some other bits to fit too.
 

Attachments

  • 8b006009f79a9ac45aa183e51a8c84f3.jpg
    8b006009f79a9ac45aa183e51a8c84f3.jpg
    46.2 KB · Views: 173
  • 2022-08-27 18.14.36.jpg
    2022-08-27 18.14.36.jpg
    245.8 KB · Views: 156
  • 2022-08-27 18.15.09.jpg
    2022-08-27 18.15.09.jpg
    262.8 KB · Views: 156
  • 2022-08-27 18.14.32.jpg
    2022-08-27 18.14.32.jpg
    279.3 KB · Views: 161
  • 2022-08-27 18.15.00.jpg
    2022-08-27 18.15.00.jpg
    204.8 KB · Views: 152
  • 2022-08-27 18.14.58.jpg
    2022-08-27 18.14.58.jpg
    317.5 KB · Views: 156
  • 2022-08-27 18.14.51.jpg
    2022-08-27 18.14.51.jpg
    272.2 KB · Views: 165
Hear are some photos of the interior coming out and some parts coming off the outside
the plan is to get the back end removed over the weekend of 9th September.
get the cabin watertight again then inspect the chassis and repair and shorten it as needed. we are going to cut it off just behind the back wheels to maximise exit angle.
 

Attachments

  • 2022-08-27 19.33.00.jpg
    2022-08-27 19.33.00.jpg
    219.8 KB · Views: 131
  • 2022-08-27 19.12.56.jpg
    2022-08-27 19.12.56.jpg
    270.5 KB · Views: 133
  • 2022-08-27 19.51.49.jpg
    2022-08-27 19.51.49.jpg
    183.2 KB · Views: 130
  • 2022-08-27 19.20.41.jpg
    2022-08-27 19.20.41.jpg
    214.4 KB · Views: 128
  • 2022-08-29 17.43.59.jpg
    2022-08-29 17.43.59.jpg
    289.9 KB · Views: 132
  • 2022-08-27 19.12.51.jpg
    2022-08-27 19.12.51.jpg
    283.8 KB · Views: 136
  • 2022-08-27 19.56.00.jpg
    2022-08-27 19.56.00.jpg
    202.1 KB · Views: 132
  • 2022-08-27 20.20.34.jpg
    2022-08-27 20.20.34.jpg
    154.9 KB · Views: 133
  • 2022-08-27 20.05.28.jpg
    2022-08-27 20.05.28.jpg
    212.3 KB · Views: 133
  • 2022-08-27 20.34.47.jpg
    2022-08-27 20.34.47.jpg
    200.6 KB · Views: 135
  • 2022-08-27 20.34.57.jpg
    2022-08-27 20.34.57.jpg
    157.8 KB · Views: 133
  • 2022-08-27 20.35.16.jpg
    2022-08-27 20.35.16.jpg
    132.9 KB · Views: 131
  • 2022-08-29 17.26.40.jpg
    2022-08-29 17.26.40.jpg
    244.9 KB · Views: 131
  • 2022-08-29 17.27.03.jpg
    2022-08-29 17.27.03.jpg
    239.7 KB · Views: 131
  • 2022-08-29 17.26.46.jpg
    2022-08-29 17.26.46.jpg
    273.7 KB · Views: 133
  • 2022-08-29 17.26.58.jpg
    2022-08-29 17.26.58.jpg
    232.3 KB · Views: 153
  • 2022-08-29 17.26.50.jpg
    2022-08-29 17.26.50.jpg
    218.6 KB · Views: 124
  • 2022-08-29 17.27.08.jpg
    2022-08-29 17.27.08.jpg
    205.9 KB · Views: 124
  • 2022-08-29 17.27.17.jpg
    2022-08-29 17.27.17.jpg
    243.5 KB · Views: 124
  • 2022-08-29 17.43.54.jpg
    2022-08-29 17.43.54.jpg
    309.8 KB · Views: 130
  • 2022-08-29 17.43.48.jpg
    2022-08-29 17.43.48.jpg
    344.5 KB · Views: 124
It was running and now having carefully moved all the wiring looms forward to the B pillars the Alarm/ Immobiliser is stuck on. I have put new battery's in both keys, the vehicle battery is fine, I do not have the EAK code.
Sometimes when I unlock it with the key from the drivers door the alarm goes off when I open the door but sometimes alarm isn't until I put the key in the ignition.
doing the 1st step of entering an EAK code where you gold the turn of the key for 5 seconds and should get a beep docent happen so even if i can get the EAK from LR I am not sure it will help.
can anyone offer any ideas or advice?

fortunately we have a few days before the planned cutting of the body shell to figure this out.
 
An odity when I got it there was a push switch below and to the left of the steering wheel.
didn't seem to do anything when pressed then the switch fell out and still nothing happened.
its 2 wire drops down below the drivers side fuse board and then no idea yet where they go next.

A mystery to solve in due course.
 

Attachments

  • 2022-08-31 13.34.23.jpg
    2022-08-31 13.34.23.jpg
    91.8 KB · Views: 101
  • 2022-08-31 13.34.36.jpg
    2022-08-31 13.34.36.jpg
    155.7 KB · Views: 105
Good luck looking forward to it.
Many Disco projects in this section so have a browse

J
 
It was running and now having carefully moved all the wiring looms forward to the B pillars the Alarm/ Immobiliser is stuck on. I have put new battery's in both keys, the vehicle battery is fine, I do not have the EAK code.
Sometimes when I unlock it with the key from the drivers door the alarm goes off when I open the door but sometimes alarm isn't until I put the key in the ignition.
doing the 1st step of entering an EAK code where you gold the turn of the key for 5 seconds and should get a beep docent happen so even if i can get the EAK from LR I am not sure it will help.
can anyone offer any ideas or advice?

fortunately we have a few days before the planned cutting of the body shell to figure this out.

This turned out to be the culprit. so no fault except the one I created for myself.
Reconnected the body earth connector to the bodywork and all is working again .

Hear is the link to the the discussion where it was solved. contains a lot of good infomation.
https://www.landyzone.co.uk/land-rover/d2-immobiliser-issues.381492/#post-5414035

Thankyou
 

Attachments

  • 2022-08-31 15.37.20.jpg
    2022-08-31 15.37.20.jpg
    226.3 KB · Views: 93
Last edited:
Well today progress has been made. she came apart a lot easier than we had expected.
looks like I have got me a convertible.

we are going to remove but try to save as much of the floor and wheel arches as possible with a view to refitting them during the rebuild.
it will save us putting a marine ply floor in the pickup bed. The wheel arches will also mean we hopefully don't have to fabricate any.

you may think then just leave the floor in but we want it out so we can make use of the easy access to work on chassis, suspension and whatever else we find that needs attention.

so a little more to remove.
fit the back to the cabin with its window and its fibre glass roof then onto the clean , inspect and remediate the chassis.

Probably a bit late to go back now.
 

Attachments

  • 2022-09-03 12.55.21.jpg
    2022-09-03 12.55.21.jpg
    208.6 KB · Views: 120
  • 2022-09-03 16.06.55.jpg
    2022-09-03 16.06.55.jpg
    181.4 KB · Views: 119
  • 2022-09-03 16.06.14.jpg
    2022-09-03 16.06.14.jpg
    189.6 KB · Views: 114
  • 2022-09-03 12.41.59.jpg
    2022-09-03 12.41.59.jpg
    214 KB · Views: 121
  • 2022-09-03 16.06.12.jpg
    2022-09-03 16.06.12.jpg
    189.3 KB · Views: 117
  • 2022-09-03 14.32.09.jpg
    2022-09-03 14.32.09.jpg
    269.3 KB · Views: 118
  • 2022-09-03 14.32.20.jpg
    2022-09-03 14.32.20.jpg
    264.1 KB · Views: 144
  • 2022-09-03 16.06.13.jpg
    2022-09-03 16.06.13.jpg
    183.6 KB · Views: 133
  • 2022-09-03 15.59.09.jpg
    2022-09-03 15.59.09.jpg
    202 KB · Views: 132
  • 2022-09-03 16.20.49.jpg
    2022-09-03 16.20.49.jpg
    257.7 KB · Views: 116
  • 2022-09-03 16.39.46.jpg
    2022-09-03 16.39.46.jpg
    242.5 KB · Views: 120
  • 2022-09-03 15.59.09-1.jpg
    2022-09-03 15.59.09-1.jpg
    202.4 KB · Views: 137
  • 2022-09-03 15.59.03.jpg
    2022-09-03 15.59.03.jpg
    202.1 KB · Views: 112
  • 2022-09-03 15.59.08.jpg
    2022-09-03 15.59.08.jpg
    203.5 KB · Views: 117
  • 2022-09-03 15.59.02.jpg
    2022-09-03 15.59.02.jpg
    209 KB · Views: 135
  • 2022-09-03 15.59.08-1.jpg
    2022-09-03 15.59.08-1.jpg
    209.5 KB · Views: 114
  • 2022-09-03 16.20.43.jpg
    2022-09-03 16.20.43.jpg
    255.9 KB · Views: 115
  • 2022-09-03 16.20.56.jpg
    2022-09-03 16.20.56.jpg
    294.3 KB · Views: 114
  • 2022-09-03 14.32.07.jpg
    2022-09-03 14.32.07.jpg
    277.7 KB · Views: 116
  • 2022-09-03 16.39.44.jpg
    2022-09-03 16.39.44.jpg
    290.9 KB · Views: 113
  • 2022-09-03 13.47.48.jpg
    2022-09-03 13.47.48.jpg
    291.2 KB · Views: 135
  • 2022-09-03 13.47.54.jpg
    2022-09-03 13.47.54.jpg
    272.5 KB · Views: 114
  • 2022-09-03 16.09.06.jpg
    2022-09-03 16.09.06.jpg
    227.5 KB · Views: 111
  • 2022-09-03 15.59.06.jpg
    2022-09-03 15.59.06.jpg
    234.2 KB · Views: 111
  • 2022-09-03 16.39.54.jpg
    2022-09-03 16.39.54.jpg
    306.6 KB · Views: 113
  • 2022-09-03 14.32.04.jpg
    2022-09-03 14.32.04.jpg
    327.3 KB · Views: 112
  • 2022-09-03 16.39.41.jpg
    2022-09-03 16.39.41.jpg
    283.2 KB · Views: 117
  • 2022-09-03 15.59.07.jpg
    2022-09-03 15.59.07.jpg
    236 KB · Views: 110
  • 2022-09-03 12.42.15.jpg
    2022-09-03 12.42.15.jpg
    278.6 KB · Views: 112
  • 2022-09-03 14.32.14.jpg
    2022-09-03 14.32.14.jpg
    361.2 KB · Views: 134
Progress was made yesterday .
The rest of the back came off and we have test fitted the clamshell and roof on the cab.

She even managed
2022-09-08 17.19.54.jpg
2022-09-08 16.14.25.jpg
2022-09-08 16.10.04.jpg
2022-09-08 16.12.51.jpg
2022-09-08 20.08.13.jpg
2022-09-08 18.21.08.jpg
2022-09-08 18.21.04.jpg
2022-09-08 16.12.28.jpg
2022-09-08 16.12.25.jpg
2022-09-08 16.12.31.jpg
2022-09-08 18.21.13.jpg
2022-09-08 16.12.55.jpg
2022-09-08 16.14.21.jpg
2022-09-08 16.10.07.jpg
to draw blood
 
We did discover some issues now we have easy access to the chassis.
need to replace both rear upper shock mounts. (we knew about 1 of them)
and one upper spring cup.

some of the drivers side chassis needs patching but as we are going to shorten it we can use the metal of the passenger side rear chassis as patching material.
2022-09-09 10.42.48.jpg
2022-09-09 10.42.17.jpg
2022-09-09 10.41.53.jpg
2022-09-09 10.42.10.jpg
2022-09-09 10.41.45.jpg
2022-09-09 10.42.02.jpg
 
More progress has been made.
seams welded up where the floor was cut off.
the sills have had end caps welded on as they have to be trimmed slightly to fir the clamshell back on.

the back is one and attached with Tiger seal (copy of) along with some tech screws that will me mostly removed later.
the rear window is in and glued with tech screws to hold it while the glue sets.
The techs crews on the window will be removed and the holes filled and then the rubber seal will be fitted to hide where they were.

the roof is on glued and clamped on an inner seam while it sets and some nuts bolts and washers will be added later along with an additional bead of glue in places.

The whole kit is precision made and fits the Disco like a glove, there is no loss of room to put the front seats back either.

A few days off from this while my Range Rover is made MOT ready then onto more chassis patching and suspension works.

2022-09-10 16.34.38-1.jpg
2022-09-10 16.34.39.jpg
2022-09-10 16.34.36.jpg
2022-09-10 16.34.42.jpg
2022-09-10 16.34.40.jpg
2022-09-10 16.34.37.jpg
2022-09-13 15.53.31.jpg
2022-09-10 16.34.40-1.jpg
2022-09-10 16.34.38.jpg
2022-09-10 16.44.04-1.jpg
2022-09-10 16.44.05.jpg
2022-09-10 16.43.41.jpg
2022-09-10 16.44.04.jpg
2022-09-13 15.53.43.jpg
 

Attachments

  • 2022-09-10 16.34.41.jpg
    2022-09-10 16.34.41.jpg
    237.8 KB · Views: 77
  • 2022-09-10 16.44.03.jpg
    2022-09-10 16.44.03.jpg
    269 KB · Views: 70
  • 2022-09-13 15.53.25.jpg
    2022-09-13 15.53.25.jpg
    302.2 KB · Views: 92
The project continues with the cab now watertight and the rear chassis rebuilt along with new 2" raised springs and shocks
I have 2" lift blocks as well but we are not going to fit them yet as they may not be needed with the weight reduction.

a lot of hammerite is going to be used once the rest of the chassis is cleaned.
new fuel tank is next and reroute exhaust.

then front suspension.

also got to work out what else we should replace while we are doing this list so far rear anti roll bar bushes and drop links
possiable the same up front
brerak flexies and copper break lines
 

Attachments

  • 306562360_5541505955902464_8979495030700413043_n.jpg
    306562360_5541505955902464_8979495030700413043_n.jpg
    288 KB · Views: 83
  • 304951849_844155356606190_8860860223053832701_n.jpg
    304951849_844155356606190_8860860223053832701_n.jpg
    473.6 KB · Views: 91
  • 305297766_1805388573159376_448146918625826247_n.jpg
    305297766_1805388573159376_448146918625826247_n.jpg
    329.2 KB · Views: 84
  • 277141297_1143476436272847_2017743433389802212_n.jpg
    277141297_1143476436272847_2017743433389802212_n.jpg
    251.1 KB · Views: 102
  • 307589271_1540005456449063_1094925876492956594_n.jpg
    307589271_1540005456449063_1094925876492956594_n.jpg
    414.2 KB · Views: 105
  • 307931878_822312822147266_743968801036713036_n.jpg
    307931878_822312822147266_743968801036713036_n.jpg
    350 KB · Views: 88
  • 306319170_2696899060445831_170056746814162170_n.jpg
    306319170_2696899060445831_170056746814162170_n.jpg
    422.2 KB · Views: 86
  • 2022-10-12 19.42.44.jpg
    2022-10-12 19.42.44.jpg
    205 KB · Views: 91
  • 2022-10-09 22.10.44.jpg
    2022-10-09 22.10.44.jpg
    65.9 KB · Views: 106
  • 2022-10-11 17.13.01.jpg
    2022-10-11 17.13.01.jpg
    269.6 KB · Views: 90
  • 2022-10-11 17.13.20-1.jpg
    2022-10-11 17.13.20-1.jpg
    272.7 KB · Views: 96
  • 2022-10-12 15.56.33.jpg
    2022-10-12 15.56.33.jpg
    267.6 KB · Views: 98
  • 2022-10-01 18.34.29.jpg
    2022-10-01 18.34.29.jpg
    313.1 KB · Views: 90
  • 2022-10-09 22.11.10.jpg
    2022-10-09 22.11.10.jpg
    239 KB · Views: 106
  • 2022-10-12 11.23.27.jpg
    2022-10-12 11.23.27.jpg
    305.3 KB · Views: 110
  • 2022-10-01 18.34.13.jpg
    2022-10-01 18.34.13.jpg
    296.1 KB · Views: 89
  • 2022-10-01 18.34.39.jpg
    2022-10-01 18.34.39.jpg
    313.3 KB · Views: 91
  • 2022-10-09 22.10.53.jpg
    2022-10-09 22.10.53.jpg
    298.2 KB · Views: 88
  • 2022-10-11 18.16.59.jpg
    2022-10-11 18.16.59.jpg
    186.8 KB · Views: 88
  • 2022-10-11 18.17.33.jpg
    2022-10-11 18.17.33.jpg
    182 KB · Views: 89
  • 2022-10-01 18.34.23.jpg
    2022-10-01 18.34.23.jpg
    313.5 KB · Views: 91
  • 2022-10-12 11.23.35.jpg
    2022-10-12 11.23.35.jpg
    324.7 KB · Views: 91
  • 2022-10-12 15.56.28.jpg
    2022-10-12 15.56.28.jpg
    282.7 KB · Views: 85
  • 2022-10-12 11.23.41.jpg
    2022-10-12 11.23.41.jpg
    394 KB · Views: 89
Last edited:
An odity when I got it there was a push switch below and to the left of the steering wheel.
didn't seem to do anything when pressed then the switch fell out and still nothing happened.
its 2 wire drops down below the drivers side fuse board and then no idea yet where they go next.

A mystery to solve in due course.

Is it an auto?

It might be a start switch. When the xyz switch plays up it can be difficult to start. I had that and just wired a switch direct from the battery to the starter motor solenoid. Got me out of many a pickle.
 
sorry for the delay in updates.
work goes on when weather allows

next us are new fuel tank and replacing the rear breaks
2022-10-11 18.16.55-1.jpg
2022-10-11 17.13.18-1.jpg
2022-10-11 17.13.17.jpg
2022-10-11 18.16.53.jpg
2022-10-11 18.16.54.jpg
2022-10-11 18.16.55.jpg
2022-10-11 18.16.59-1.jpg
2022-10-11 17.13.20.jpg
2022-10-11 17.13.18.jpg
2022-10-11 18.16.53-1.jpg
2022-10-11 17.13.19.jpg
2022-10-12 15.34.44.jpg
2022-10-11 18.17.00-1.jpg
2022-10-12 15.56.32-1.jpg
2022-10-11 18.16.56.jpg
2022-10-11 17.13.21.jpg
2022-10-11 18.17.01-1.jpg
2022-10-11 18.17.00.jpg
2022-10-11 18.17.34-2.jpg
2022-10-12 15.56.32.jpg
2022-10-12 15.56.23.jpg
2022-10-11 18.17.32-1.jpg
2022-10-12 15.56.24.jpg
2022-10-29 15.01.06.jpg
2022-10-11 18.17.01.jpg
2022-10-29 17.10.53.jpg
2022-10-11 18.17.27-2.jpg
2022-10-11 18.17.32.jpg
2022-10-11 18.17.27-1.jpg
2022-10-12 15.56.25.jpg
2022-10-11 18.17.31.jpg
2022-10-11 18.17.29.jpg
2022-10-11 18.17.34.jpg
2022-10-12 15.34.52.jpg
2022-10-11 18.17.27.jpg
2022-10-11 18.17.34-1.jpg
2022-10-29 17.10.54.jpg
2022-10-29 15.01.26.jpg
2022-10-29 15.01.16.jpg
2022-10-29 15.01.24.jpg
2022-10-29 17.10.37.jpg
2022-10-29 15.01.25.jpg
2022-10-12 15.56.24-1.jpg
2022-10-29 15.01.09.jpg
 
Back
Top