holidaychicken
Well-Known Member
- Posts
- 4,014
- Location
- Kent
Well that didn't take long for you to find that 
Anyhoo, continuing on again...
Eventually the thing moved but I reckon over an hour a side for me but more heat is the key I reckon. Copper slip in the bore and must use new torx bolts and torqued them up. Had to drop the steering arm back in to stop the hub spinning while tightening the bolts.
Edit - something that i thought of after doing the first side but then forgot to try when doing the second side bottom ball joint was to cut off the two lugs on the old bottom ball joint while it is still in place and then using a large socket or some sort of spacer to go over the tapered threaded part and then wind out the ball joint using the nut, just an idea...


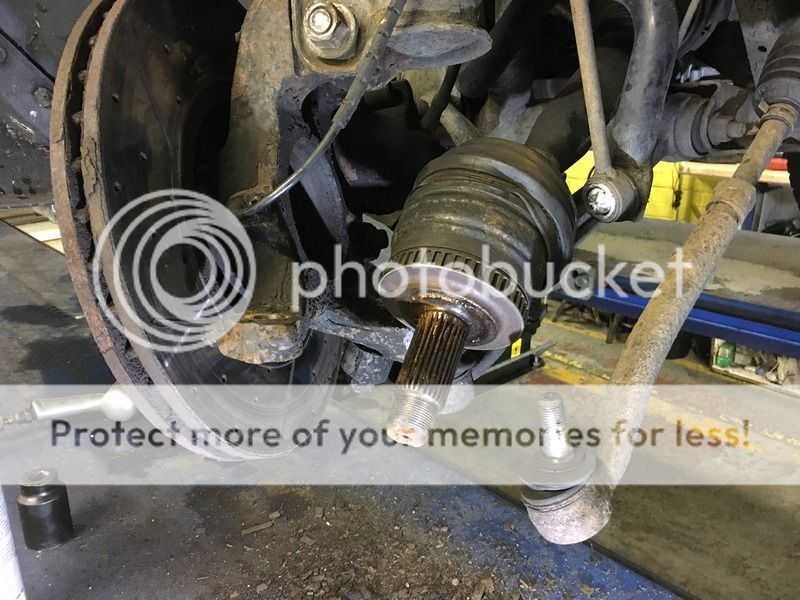
Clean up the spline and fit a new snap ring and boot (I turned mine inside out and pushed as far up the shaft as possible to give more room to see the circlip) and load up the grease into the new joint by moving the inner race to its max travel in lots of different directions while forcing grease into the ball races and balls etc. wipe a clear area where the spline goes in so you can see the circlip to start it, sorry didn't get a phot.
Push the CV joint up until it touches the circlip where it will stop.
Get a flat screw driver and while putting the joint under a bit if pressure inwards, push the circlip into the groove to give it a start as although it says to give it a tap, that won’t work with the driveshaft in place as the inner joint just compresses. Once the clip is seated, the CV joint will then tap home until it clicks into place and cannot be pulled back off again.
I used the old hub nut to pull the spline all the way through the hub and then replaced the hub nut just hand ratchet tight as I had to torque this up with a small amount of weight on the wheel to stop it turning
Fix the CV boot clips in place using old style pinchers or CV pliers.

Cleaned up the taper faces in the hub for the ball joints, loosely fitted the bolts in the subframe for the suspension arms, put the ball joints in place and torqued them up leaving the subframe bolts just nipped up. the arms and ball joint came with new nuts and i also replaced the nut on the steering ball joint.

I replaced my brake pads, wear sensor and ABS sensors; purchased a large g clamp form B&Q to push back the caliper after removing a little brake fluid from the reservoir to stop it over flowing when returning the piston. i also ordered as a backup a 34 piece brake caliper piston rewind set off ebay for about £15 which you can see in the pic but the g clamp worked just as well.

I also fitted new anti roll bar drop links, and take care when undoing the top bolt as there is a washer that stays with the ball joint on the old drop link which needs to be transferred onto the new one and the same way around for some reason that i couldn't see.

Disc back on, back plate and dinner plate washers back on and caliper, wheel back on.
Lowered the car on to the wheel to stop it turning and then ‘torqued ‘ up the hub nut. Now my torque wrench only goes up to 250 nm and rave states 420Nm, so I calculated using my weight (mass) of 88 Kg multiplied by acceleration due to gravity which is 9.8 m/s2 to give 862 N. The required torque is 420 Nm. So if I am correct in my thinking I should position myself just under 0.5 metres from the pivot point, I actually calculated 487 mm) along my breaker bar and stood on it with all my weight to torque it up. Now it’s a while since I drank my way through college so that could be total bollox but the wheels are still on for now.
I dove the car up onto my two stage sleeper system to give me some clearance, lowered the car to normal height and torqued up the inner suspension arm bolts to 165 nm I think but check rave and then gave them another ¼ turn after marking the nuts / bolts. Now that sounds easy and I do have a pretty long torque wrench but that extra quarter turn is a lot when you are lying under a car with a breaker bar that is just too long in every position but I managed it using my torque wrench that has a ratchet.

Now I am bound to have missed something and this is my first attempt at writing something up and generally I was smothered in grease so picking up my camera was tricky at times and I do get a bit stressed when things are proving very very awkward .
Hope this is of use to somebody and feel free to point out anything that requires editing.
This is by no way a full and accurate account of how to do the job so if you are unsure, get some help or take it to a garage that knows as these are fairly critical parts to change.
The Rave manual is by far the best set of instructions to follow and also has all the correct torque settings.
In other words, if you follow this and your wheels fall off don’t blame me, I am just must telling a story…………
Anyhoo, continuing on again...
Eventually the thing moved but I reckon over an hour a side for me but more heat is the key I reckon. Copper slip in the bore and must use new torx bolts and torqued them up. Had to drop the steering arm back in to stop the hub spinning while tightening the bolts.
Edit - something that i thought of after doing the first side but then forgot to try when doing the second side bottom ball joint was to cut off the two lugs on the old bottom ball joint while it is still in place and then using a large socket or some sort of spacer to go over the tapered threaded part and then wind out the ball joint using the nut, just an idea...
Clean up the spline and fit a new snap ring and boot (I turned mine inside out and pushed as far up the shaft as possible to give more room to see the circlip) and load up the grease into the new joint by moving the inner race to its max travel in lots of different directions while forcing grease into the ball races and balls etc. wipe a clear area where the spline goes in so you can see the circlip to start it, sorry didn't get a phot.
Push the CV joint up until it touches the circlip where it will stop.
Get a flat screw driver and while putting the joint under a bit if pressure inwards, push the circlip into the groove to give it a start as although it says to give it a tap, that won’t work with the driveshaft in place as the inner joint just compresses. Once the clip is seated, the CV joint will then tap home until it clicks into place and cannot be pulled back off again.
I used the old hub nut to pull the spline all the way through the hub and then replaced the hub nut just hand ratchet tight as I had to torque this up with a small amount of weight on the wheel to stop it turning
Fix the CV boot clips in place using old style pinchers or CV pliers.
Cleaned up the taper faces in the hub for the ball joints, loosely fitted the bolts in the subframe for the suspension arms, put the ball joints in place and torqued them up leaving the subframe bolts just nipped up. the arms and ball joint came with new nuts and i also replaced the nut on the steering ball joint.
I replaced my brake pads, wear sensor and ABS sensors; purchased a large g clamp form B&Q to push back the caliper after removing a little brake fluid from the reservoir to stop it over flowing when returning the piston. i also ordered as a backup a 34 piece brake caliper piston rewind set off ebay for about £15 which you can see in the pic but the g clamp worked just as well.
I also fitted new anti roll bar drop links, and take care when undoing the top bolt as there is a washer that stays with the ball joint on the old drop link which needs to be transferred onto the new one and the same way around for some reason that i couldn't see.
Disc back on, back plate and dinner plate washers back on and caliper, wheel back on.
Lowered the car on to the wheel to stop it turning and then ‘torqued ‘ up the hub nut. Now my torque wrench only goes up to 250 nm and rave states 420Nm, so I calculated using my weight (mass) of 88 Kg multiplied by acceleration due to gravity which is 9.8 m/s2 to give 862 N. The required torque is 420 Nm. So if I am correct in my thinking I should position myself just under 0.5 metres from the pivot point, I actually calculated 487 mm) along my breaker bar and stood on it with all my weight to torque it up. Now it’s a while since I drank my way through college so that could be total bollox but the wheels are still on for now.
I dove the car up onto my two stage sleeper system to give me some clearance, lowered the car to normal height and torqued up the inner suspension arm bolts to 165 nm I think but check rave and then gave them another ¼ turn after marking the nuts / bolts. Now that sounds easy and I do have a pretty long torque wrench but that extra quarter turn is a lot when you are lying under a car with a breaker bar that is just too long in every position but I managed it using my torque wrench that has a ratchet.
Now I am bound to have missed something and this is my first attempt at writing something up and generally I was smothered in grease so picking up my camera was tricky at times and I do get a bit stressed when things are proving very very awkward .
Hope this is of use to somebody and feel free to point out anything that requires editing.
This is by no way a full and accurate account of how to do the job so if you are unsure, get some help or take it to a garage that knows as these are fairly critical parts to change.
The Rave manual is by far the best set of instructions to follow and also has all the correct torque settings.
In other words, if you follow this and your wheels fall off don’t blame me, I am just must telling a story…………
Last edited: