Chassis welding questions

This site contains affiliate links for which LandyZone may be compensated if you make a purchase.

dominicbeesley

Well-Known Member
Posts
1,701
Location
Hebden Bridge, West Yorkshire
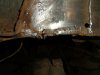
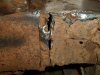
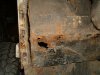
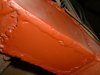
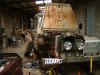
I've just discovered some alarming cracks and broken (well never stitched up) welds in my S3 chassis. Christ knows how it hasn't fallen in bits.

I'm going to have to try and patch it up this weekend before I get the new spring on that corner so a few questions:

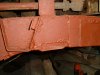
Plate - what thickness? I need to do the bottom and inner side-wall between the front spring hanger and the front X-member. Also bottom and part of the outer side between the front x-member and the bump stop.

The actual plate between the bump stop and the front x-member looks in good nick and relatively new but the welding was hopeless! Is it a reasonable idea to grind the weld out and stitch it up? There would be about a 1/4" gap.

But weld or get my mate to bend it up on a press brake? Where there is a bit of the side needs replacing (about 1/2" from bottom) should I cut a small piece for the side and a separate one for the bottom or is it best to butt weld anyway?

This is my first "real" welding job other than kid's go-carts, benches / shelves etc so any other advice for idiots would be good. I'll have to nip out this arvo to try and find/buy/liberate some sheet steel from somewhere....I'll be using a MIG welder hopefully so should be able to make a half decent job. Looks like the last person used bits of spaghetti in a stick welder...

Dom
 
3mm is fine ,that gap while can be weld filled is better redone ,often for underside areas a plate made with edges folded up so you can weld to the side of chassis makes an easier better weld ,butt welding with thin chassis section tends to lead to lots of holes overlap is better
 
i usually make a u shaped section if you can bend it to fit snugly over the chassis or weld 3 pieces together to form the u shape, and as mentioned leave plenty of overlap as you will find the metal to be quite thin around the rotten area, i use an arc welder for these jobs as the metal is thick a and needs good penetration, if your mig hasn't got the power you will find it will go on like bird **** and it will be no good
 
Just got the wing off and had a poke around. I'm not sure any of it is all the rotten, it looks like its a fairly recent botch gone wrong. I've got some pretty nice looking 3mm stuff off my mates work scrap pile so will be having a go tomorrow hopefully.

I couldn't get at the press brake though as they were busy so will probably weld up a U-section off the motor and then offer it up like that as you suggest. Will give me a chance to get my eye in!

D
 
i've repaired two chassis of my own without bending U sections, i just cut the rot out back to good metal and replaced/let in new metal, the first was my 88" which is my rough and ready truck, used for everything and anything on or off road

the second was my nice show car 109 chassis

i've repaired a couple of other chassis in the same way for others

p/bucket links if you want to look through my repairs

My 1965 109 pictures by NiteMare_08 - Photobucket

Zebedee pictures by NiteMare_08 - Photobucket
 
Practice on something first, It'll save you a bit of grinding if it don't go right first time. I've found that whatever steel they used for the old chassis's, it's really nice to weld. Make sure you clean it back to nice shiny steel first..:D
 
I think the best bit of advice for any welding is as mad said, make sure it's really clean. I take every thing off the chassis where I'm going to weld with a grit flapper disk. Go round the edges of your steel plate also.
I tend to prefer mig or tig. Arc is good but a bit cumbersom in tight spots. If you're using Mig have a whisper of gas coming out. More if it's windy outside. 1.8 mm wire is good. Turn the power up almost until you burn through, and adjust the wire feed to give a good fill. If you're burning through too much knock the power down a bit or move faster. But a clean surface is a must for a good weld.

314306_10150761289410013_533845012_20087769_2161519_n.jpg
 
there is a way of not having to do inverted welding on the rails

if the side needs welding cut the side out then cut the rotten bit out of the bottom then put yer plate in for a nice tight fit then weld the bottom plate in from inside the rail effectively doing it from above

if your worried what the MOT man will say take pics of the welding done from the inside so if he asks or mentions it during the test you have proof its been done propperly just the other way round :D:D:D
 
Thanks lads,

I wish I'd read your post before I started Johnny, just done the bottom plate from underneath. I didn't cut enough out of the side to do it from the side. What a bugger that is to do, I've had to go over it about 10 times to get it right and it looks like a right mess, however I can at least see in through the side to see that it has taken right. Think I've not done my mates nozzle a lot of good though!

Anyway here's the before pictures, I'll try and get some after pics when I do the rest tomorrow, but it might be too embarassing!

Any hints for how best to sort the driver's footwell? Would it be sensible to weld a patch on from the inside....it would look a bit ropey but would be a lot easier. Would it be kosher to bolt one one?

Is there anything I should be doing to the inside of the chassis? Not much point painting it if I'm gonna weld it...

D
 

Attachments

  • DSCF0035-s.JPG
    DSCF0035-s.JPG
    91.9 KB · Views: 776
  • DSCF0036-s.JPG
    DSCF0036-s.JPG
    120.7 KB · Views: 556
  • DSCF0037-s.JPG
    DSCF0037-s.JPG
    61.4 KB · Views: 517
  • DSCF0040-s.JPG
    DSCF0040-s.JPG
    113.4 KB · Views: 504
When you have finished welding the chassis, spray a 50% mix waxoyl and diesel up inside it. The footwell could be welded from inside or out. Why not do both to make it look tidy?
 
Well here's some pics of my attempted welding...not sure it will pass an MOT but certainly should be strong enough. The old plates would bend in with thumb pressure and the welds cracked easily. The original plate on the bottom was only 0.8mm! This is all nice thick stuff and I've belted at it with hammers as a check....anyway here's some pics for those of you who want a giggle. I didn't get any of the footwell that is just far too embarassing!
 

Attachments

  • DSCF0041-s.JPG
    DSCF0041-s.JPG
    92.5 KB · Views: 1,609
  • DSCF0044-s.JPG
    DSCF0044-s.JPG
    47.2 KB · Views: 589
  • DSCF0045-s.JPG
    DSCF0045-s.JPG
    107.8 KB · Views: 543
Well here's some pics of my attempted welding...not sure it will pass an MOT but certainly should be strong enough. The old plates would bend in with thumb pressure and the welds cracked easily. The original plate on the bottom was only 0.8mm! This is all nice thick stuff and I've belted at it with hammers as a check....anyway here's some pics for those of you who want a giggle. I didn't get any of the footwell that is just far too embarassing!
you can see what i mean about leaving enough to come round to the sides , a big part is planing ,nozzels and tips should be changed frequently especially tips ,the grinder is your friend thats the good thing about welding you can allways remove and reweld the joint
 
if your cutting out and butt welding the joints try this

tach the plate into position then go round the edges creating a shallow groove to fill in with weld this normally leaves the surface of the weld near flush to the surface of the work piece and causes a hell of a lot less grinding tidying the job up

but looking at what youve done its a damn good job and looks stronger and neater than youd get from most mot places itll pass no matter what that will

great work ......keep going :D:D:D:D
 
Thanks lads, especially for the encouragement.

I'll definitely take james's advice next time and try and do it through the side.

Cheers for the tip johnny. I do get better each time I do welding but it is not so often so quite often forget tricks like this!

Anyway off to try and get some body paint again...went to the shop yesterday and the gits had shut up five minutes early and refused to turn the machines back on! I tried using spray cans from Halfrauds but £14 worth had not done one door panel and I made a right pig's dick of it...back to rollers me thinks!

halfrauds tins are crap fer colour matches and as thin as **** 6 coats and i could still see through the fukkin door i did on me mondildo but their satin black and primers are pretty good if you heat it up with a hairdryer while drying between coats

this series ive got on the go is the first job ive done with the compressor since they stopped with the lead based paints and now ive got a taster for it i aint going back to tinnies ever :cool::cool::cool:
 
Aye, colour match wasn't that important I just wanted to get the channels of the door the right colour (or close) before I refitted with runners and glass...never got that far anyway so a complete waste of time, money and swearing!
 
Back
Top