Bulkhead Top Repair Advice Required

This site contains affiliate links for which LandyZone may be compensated if you make a purchase.

Auldgreen90

Active Member
Folks

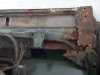
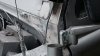
As the title says I'm looking for advice for the next part of my rebuild. After looking at the extent of rot around the vents and in the recess of the vents I've decided to do away with them and fit YRM repair panels over the full length.

My question is kinda 2 fold. Should I scribe round the panels to give accurate cuts? When we go to weld should I go for butt weld or overlap joints? The reason for asking this is to do with the tidy up afterwards. Grinding back a butt weld to leave no major trace would be really difficult I think. I would prefer to drill holes in the repair panel and do plug welds the sand it smooth but not sure if this is okay will the MOT test as it wouldn't be fully welded.

I've tried to add a pic to show what I'm up against.

Any advice from those who have done this would be appreciated.

All the rebuild threads I've seen have sorta scanted over this or focused on other stuff.

Thanks in advance.
 

Attachments

  • image.jpg
    image.jpg
    351.6 KB · Views: 225
I haven't done this, but I will be doing it soon, I've got the YRM panels already. I'm
planning on drilling/punching holes and spot welding these, I think I'll butt weld where the new panel meets the original ( halfway along the vent ) but I'll just play that by ear!
I hope I don't uncover what you did. If you do it before me ( likely ), could you be good enough to take some photos !?
 
I've come across that one in the past, that guy made his panels from scratch! Bit too advanced for me ( especially when YRM were £18 a pair! ). Considering the bulkhead is one of the most repaired parts of the Defender ( and pre-Defenders ) there are very few videos or threads!
 
I didn't DIY it either. I copped out and bought a reconditioned one. All recon ones I've seen are butt joined, not overlapped. They are tacked in place, welded along the join and the weld then ground down flush with the surface. An overlapped join will not look great.
What are the bottom of the door post like? Mine looked fine until I poked them with a driver :eek: Just the paint on the surface holding it together :) I could put my fingers in from the bottom to half way up the post.

Bottom of the door posts are surprisingly fine. One of the brackets that fixes the bulkhead to outrigger was a bit rusted but was an easy repair.

Think one of my concerns with even just welding these parts is that my welder ain't great on thin metals as not much adjustment. Did great on chassis work but footwells were hard going. My sons the welder though so his problem hehehe.
 
I have just done mine yesterday and I drilled holes in mine spot welded it and welded all the edges. plus this was my first ever welding job I finished it off with some body filler to make sure it was smooth and ready for paint.
 

Attachments

  • 20150530_164640.jpg
    20150530_164640.jpg
    177.4 KB · Views: 154
Mine was like that under the filler that someone had spread over it which lead me to believe it was going to be an easy repair. The only problem is with repairing it is you will probably never get all the rust out so it will reappear that's why i went down the 2 year old rust free Puma bulkhead and it was half the price of a 200/300/TD5 bulkhead.
 
Bottom of the door posts are surprisingly fine. One of the brackets that fixes the bulkhead to outrigger was a bit rusted but was an easy repair.

Think one of my concerns with even just welding these parts is that my welder ain't great on thin metals as not much adjustment. Did great on chassis work but footwells were hard going. My sons the welder though so his problem hehehe.

Bottom part of the door pillars has already been replaced, that is why they are better! ;)

Best of luck with that, looks like a nasty case of rot. :(
 
Bottom part of the door pillars has already been replaced, that is why they are better! ;)

Best of luck with that, looks like a nasty case of rot. :(


Yeah, doesn't look good mate. I would have gone for replacement as per 200's suggestion. Or a galv refurbished one, if the vehicle is worth that level of investment. Good luck though.
 
Think in hindsight with amount of welding done already would have been quicker and cheaper buying a better Landy! :doh: but can't admit that to the missus Lol

Keep telling myself it's my first and use it as a learning curve. More like a bloody 90 degree bend tho :(
 
Think in hindsight with amount of welding done already would have been quicker and cheaper buying a better Landy! :doh: but can't admit that to the missus Lol

Keep telling myself it's my first and use it as a learning curve. More like a bloody 90 degree bend tho :(

I'm sure you'll get it sorted. Once the panels are welded in make sure all remaining rusty surfaces are cleaned back to shiny metal, then etch primed etc. Internal sections, like the door posts, get plenty of cavity wax in.

We like pictures and people gaining success against the tin worm on here, so once you've got it done stick a picture on :tea:
 
Think in hindsight with amount of welding done already would have been quicker and cheaper buying a better Landy! :doh: but can't admit that to the missus Lol

Keep telling myself it's my first and use it as a learning curve. More like a bloody 90 degree bend tho :(

That does look like a nasty one, as some have said, replacement may be needed in a while, if not immediately.

Best of British with it, you are certainly a far better fabricator than I will ever be if you can do that. :)
 
Internal sections, like the door posts, get plenty of cavity wax in.

We like pictures and people gaining success against the tin worm on here, so once you've got it done stick a picture on :tea:

+1 Cavity wax, oil, etc. sprayed inside is the way to go. That has never had anything sprayed inside at all, why it has gone like that in the first place! :(


+1 about the pics too! :)
 
Back
Top