Bulkhead - here goes!

This site contains affiliate links for which LandyZone may be compensated if you make a purchase.
Having to pick the moments to finish this job around 'life' - but new gas bottle for the welder and made a big step today...

Getting the settings right on the welder has made all the difference. Melting into both surfaces, no blowing through, and mixing well.
IMG_8549.JPG IMG_8548.JPG IMG_8546.JPG
 
Also managed to smash out another door frame repair...

IMG_8531.JPG

So thats basically everything replaced that was rusty. Need to finish the top of the bulkhead with some more welding, and then some filler to smooth it all out. Paint and prime. There is the driver footwell to do, but I'm going to leave that as this has already well over run.

So I need some weather that will let me paint it - then it's just a case of putting the dash back on, wipers, etc. Easy job I'm sure.
 
A very very slow day.

The wind has been up so I can't weld. So i decided to cut out the driver's footwell rot after all. Glad I did, means I won't have to revisit this job (fingers crossed!!!!)
IMG_8606.JPG
Bit more welding and it will be in good.

The top of the bulkhead is done, ALMOST. I need to weld on the last hinge for the bonnet. Everything else is sanded down and waiting. There where some spot welds I drilled out where the outside panel goes over the top of the bulkhead and joins the inside surface. Not sure if I will fill in the drill holes (which would be welding from underneath and a bit awkward), or weld along the lip where the two meet on the top just inside of the windscreen frame to bulkhead seal.
IMG_8597.JPG IMG_8598.JPG

one silver lining of not being able to do anything more meaningful on the repair list is that I took the time to remove the bulkhead to outrigger bolt. Had to get a breaker bar on it to loosen it and the rusty bugger twisted and melted in the middle. Managed to get the rest out no worries, and have ordered a replacement, but amazed how far gone that hidden bolt was.

A QUESTION:
I took off the bulkhead to chassis support to give access when welding to the underside. It had an earth strap on it. But I can't for the life of me imagine that there is any electrical contact. The support bracket is covered in wax, and I can't see any good metal to metal contact. There has been a weird elec fault where a light on the dash sometimes flickers, or my temp gauge goes crazy, or fuel gauge dances. Might it be worth moving this strap? or putting another one from it to the battery?
IMG_8599.JPG IMG_8600.JPG IMG_8604.JPG
 
Other foot well is now done.

Welded up, sealed and painted.
22.jpg 33.jpg

And the bulkhead priming has started. It's raining now, so I can't put anything else on it, But hopefully will be able to key it and put some colour to it very soon.
44.jpg 55.jpg

Can't tell you all how good it is to be on the final stretch. Doors are ready to go back on, roll cage is ready to be put on (although that is going to be a bloody nightmare!) wings and bonnet all ready.
 
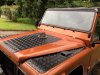
Didn't get a chance to update on the final push. It's been a manic last week with putting the dash back on and making the MOD I planned to it. I have long ditched the air con from it, and the car has no heater, so the ducking was useless. The front broke away long ago, so I have put in a little padded panel on the bottom and one on the top (with some USB sockets in it). It's crude, but a surprisingly neat little glove box kinda thing. Trouble is the new top panel that I picked up (well new to me) to replace my broken and tatty old one has wider vents than I do, so I will find something to span the gap and tidy it up. Then I want to paint the bottom of the dash or at least the handle was it ruins everything. The cables don't use that hole anymore so I will grommet that closed.
IMG_8708.JPG

I managed to paint the bulkhead, and have been amazed with the colour match. That was a nice relief! We'll see how good the paint lasts, but to be honest I was really down in the dumps about 2 days into this job, so everything now is an upside!
IMG_8632.JPG IMG_8633.JPG IMG_8634.JPG

putting the wings back on went well, except the radiator has started to leak (maybe I banged it) so it's off to get re-conditioned. The wings all went in fine and lined up well. The bonnet went to smooth, and that was great news as I had to weld on the hinges to the new bulkhead part - They used to be high as the previous owner wanted to maximise the draft to keep the engine cool. I always wanted to change it back, now I have and was very please that is all fits perfectly.
IMG_8698.JPG IMG_8698.JPG

Doors lined up perfect - couldn't believe it!! Only thing that didn't line up was the windscreen hinges. I had the old kind but they have seen better days so I have got some black Alu ones now. Smart and simple but it was a real pain to get it all on and neat. Lots of loosening one bolt to get the other in, etc etc. But in the end it's on and it's straight. I can't believe it's not warped!!!!

The only thing that really didn't work very well is the drivers washer jet. The holes don't line up so it's at a slight angle rather than perpendicular. So I've sealed it in using some SicaFlex and we WON'T mention it again.
 

Attachments

  • IMG_8697.JPG
    IMG_8697.JPG
    498.4 KB · Views: 85
Today - had a great day, with tidying up some things... and deciding 'screw it' I'm going to put the roll cage on.

I have been measuring and re-measuring everything, but there is not really a fixed point to work off, considering the cups on the outrigger at the front are not totally snug inside the roll cage and the back piece has some room with the bolt holes. But hey - gotta start somewhere. So measured the front holes and went from there....
63c550da-0235-4757-934d-fc355b2b7d30.JPG 386a5dca-4bf3-42d0-84a4-0fa059df4e0b.JPG

Next will be to get the height and positioning just right and then bolt everything up and secure it. Annoyed that I bought some grommets to seal round the front holes but stupidly didn't think that the hole would be a bigger circumference as the hole is 'wrapped' over the body. Oh well, more sealant needed. Very pleased though, a major piece of the puzzle.
de58c042-4215-491f-8c0e-ec259fd11707.JPG
 
Right as a closing statement...

before....
IMG_8103.JPG


After...
de58c042-4215-491f-8c0e-ec259fd11707.JPG


Things I've learnt.
- Cut away the minimum you can. Small piece, just because the repair panels come in nice big sections, doesn't mean it's easier to use the full thing. Small bits keep the shape and are easier to weld.
- Overlap the weld where ever possible. Even using the replacement panels you can push them under the metal still on the bulkhead and then fill in the edge. Stronger and easer.
- Don't scrimp with the sanding back when prepping for painting. I did, I thought I had it completely smooth. That error will haunt me for years.
- A dremel is a good tool for the smaller areas where a angle grinder doesn't really fit.
- I am bad at estimating how long work like this takes.
 
Well it looks like a job well done:) you should be pleased with that work.

And it’s always good to admit to learning from your own work, trick is to remember it:D.

Oh the guy looks like he’s eyeing up your landy, he’s looking a bit cagey ;)

J
 
Looking very good, you do need a fair bit of space around roll cage tubes as its amazing how much movement there is even though it feels totally solid.
 
Amazing job - my 1986 90's bulkhead was last repaired around 20 years ago and is in need of some work now, especially at the top corners (can't complain at that length of time I've had from it though) - thanks for all the tips and info. I'll be referring back to these posts quite a bit. Still apprehensive about tackling it though.....
Landie up north.jpg
 
Back
Top