Boot floor

This site contains affiliate links for which LandyZone may be compensated if you make a purchase.

arienol

New Member
Posts
334
Location
Work London - Home Norwich
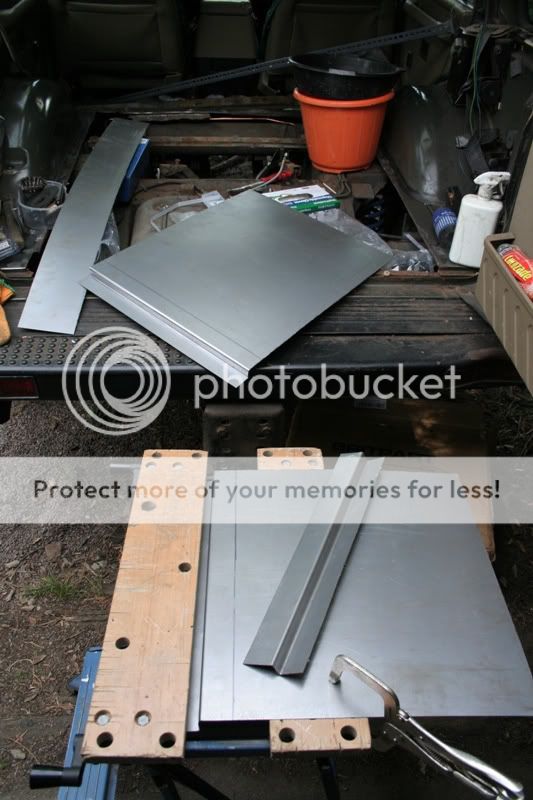
A little something to keep me occupied for the weekend...I've had to completely cut out the flange around the edge of the boot floor panel and will need to fabricate new sections and weld them to the side panels (which thankfully are solid).

Salvaged both of the thicker crossmembers, the thinner 'strap' type supports were completely shot so I will be fabricating a couple of replacements for those too.

_MG_0097.jpg
 
Looks in better nick than most. Dont replace the straps with like,buy a couple of the proper ones and use the old good ones as well,that way you get good support in the load area.
 
Looks in better nick than most. Dont replace the straps with like,buy a couple of the proper ones and use the old good ones as well,that way you get good support in the load area.

Good suggestion - when I stripped out the interior out I was surprised to see that both of the wheel wells/arches were in pretty good nick, boot floor and surround was totally gone though. There is a bit of rot on the top of the pass side arch (you can see a brown stain in the photo) but I should be able to patch it without too much hassle.

Also going to replace rear brake pipes and hoses and clean/bypass the fuel sedimentor while the floor is up.
 
Take the opportunity to get a really good look at the pipe unions on the fuel tank top , they are a common place for crud build up leading to pinhole rot and hence air in system. So,a really good clean and make sure the access panel goes back nicely.

When you are there,have a look at the bushes and so on that you usually only see from below. Clean out much and scrub and paint all the chassis you can reach,or schutz it. Also get some paint on the bottom of the new floor,not right up to the weld edges obviously,but its worth doing it well then you wont have to do it (to this one!) again ....good luck mate and show us how you get on.Have a think about replacing the sponge liner with closed cell foam,camping bedmats are cheap and good.
 
Quick update:

Salvaged both main crossmembers, one needed patching.
Obtained two lengths of rectangular box section which I'm going to use to replace the thin 'straps' the floor is also supported by. I've fabricated all the repair sections to sit around the edge of the floor, I will plug weld these to the solid metal which I cut back to.

_MG_0122.jpg


_MG_0126.jpg


Brake pipes replaced from the ABS connections near the passenger side wing back, took opportunity to fit extended braided hoses. Stripped a thread out of the brass union on the axle whilst removing old hoses, £17 for the replacement part!

_MG_0115.jpg

_MG_0125.jpg
 
looks like your doing a proper job on that, when my floor needed doing i could'nt be arsed to mess about with all them edges and support straps,instead went to local fadricator and got them to cut me a new floor out of 4mm thick steel plate.this covered the whole rear floor in 1 piece best bit was it only cost £20 and 1 1/2 hours to full seam weld it in place.no more rusty floor for me.
 
looks like your doing a proper job on that, when my floor needed doing i could'nt be arsed to mess about with all them edges and support straps,instead went to local fadricator and got them to cut me a new floor out of 4mm thick steel plate.this covered the whole rear floor in 1 piece best bit was it only cost £20 and 1 1/2 hours to full seam weld it in place.no more rusty floor for me.

Yeah could of done that I suppose, I work away a lot so I bought the boot replacement panel a couple of weeks ago from Island 4x4 when I knew the job needed to be done - don't have a lot of time to get to steel stockholders unfortunately (with the exception of today, to get the box section...)

If it's just one big sheet wouldn't it be a bit flexible, for example if you put a heavy weight in the middle?
 
I dont think 4mm plate is going very far.....but personally would have gone for some crossmembers too. the bloke at my MOT fave cuts me a lot of slack (but doesnt compromise on safety) and he like to see things substantially as they were when the vehicle was built. Before anyone starts in , this is a subject that has been much discussed (with the inclusion of MOT testers) and is open to interpretation as to the regs.

Me, I just like to keep the man sweet and do it how he wants to see it. Others have different situations and opinions.

OP....Im sorry my suggestion caused you more work and expense....but not sorry enough to pay for it ;) :D.....how did you fabricate the Z sections and what out of ? I have an old manual Clarke sheet bender that restricts one to the width of the piece to be folded....looking at your pics,are you in the same place ?
And get that bloody chassis painted !!!!:D:D:D:D
 
Getting some paint on the chassis is one of the jobs on the list :) For some reason it's only scabby on the inside of both rear spring mounts, the rest seems to be absolutely fine, probably just the fact those sections are inaccessible for washing.

Fabricated the sections using the same trusty old Clarke sheet bender! I'm using 1.2mm sheet which once folded is suprisingly rigid - this is actually thicker than the max specified by the machine, but it works just fine. The minimum distance between folds I seem to be able to get away with is about 15mm.

Ben
 
forgot to say i welded box section across top of chassis before welding the floor in.the way i did it meant i could drill through floor and box section for my seat belt mounts.it might be a bit over the top for a boot floor,but now i know it wont rust through and i can throw owt in the back with out it bending.
 
Back
Top