Series 3 Big dent/crack on rear panel - thoughts?

This site contains affiliate links for which LandyZone may be compensated if you make a purchase.
Posts
15
Location
West Sussex
Hi all,

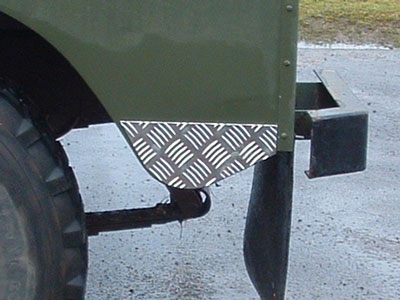
What are your views on what I should do with this (see photo below)?

  • Is it something a normal garage would be able to fix (I lack the tools/knowhow)?
  • Or would it be necessary to use a Land Rover specialist like Gumtree 4x4 (my nearest one)?
  • Or is it a case of sourcing a new panel?

As ever, thanks for your help.
 

Attachments

  • B4DB38A5-B2A7-4927-856C-3CF3E62CE6F4.jpeg
    B4DB38A5-B2A7-4927-856C-3CF3E62CE6F4.jpeg
    321.7 KB · Views: 336
As its been filled before I would suggest body filler and sand paper. For the top one.
Similar for the bottom one but rivet on a pre-made corner protector over the top (not a checker plate one it'll look crap).
ff000514.jpg

They do them in all sorts of sizes and prices and you can get them that fit inside the panel if you want the unmolested look.

Any body shop will do it for you but all you will need is a block of wood, a tin of filler and a few sheets of sandpaper.

You can get the body shop to paint it when done or break out the cans.
 
I would aagree with the above, you dont want to be changing the panel, to change the side is a very big job, would be easier to swap a complete tub if you can find a straight one, but still a big job. Best bet if you weant it smooth would be to give a skim of filler, sand a repaint as suggested above. However, I personally prefer the work worn look and belive the dents are part of the story with a working vehicle this age. This is why when I repainted my sereis I removed all the filler back to metal and then painted it. It is not a smooth concourse finish but looks far more authentic to have a slightly dented painted panel, also looks far better than poor filler and you dont have to worry about the filler cracking again in the future.
 
Hi Rugby & LRs
Or would it be necessary to use a Land Rover specialist like Gumtree 4x4 (my nearest one)?
They are good but expensive as you probably know. Not many good independents in Sussex. Nearest to me in E. Sussex is C R Allen, been around for years but have got progressively more expensive since they've gone from tractors and series trucks to D3s, Evokes, Disco sports et al. Also Paul Rutter in Bognor. If you know of a good indie in the Sussex area please let me know!
Unless you're looking for a concourse finish, as others have said filler and plate will sort it much more easily and cheaply than panel bashing ali or fitting a new panel.
 
Dings n dents within reason are part of the provenance of a classic vehicle like a landy. You might not expect it from say a 1960's or 70's classic sports car but a landy is a different thing.:confused:
 
I agree with all those who advocate doing this yourself. When it comes to Series Landys all repairs begin at home (even if they don't all end there...), one of the (dubious) pleasures of series ownership is doing your own repairs. Get some blocks of wood and a hide mallet and get it as flat as you can then use a panel beatng hammer (a few £ off e-bay). I agree with getting rid of the filler too, Series panels are flat so they flex a lot. My intial attempts are panel beating were rubbish, but now the results are getting better and I'm going back to old repairs and doing a better job, with no filler that's easy to do. Birmabright is very tough and it work hardens so its not easiy to find panel beaters with the right expereince, you may find you're being charged the penel beating rate for a filler job.. I'm also a fan of rivetted patches, they are good enough for aicraft why not a series?
 
Hi, if it was me i would cut it out and replace the damaged bit only. it is IMO a very simple and satisfying task and all you will need are snips, rivets and rivet gun, filler sandpaper and paint of course
when i have done this in the past after the rivets have been put in place, i flatten them with a dolly, but two hammers will do the same job and it in a good place to do it.
For me there is so much satisfaction in doing it myself and getting the rewards of looking at it as my own work
 
I rivetted a patch on mine recently and I'm pleased with it. I used 2mm sheet and chamfered the edge. 1/8 countersunk rivets. Once painted the rivet are vitually invisible. I wanted to joggle it and let it in flush, but it was right on the tub joint line so it had to be done from one side. Patch is about 30" long and 3" wide and hardly shows. Mine is ex-mil and it had the extra steel angle in the tub, this had galvanic corrosion and was forcing the tub side out. Got the steel out, rivetted in an ally angle then patched over the top, good for another 47 years...
 
Back
Top