And Here We Go Again: A Discovery 2 Story

This site contains affiliate links for which LandyZone may be compensated if you make a purchase.
Posts
12
Location
Doncaster
IMG_2162.jpeg

Delivery!
 
So here’s the truck:
IMG_1636.jpeg

This was taken when I bought it back in 2018. The reason this project thread is so titled is that it’s been on and off since the end of 2020 and as you’ll see from the above, I’m about to put it on a new chassis. I’ll catch you up on the last few years and then try and keep you all updated on the chassis swap and other works.

So December 2020 saw me take it for an MOT to a different test station than I had been using and I’m not saying any more than that.
The latest test basically showed up a rotten back end and some unsatisfactory chassis repairs:
IMG_6886.jpeg
IMG_6890.jpeg
IMG_6891.jpeg

Yep, that’s cardboard.

With the fuel tank out, the inside of the chassis rails showed the worst of the corrosion:
IMG_7047.jpeg
IMG_7049.jpeg
IMG_7051.jpeg


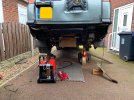
So I got one of these:
IMG_7045.jpeg


And some new toys:
IMG_8398.jpeg


Cutting the old back end out, cleaning up, prepping and welding in was fairly straightforward. I used the rear body mounts to locate the new back end, but I’d also measured the distance between the cross member forward of the fuel tank, back to the original rearmost cross member, so I could use that as a reference too. I also refitted up the rear bumper, prior to welding, so check alignment with the bodywork. And after some minor adjustment, welding commenced.
I also patched the chassis in a couple of places, inside mid frame, making good the previous “repairs” and the end result was she passed the MOT with an advisory for chassis corrosion and heavy underseal. I was certainly happy enough as I knew it was definitely a lot more solid that it had been. But also, that I’d now be needing to check and repair as needed going forward.
 

Attachments

  • IMG_8391.jpeg
    IMG_8391.jpeg
    471.7 KB · Views: 32
Morning. So fast forward back to present day.

Up, up and away!

IMG_5233.jpeg

At this point, most of the interior is stripped, so a load of weight is out. All mount bolts are out. I wish I’d known earlier the two inner ones at the front of the boot sparse had captive nuts on the chassis!
IMG_5242.jpeg
IMG_5243.jpeg
IMG_5234.jpeg

Just lifted bit by bit with bottle jack under the sills (now that there is a RHS sill!! - story for later) and blocked on the body mounts as I went
IMG_5235.jpeg
IMG_5249.jpeg

Breeze blocks: cheap, cheerful, very effective (nod to whoever on here I got the idea off - sorry forgotten who)
IMG_5251.jpeg
IMG_5253.jpeg

Just enough…

IMG_5254.jpeg
IMG_5256.jpeg

Temporary support while I pull the chassis out and move the blocks. Two 4x2 screwed together on edge.
IMG_5259.jpeg

And done.

All in all, I found it quite straightforward, just steady away. I think it took me longer to get all the bolts out that it did to lift the body.
 
So back to the old chassis. Slackened off all the radius arm bolts. I’m going to fully rebush the arms but you can bet that if I took the axles off first, I’d have a right job slackening the bolts when hold the arm to the axle. As luck would have it, plenty of WD40 and a breaker bar and they all came loose fairly easily. I just worked the nuts up and back a bit by hand (no ugga dugga’s) rather than forced the nuts over the somewhat corroded threads.

Getting the prop shaft and exhaust out of the way first obviously helped.


IMG_5408.jpeg
IMG_5407.jpeg
IMG_5413.jpeg


I’m just going to cut the anti roll bar links. They’ve seen better days and I’ll just replace rather than try to fight them off.

Front radius arms to chassis bolts were a bit more of a fight, especially on the LHS. Had to remove the exhaust, but once disconnected from the turbo, I found it was impossible to remove without the cross members coming off. So, I set about that, but quickly discovered that you cannot get a regular 13mm spanner in to hold the nut and of course, too rusty to hold with pliers! 😡

IMG_5411.jpeg
IMG_5410.jpeg


Angle grinder sorted it. 👍

Next out will be the fuel tank, then onto the front axle panhard rod and steering link.
 

Attachments

  • IMG_5414.jpeg
    IMG_5414.jpeg
    404.9 KB · Views: 24
Back
Top