Aaron's 90 rebuild (round 3)

This site contains affiliate links for which LandyZone may be compensated if you make a purchase.
looking good chap! Thanks for showing that brake line routing... that's my next job after the poxy gearbox is in, so I'm glad to see another for comparison. I guess I've got the same pain ahead too regarding drilling the holes!
 
All looking good. Glad to see you've got some little friends to help you. Are they new additions to the Morris household?

Cheers Brown :) The one pictured is quite a new addition, but they're always coming and going in our household.

Not interested in the landy anymore - that dog is gorgeous!!!! I need one! Where can I obtain such a pet? Will it stay that cute forever? Is it good with kids? It could come with us in the landy and chew the dashboard and everything:)

Haha, sounds about right chewing the dashboard :eek:
Where can you obtain such a pet, well here would have been the answer as he was for sale :eek:She always sells the good dogs..

I, that's a bonny dog all right!
It's looking good, Aaron. The weather is, hopefully, on the turn and so no need to rush. I know you like to crack on though. :)
Hard to tell from the pictures, do the cappings sit tight against the body panels? Mine have an annoying gap.

Cheers bud :) Not rushing, well maybe a little, but trying to make things work for the long easter weekend and want the tub painted and fitted so I can spend the 4 days off digging all the panels out and trying to set the bulkhead up before going on to paint all the doors, sides, roof etc..
But yes, if the weather stays like this it would be nice, well just not any colder really.
As for the cappings, they was only sat in place, they do actually have a gap from factory down the sides, was only a quick try to see if they was anywhere near, didn't want to rivet them all on to have to drill them out again, job for easter weekend and then I'll know more :)

There must be two of them. You can see somebody's legs sticking out from under the rear tub as well as the dog in the foreground. So that's twice as cute!

2 of them :eek: Try 8 :eek::oops:

Mine was a bit different as I have both tanks, but I just joined the rear tank to the TDi tank wiring near the front tank via a switch. It works fine with the original gauge as far as I can tell.

Ah, no worries, think I know which direction I'm heading in now, other than the fuel pipes, rubber hose doesn't look very factory, so was thinking about using plastic stuff, not sure yet.
I'd like the proper things, but that would cost the best part of £200 :eek:

Looks really good Mate
wish i had the gits to paint mine
would save me a small fortune, and lots of stress

Cheers mate :)
End of the day it isn't perfect but it's good enough for me, it all depends what you want, if I paid someone £1500 (or whatever the going rate is now) to paint mine and I scratched it I would be 'kin pissed off.
Do it myself and it costs me £300 or so in paint and prep type stuff, scratch it, not a major, usually have some left to re-do a panel or so, even though I would still not be happy.
 
Crikey, stuck too day 2 and top coat is on, will do another coat tomorrow evening and if some rivets have turned up by then I will get the galv tub supports fixed on.

 
looking good chap! Thanks for showing that brake line routing... that's my next job after the poxy gearbox is in, so I'm glad to see another for comparison. I guess I've got the same pain ahead too regarding drilling the holes!

No worries, give me a shout if you need any more and I'll grab some.
And yes you do. Highly annoying :mad: no reason why they couldn't just stick half a dozen holes in their.

Hi aaron, are you leaving the cappings bare galv? I think they'll go very well with the colour green you chose :D

That's the plan me owd :D Will have to see what they look like when the tub is painted this weekend and make a decision.
 
Had another hour or so in the garage tonight, got another top coat on.
Again I have used some self adhesive closed cell foam on the underneath of the supports to try and isolate them and the ali floor.


Got them riveted on, and a couple of new rubber pads riveted on and the jobs a good 'en.
Ready to flip it back over tomorrow and start flatting the primer.


My fuel tank guard turned up today aswell.
It's bloody heavy, and seems pretty solid. Chuffed with it for the money.

 
Proper job, Aaron! :)
You are doing the right thing with the foam and rubber, the more you can pad the metal components, the better for corrosion and noise reduction.
Tank guard looks very solid, is that Paddock HD?
 
That's an awesome picture! :)

Haha, seemed a good opportunity at the time too :) Things have changed a little since, some have gone, some others have arrived, but still the same old mad house :eek:

Proper job, Aaron! :)
You are doing the right thing with the foam and rubber, the more you can pad the metal components, the better for corrosion and noise reduction.
Tank guard looks very solid, is that Paddock HD?

Cheers Turboman :) My thoughts too.
And yep, it's a Paddock hd one, meant to put that in my post and forgot, doh.
 
Well yesterday was a day of doing a few little bits and bobs.
Got the tank guard fitted, tank just sits on top so that was easy too. Tank guard seems very solid and is bloody heavy.
Ran the fuel lines from the tank down the chassis rails along with the wiring loom. All p-clipped, and used 20 of the buggers :eek:
Wiring loom was put in some split copex type stuff, I ordered 10mm internal diameter and it was a pretty snug fit, could have done with the next size up really, but it's in and done now.
It's all a little tight on top of the chassis rail and isn't anywhere as neat as I had hoped either :confused:


And then about 6:30 last night I started painting the tub.
I was pretty chuffed with progress in the week, another weekend would have been gone had I not had an hour or so after work a few nights, and spent Thursday night flatting the primer, it just pushes it on that little bit further.
But I couldn't be arsed to do that every night, I just haven't got the energy after work, mind you life should be easier at the mo seen as I can lift everything up the scaffold with the tele-handler and not have to lug everything up the ladder, it's bloody heavy stuff that stone :eek: but it doesn't quite work like that..

Tub is painted inside and out, not something I've done before, but it makes it look more complete this way, it annoyed me when I could see white on the inside of my other 90 :mad:


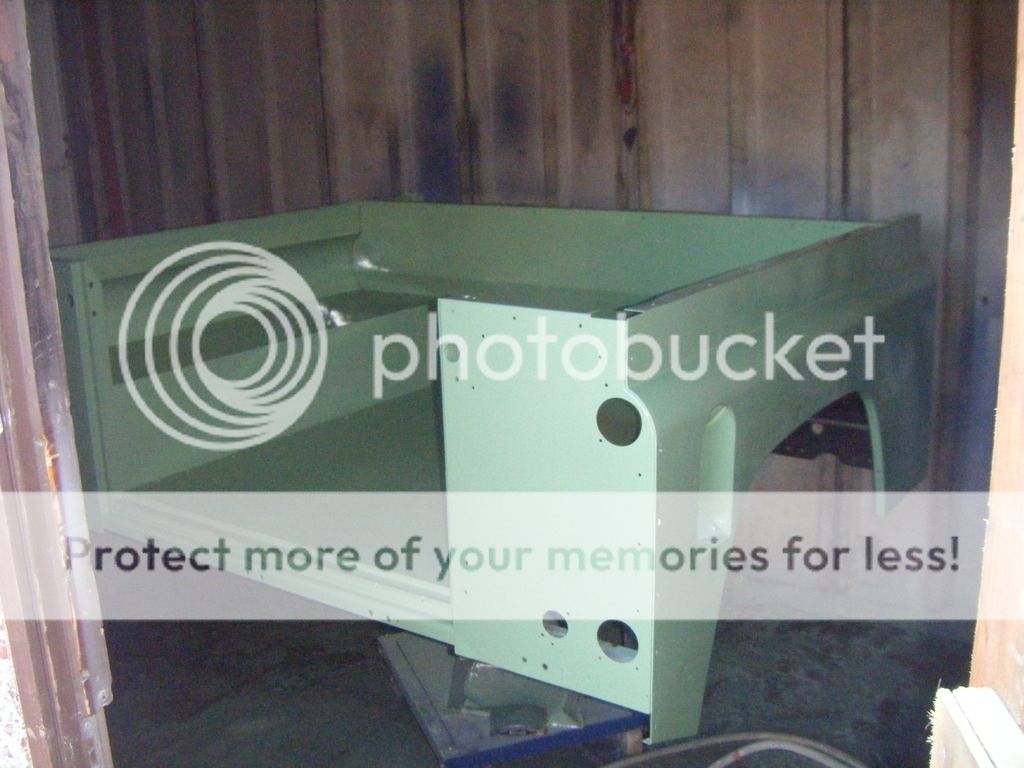
Went out and took these earlier, but will get some more later when I roll it out of the garage.
Today will be much the same as yesterday, doing bits and bobs, need to go and buy a new bottle jack so I can get the centre crossmember in, make a new little extension wiring loom up for the rear fuel tank (never made these style connectors up before, so we'll see how that goes) few brackets to fit to the chassis and then hopefully I can lift the tub on.
 
Looking great, son. And your wiring looks excellent too, I think you are being a bit hard on yourself there. Lets face it, yours is better than the original LR set up along the chassis rail. :)
 
Another day of bits and bobs, first job was to make up an extension loom for the fuel tank.
So 4 way econoseal connector at the fuel tank end, only 2 wires needed (never made these up before so I hope it works :eek:) and then run up the chassis in some braided sleeving.


Fuel tank guard I fitted yesterday.


Went and bought a new bottle jack first thing, so fitted the centre crossmember and then got the tub fitted.


And then started fitting the galv cappings.
Didn't think I was going to get this far, and was going to get an air rivet gun to make life easier, as theirs still the battery box, seat box ends, fly vents and god knows what else still to do yet.
Although it wasn't too bad doing all by hand.


One side down, one to go.


And done, although I have run out of rivets for the tops.
Why I only bought 100 I'll never know..


And that's it until next weekend folks, apologies for poo picture quality as usual, I know I keep threatening to buy a new camera, and I will eventually.. :oops: Not like I've even got one on my phone.
 
Nice work, what's the paint? 2k? I get what you mean about paint the inside, that's why I've bare metalled most of mine.

Yep 2K. Not got the patience to bare metal mine, but doing a proper job this time and at least painting inside and out, looks so much better than having several different colours when you get inside.

Looking great, son. And your wiring looks excellent too, I think you are being a bit hard on yourself there. Lets face it, yours is better than the original LR set up along the chassis rail. :)

Cheers bud :) It looks ok, I just had visions of it being all perfect and in a nice straight line and not like a snakes belly, but I'd have to clip it every 6" to get it like that, guess it's just the nature of convoluted plastic, it's never going to be completely flat.

The more i see the color mate the more i like it
that's going to be on start looking truck

Cheers bud :) I do quite like it at the mo, but still not 100% (well am I ever :oops:) still not sure if it's going to be too much once I get the wings/doors/sides on.

ace looking really really great ,,,,,,,,, oh and love the new neighbour friendly fence ,lol

Cheers mate :) And yes, the neighbour friendly fence is great :D
They put it up a few months ago, I thought great I don't have to look at her now, but now I have to listen to her voice shouting at me over the fence..
'Aaron'
Aaron!'
'What is this on my drive?!'
:mad: It's water ffs!
 
Back
Top