You are using an out of date browser. It may not display this or other websites correctly.
You should upgrade or use an alternative browser.
You should upgrade or use an alternative browser.
Aaron's 90 rebuild (round 3)
- Thread starter aaronmorris
- Start date
This site contains affiliate links for which LandyZone may be compensated if you make a purchase.
aaronmorris
Head's a shed
- Posts
- 6,369
- Location
- Doncaster
That's coming along very nicely. Looking great, Aaron. That chassis should be up on wheels soon after it arrives.I'm away next weekend, so I'll probably not see it until I get home from work on Monday night
Cheers bud
We'll see, still quite a few bits to do before I start bolting stuff to the chassis, but the goal for me is a rolling chassis by the end of the weekend As for bushes fitting in the holes, the panhard rod wasn't galvanised, or this one at least, I painted this ages ago ready, so these went in just fine.
The rest, well time will tell, but I have given the holes a little bit more of a clean today with some sanding drum type things.
ay up cocker. think worksop galv is way nearer to you mate, glad you got em sorted, btw, what size tap do you need for axle drain/fill holes?
Ay, only 30 minutes from me at most, just the fact it was an unknown I didn't like mate.
And fill/drain plug holes are 3/4 bspt. Do you need one? You are welcome to borrow mine if you need too.
Discokids
Well-Known Member
- Posts
- 3,160
- Location
- Derbyshire
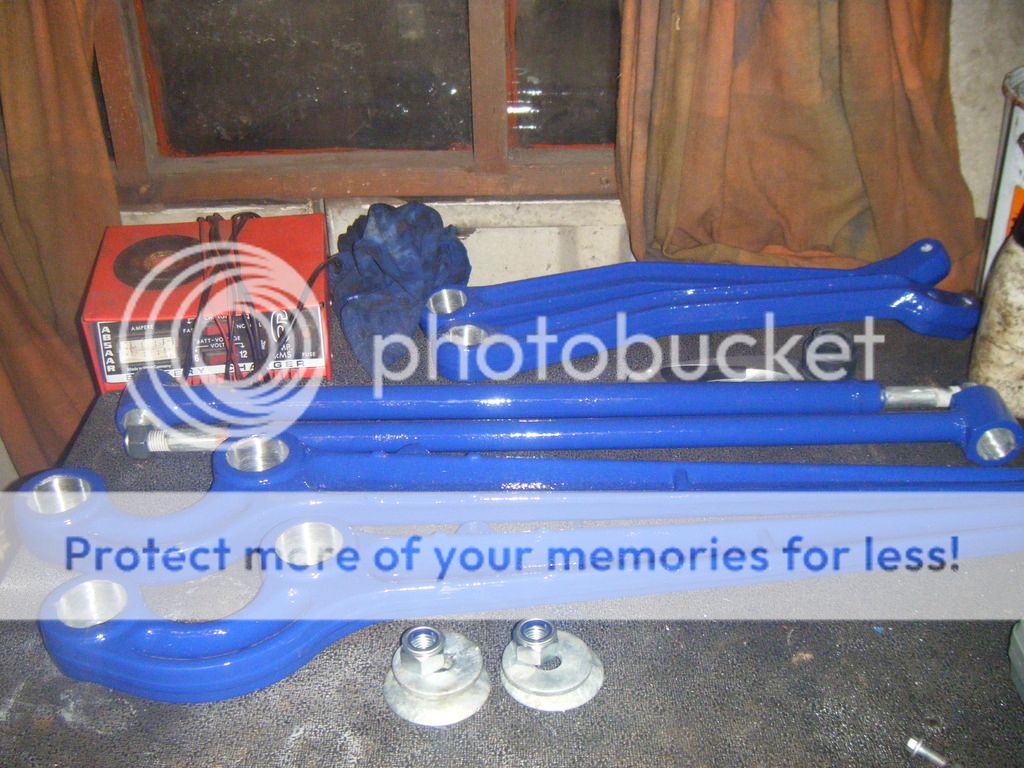
Those axles look fantastic! This is gonna be your best one yet, looking at the quality of some of your work makes me want to re-do some areas of mine, like those calipers and swivel housings. Mine look crap compared to those, but I didn't know about all the different paints available until after I did them (hammerite).
aaronmorris
Head's a shed
- Posts
- 6,369
- Location
- Doncaster
Day off work today, shame I had no parts or such to do much with..
But these turned up to clean the holes out in the radius, trailing and a-frame arms for the bushes.

So got everything down that was hung up, I had already removed the big burr's with a die grinder, but a quick run around with the above brought them up lovely, and hopefully all ready for new bushes now. (due tomorrow I think)

- Posts
- 11,040
- Location
- North of the Wall
That should work a treat, marra. Hope they push in ok. That press is going to earn it's keep.
aaronmorris
Head's a shed
- Posts
- 6,369
- Location
- Doncaster
Those axles look fantastic! This is gonna be your best one yet, looking at the quality of some of your work makes me want to re-do some areas of mine, like those calipers and swivel housings. Mine look crap compared to those, but I didn't know about all the different paints available until after I did them (hammerite).
Cheers
Yours look good and right enough on your build thread bud, and I'll be honest I sometimes look at my own work and think I could have done things differently or better.Hindsight is a wonderful thing, but it's usually too late to do much by the time you realise, but it's why my projects have evolved a little each time, because by the time I have gotten to the end of a project I have learnt something new, a better way to do something, or just better products to use.
That should work a treat, marra. Hope they push in ok. That press is going to earn it's keep.
They seem to have for the most part mate
.
And fill/drain plug holes are 3/4 bspt. Do you need one? You are welcome to borrow mine if you need too.
CHEERS mate. might pop up when i get a minute.[/QUOTE]
No worries, give me a shout closer to the time mate, but you know what I'm like, I'll be about for the most part.
aaronmorris
Head's a shed
- Posts
- 6,369
- Location
- Doncaster
So, a few parts turned up yesterday, mainly new brake pads (the right ones this time) and some new bushes.
Had an hour last night, and they went in for the most part, with exception to the chassis end of the trailing arm, the inner metal sleeve of the bush just wont go over the shaft, so I need to remove a little some how, but a job for another day.
And then tonight I had a reasonably early finish for once, I was home for 4:30, but it had been a miserable day to say the least and I was ready for it, I just love digging and concreting in the rain
So I got changed and got some warmth in me bones and headed out for an hour.
Tonight's jobs where fitting the new brake pads, and I made a couple of new brake pipes to go from the caliper to the flexi pipe.
We'll see how I feel tomorrow night, but if I can be arsed I will put the wheels on the axle and start bolting radius arms etc on.
rathomas
Active Member
- Posts
- 206
- Location
- Via Bristol
Out of interest, what sort of press do you have. I have seen some bent up clarke ones in the past!That should work a treat, marra. Hope they push in ok. That press is going to earn it's keep.
aaronmorris
Head's a shed
- Posts
- 6,369
- Location
- Doncaster
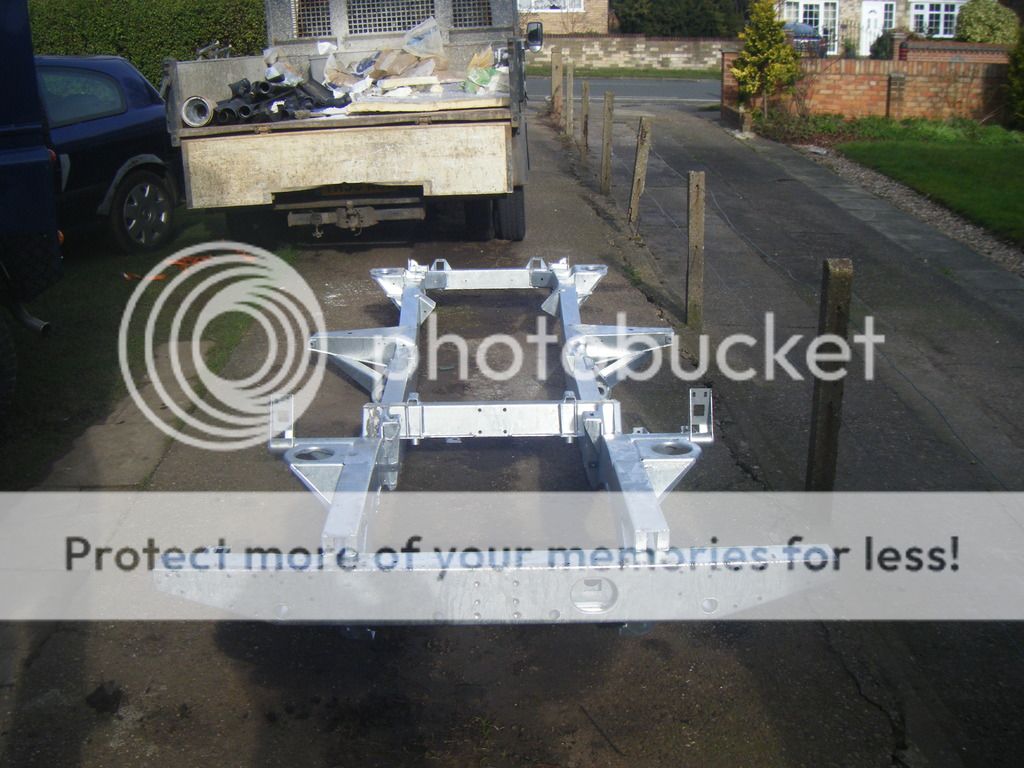
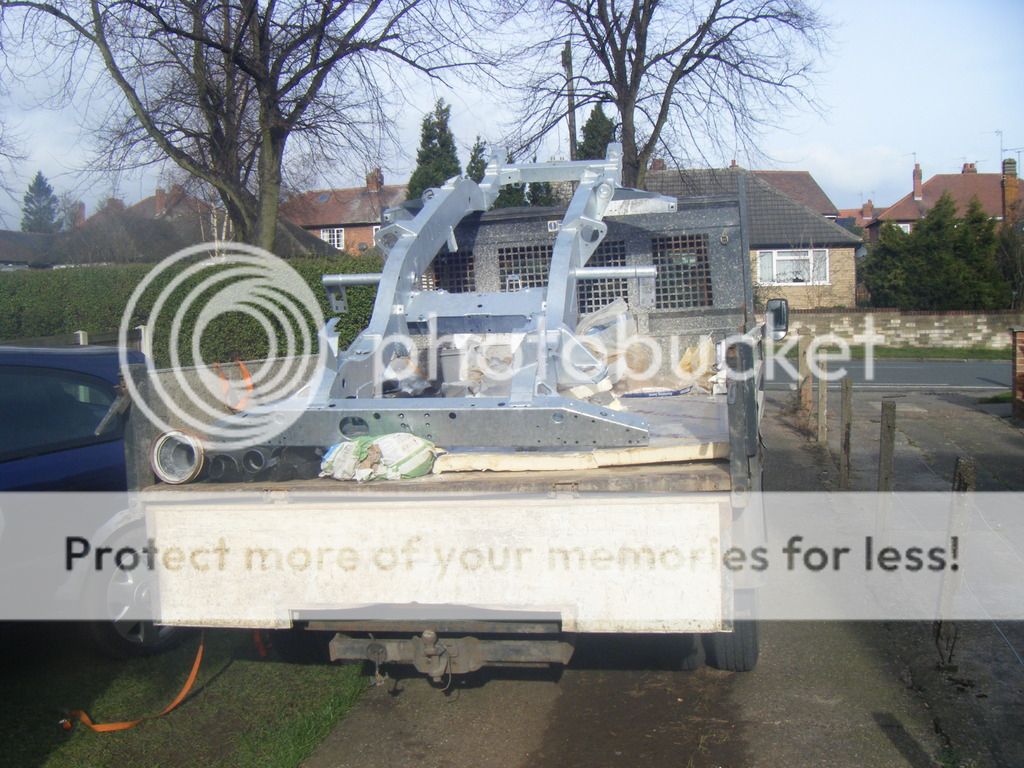
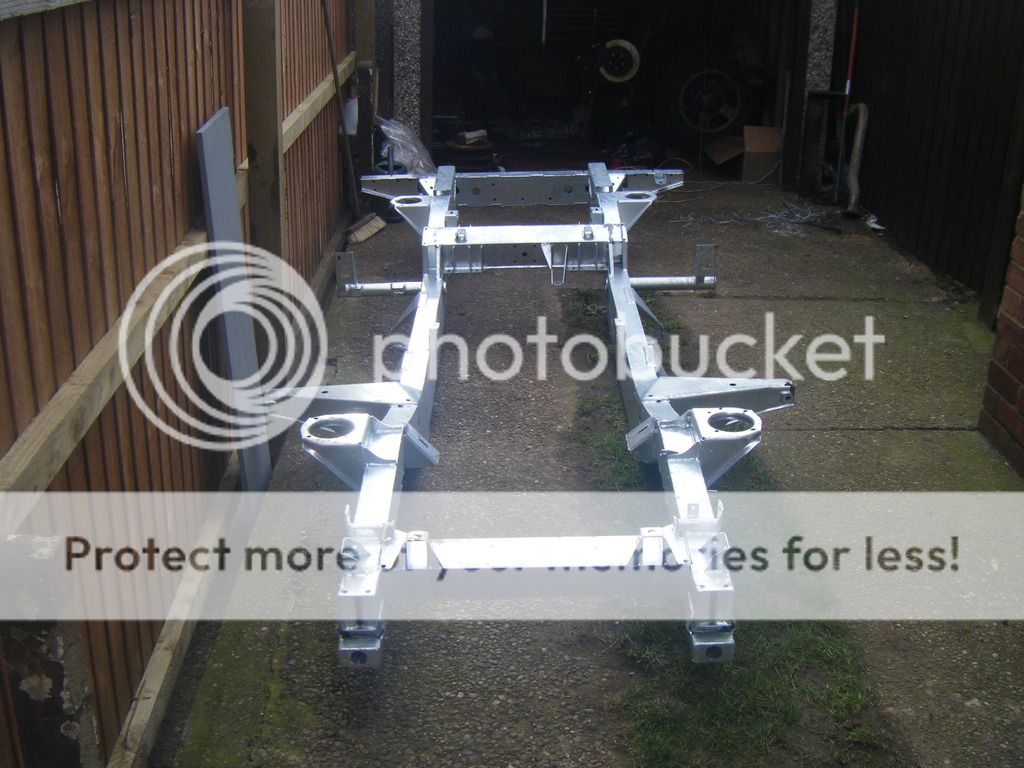
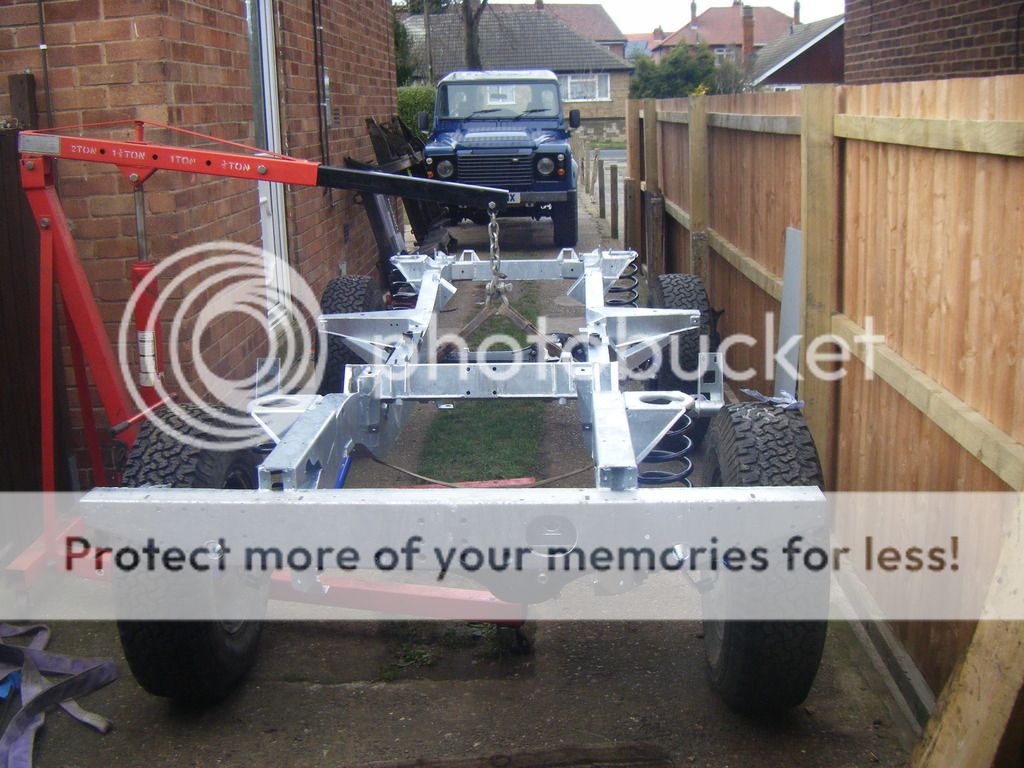
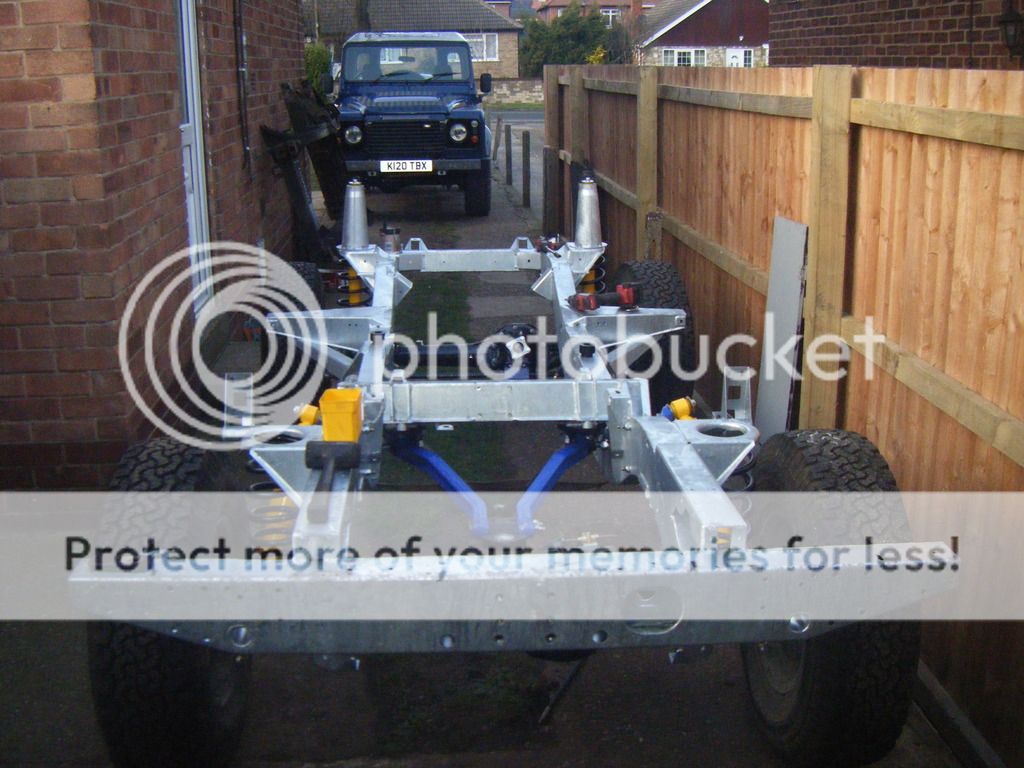
Well it's a start, went and collected the chassis this morning
More to come later
More to come later

Bennehboy
Well-Known Member
- Posts
- 2,260
- Location
- Huddersfield
Oooh shiney!
- Posts
- 1,205
- Location
- The Flat lands of Cambridgeshire
i can sense the midnight oil being burnt shortly.
Reckon you will have that rolling and half the other stuff on by next weekend.
Good luck keep us posted
Reckon you will have that rolling and half the other stuff on by next weekend.
Good luck keep us posted
aaronmorris
Head's a shed
- Posts
- 6,369
- Location
- Doncaster
Out of interest, what sort of press do you have. I have seen some bent up clarke ones in the past!
Mine is just an unbranded one off ebay, think it was about £200 for the 20ton one. Been good upto now, but the pressure gauge has stopped working for some reason.
Oooh shiney!
Yep, 'tis lovely
i can sense the midnight oil being burnt shortly.
Reckon you will have that rolling and half the other stuff on by next weekend.
Good luck keep us posted
Not quite, pretty busy at the mo, but she is rolling
Just waiting for pictures to upload to photobucket and will do a post.
aaronmorris
Head's a shed
- Posts
- 6,369
- Location
- Doncaster
So first things first, and as I posted earlier I went and collected the chassis this morning.
This was easier said than done, I was borrowing a van and he said 'yeah theirs a few bits in the back but it should fit on top'
A few bits! It was bloody rammed.. So I had to go back home to empty some stuff out, half a dozen battens, a few tressel's, half a tower scaffold, 2 wheel-barrows and god knows what else!
Well that kinda' put me behind schedule, and by the time I'd been and collected, came back and dropped it off, filled it back up with the other shit'e and took it back it was bloody dinner time.
I have gone for td5 fuel tank mounts too, whether I use them or not is another matter, but I'd rather have them and not need them, than not have them and want them, for the sake of £50.


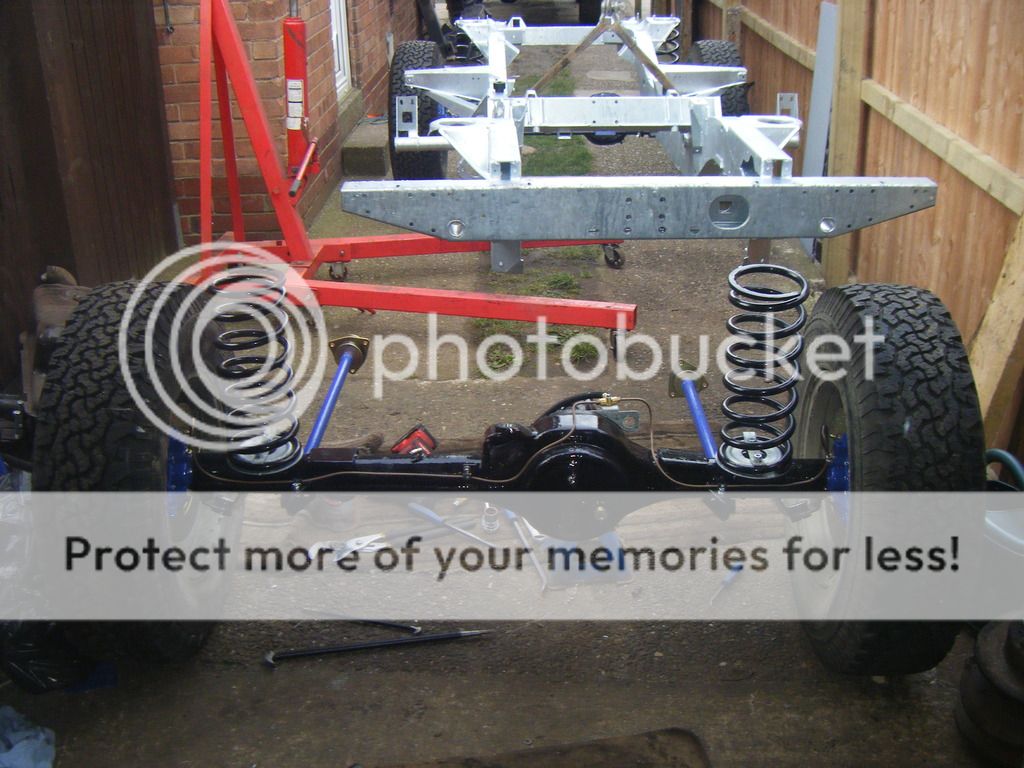
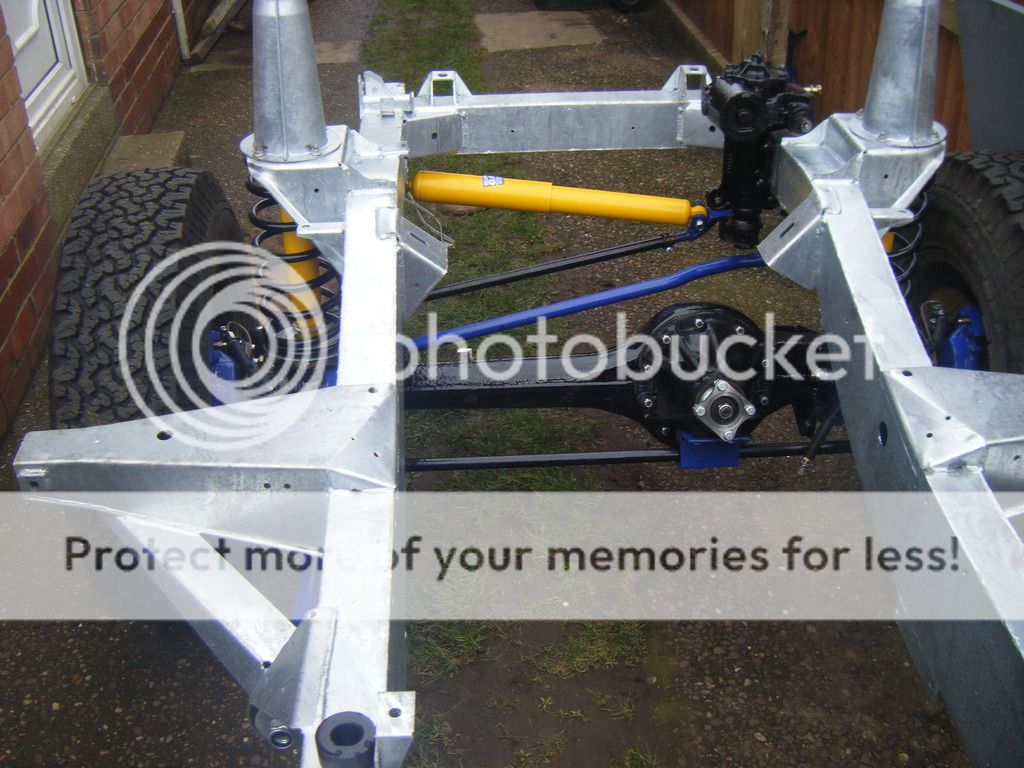
Before I started assembly I had to get the radius arms etc on the axles, and wheels on the front one.


And just about ready to go on.


Would have been much easier with a helping hand, but I didn't have one so I used the engine crane and got the front axle under.

And moved onto the rear, and this is where the issues started.
Now I had ordered polly bushes thinking it would make life easier, well.. it didn't.
They just wouldn't sit right in the arm and go into the chassis bracket, after trying for a while I though bugger this and went for a look in the shed to see if I had any standard bushes, I did and they pressed straight in!
The next was the chassis end bushes, the inner sleeve just wouldn't go over the end.
Not even the threaded bit, so I'm not sure if that's a fault of mine with galv etc.. or the bushes supplied.
So I spent god knows how long with a die grinder amongst other things trying to reduce the diameter a little.
I must have wasted a good 3 hours fucking around But it's sorted now.
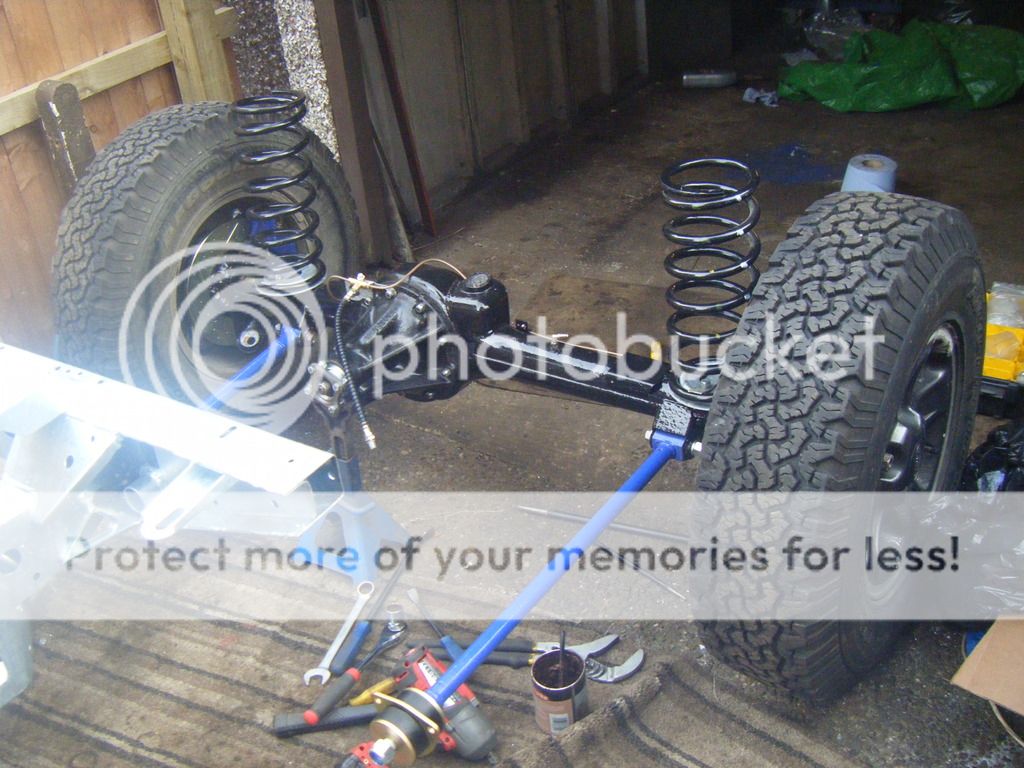


And got it rolled under the chassis.


Got the A-frame arms and brackets on, and rear shock mounts.
Fitted the shocks, front/back and a set of galv shock turrets.
And their you have it, a rolling chassis


I had hoped to get a little more done today, but things rarely go to plan, and I'm happy with what has been achieved today anyway
Will do a little more tomorrow, but my main priority is to sort the garage out so I can get the chassis in their out of sight until next weekend.
Need to do some paint repairs too where it has been damaged, but I will do that as and when.
Got a bloody toolbox in their I sold on ebay and hasn't been collected yet and want's to send a courier Just in the way now.
This was easier said than done, I was borrowing a van and he said 'yeah theirs a few bits in the back but it should fit on top'
A few bits! It was bloody rammed.. So I had to go back home to empty some stuff out, half a dozen battens, a few tressel's, half a tower scaffold, 2 wheel-barrows and god knows what else!
Well that kinda' put me behind schedule, and by the time I'd been and collected, came back and dropped it off, filled it back up with the other shit'e and took it back it was bloody dinner time.
I have gone for td5 fuel tank mounts too, whether I use them or not is another matter, but I'd rather have them and not need them, than not have them and want them, for the sake of £50.


Before I started assembly I had to get the radius arms etc on the axles, and wheels on the front one.


And just about ready to go on.


Would have been much easier with a helping hand, but I didn't have one so I used the engine crane and got the front axle under.

And moved onto the rear, and this is where the issues started.
Now I had ordered polly bushes thinking it would make life easier, well.. it didn't.
They just wouldn't sit right in the arm and go into the chassis bracket, after trying for a while I though bugger this and went for a look in the shed to see if I had any standard bushes, I did and they pressed straight in!
The next was the chassis end bushes, the inner sleeve just wouldn't go over the end.
Not even the threaded bit, so I'm not sure if that's a fault of mine with galv etc.. or the bushes supplied.
So I spent god knows how long with a die grinder amongst other things trying to reduce the diameter a little.
I must have wasted a good 3 hours fucking around
But it's sorted now. 


And got it rolled under the chassis.


Got the A-frame arms and brackets on, and rear shock mounts.

Fitted the shocks, front/back and a set of galv shock turrets.
And their you have it, a rolling chassis


I had hoped to get a little more done today, but things rarely go to plan, and I'm happy with what has been achieved today anyway
Will do a little more tomorrow, but my main priority is to sort the garage out so I can get the chassis in their out of sight until next weekend.
Need to do some paint repairs too where it has been damaged, but I will do that as and when.
Got a bloody toolbox in their I sold on ebay and hasn't been collected yet and want's to send a courier
Just in the way now.
Last edited:
- Posts
- 8,093
- Location
- East Midlands
Looking lovely. It must be so good to have a chassis that you can actually roll about after all that preparation.
James_mac
Active Member
- Posts
- 264
- Location
- Leeds & Yeovil
looking good mate, always nice to get it rolling!! i expect this t be finished in a month :-D
farmershort
Well-Known Member
- Posts
- 1,067
- Location
- West Berkshire
Damn it... You beat me to rolling well done!
Do you happen to know the part number for the rear pad retaining kit? I ordered what I thought was right and got some black metal clips and split pins... The black metal bits are too wide... Deffo not the right part. It's the one thing that isn't in the parts manual!
well done!Do you happen to know the part number for the rear pad retaining kit? I ordered what I thought was right and got some black metal clips and split pins... The black metal bits are too wide... Deffo not the right part. It's the one thing that isn't in the parts manual!
aaronmorris
Head's a shed
- Posts
- 6,369
- Location
- Doncaster
Looking lovely. It must be so good to have a chassis that you can actually roll about after all that preparation.
Cheers and yep
I was going to say that, It's nice to have something to show for the effort so far.looking good mate, always nice to get it rolling!! i expect this t be finished in a month :-D
Cheers bud
Definitely nice to get it rolling. I might have painted the bulkhead in a month Thinking about it and being realistic with myself and time scales, I recon it'll be November/December by the time it is finished.I'm in no rush though, it may take longer than that.
Damn it... You beat me to rolling
Do you happen to know the part number for the rear pad retaining kit? I ordered what I thought was right and got some black metal clips and split pins... The black metal bits are too wide... Deffo not the right part. It's the one thing that isn't in the parts manual!
Haha, cheers
My goal for this weekend was to get it rolling and that's what has happened, so I'm pretty happy.Things will slow down now I would think, as for one I have no engine/gearbox, and I will be moving onto paint, which I need to chose a colour and it's a little cold for it at the mo..
As for pad retaining kit, what you describe sounds exactly like what I have which it correct for my calipers, what you need is like the front ones I think, but I don't know the part number unfortunately, sorry I can't help.
- Posts
- 8,093
- Location
- East Midlands
You might try an RTC5001. It's usually sold to retain the pads on front solid disc callipers, but it's got the solid pins and coil springs you need. And I believe the pins are the right length. https://www.britishparts.co.uk/products/5912-brake-pad-fitting-kit-RTC5001
aaronmorris
Head's a shed
- Posts
- 6,369
- Location
- Doncaster
So, I've done a few little bits and bobs today, but mainly sorting other stuff out.
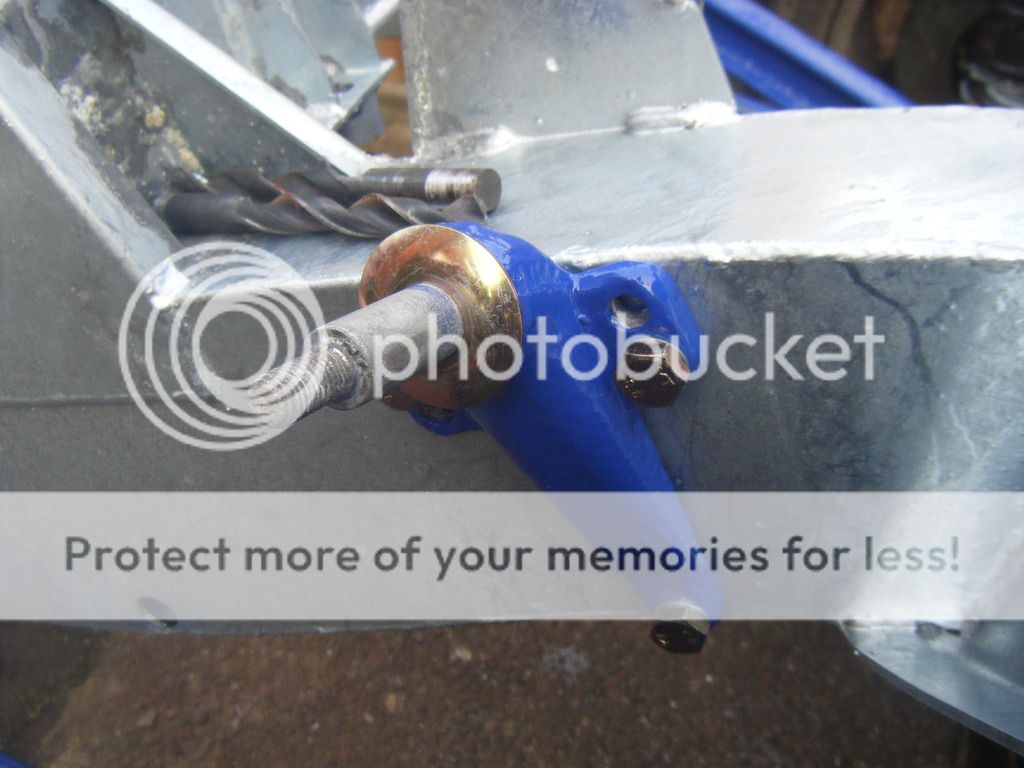
Got bumps stops fitted, steering box, panhard rod, steering damper and a couple of other bits on.


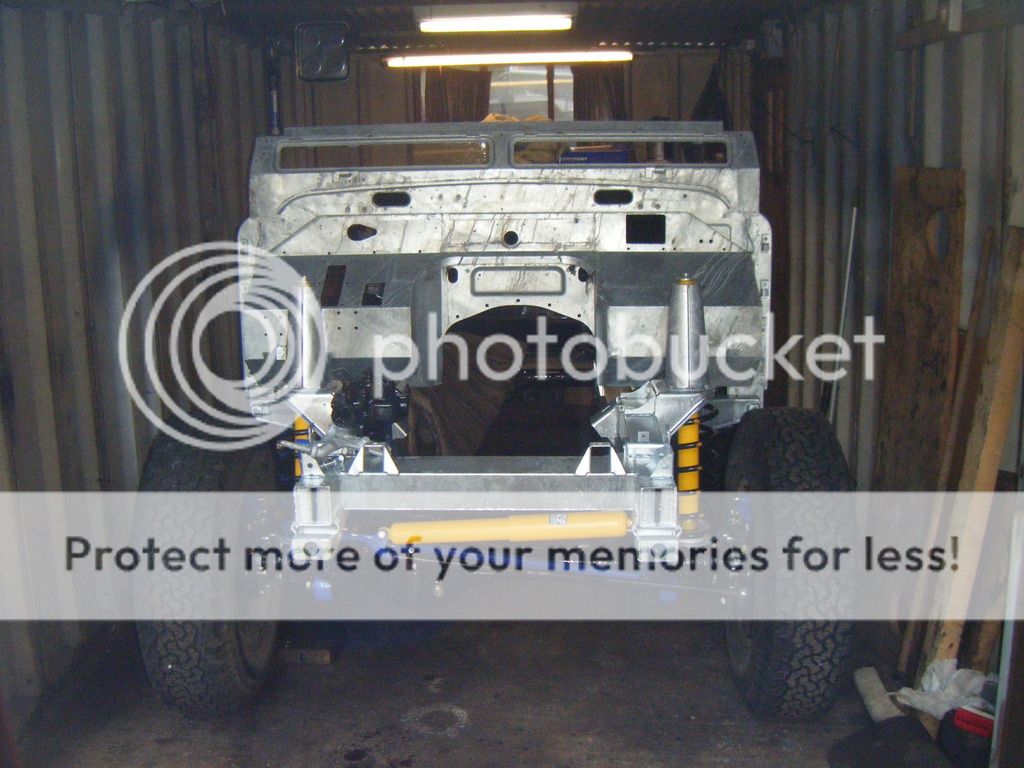
I then tried the bulkhead on the chassis, and it fitted without issue.
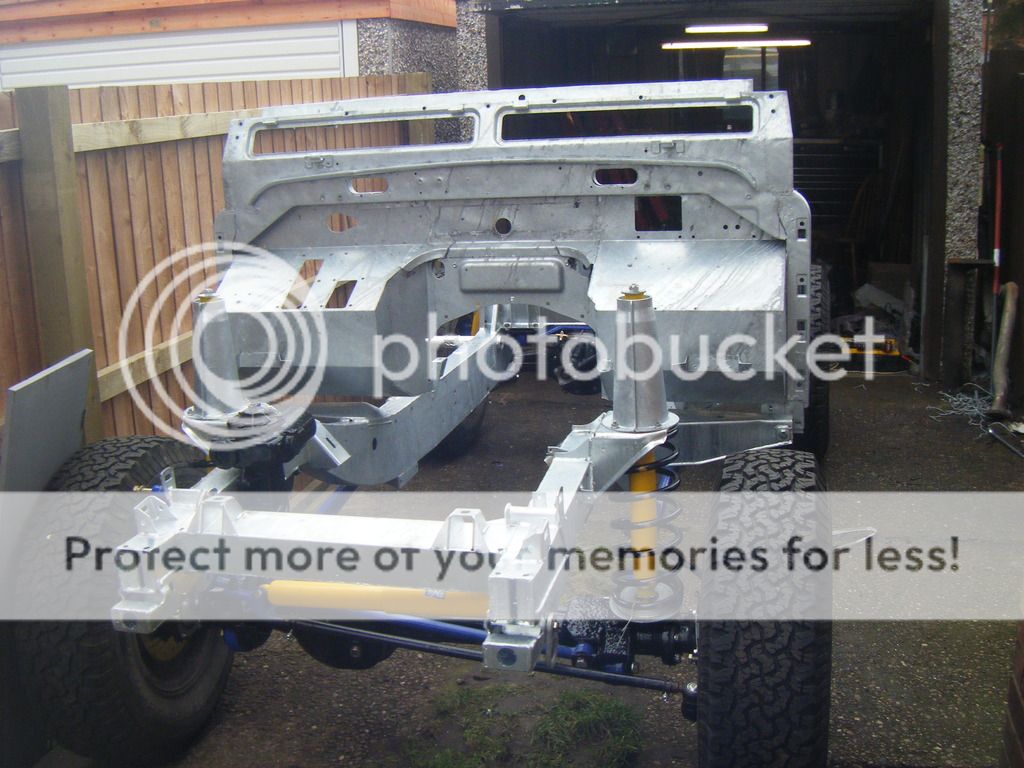
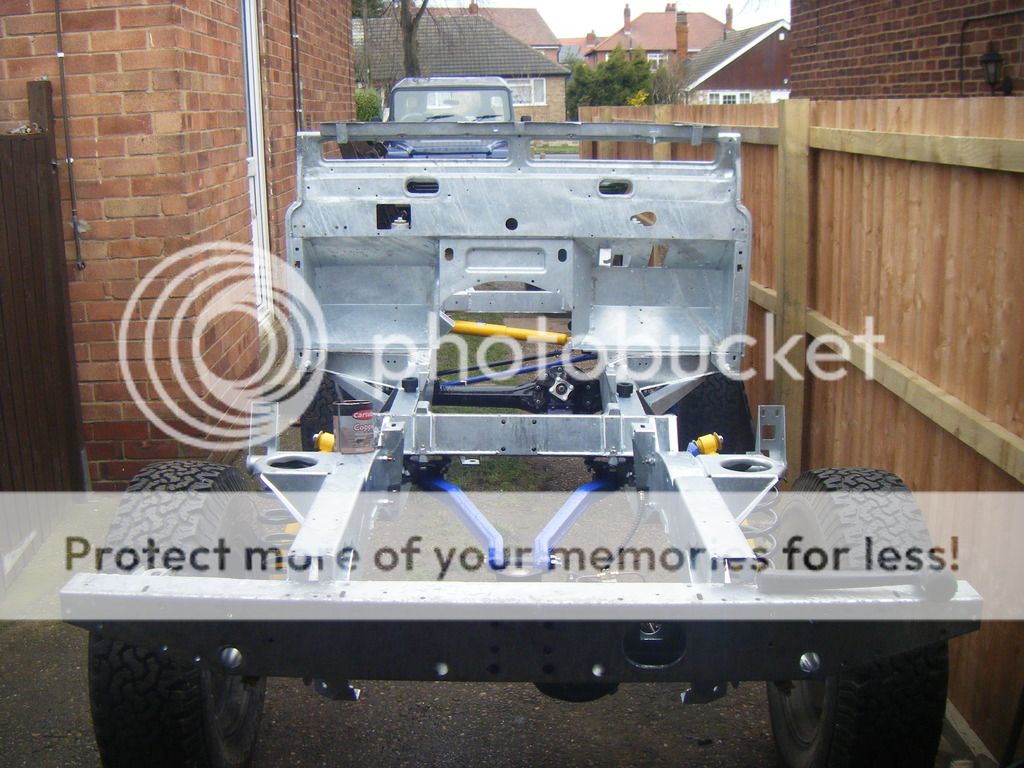
You can see how the galv has sat on where the weld was, but from what I'm told (by a welder) that's just the nature of galv and you can't stop it completely.
So I will lightly sand/grind back and try to get it invisible, although I think getting a good finish on the bulkhead is going to be difficult.
As because of the galv the surface isn't exactly smooth, we'll see, plenty of flatting back I would think.

Garage cleared out and chassis rolled in for safe keeping until next weekend.
I now have some dilemma's, now at this stage I would usually fit the engine/gearbox/props etc, but I don't have any and need to find another
And then move onto paint, starting with the bulkhead.
Well that's something else.. I now need to choose a colour I can never make my bloody mind up
Now when I started this project I had told myself I would paint it deep bronze green, with a possibility of Keswick green or pastel green.
Well I've kinda' gone off the deep bronze green and I'm fancying a lighter colour, I just can't make my mind up..
I also can't find either/or in 2k which I would usually use.
But I need to figure out what colour and what type of paint I will be using pretty soon.
It is a little cold for painting at the mo, but my thoughts are if I can get the bulkhead painted it will free up a lot of work like fitting the wiring loom and dash, plus the peddle boxes and heater box etc..
Which by the time that is done it should be slightly warmer and could move onto painting the tub.
I'm also tempted to assemble the body, well bulkhead, tub, doors, sides, windscreen and roof prior to any painting whatsoever, just incase I have to fettle the bulkhead at all for fitment.
And I think I may start looking for a new compressor, the 100L one I have at the mo just doesn't cut it, especially when doing things like the tub, or more than one panel at a time. It has done me well but I think it's time to upgrade, but space will be the limiting factor as always.
Got bumps stops fitted, steering box, panhard rod, steering damper and a couple of other bits on.


I then tried the bulkhead on the chassis, and it fitted without issue.


You can see how the galv has sat on where the weld was, but from what I'm told (by a welder) that's just the nature of galv and you can't stop it completely.
So I will lightly sand/grind back and try to get it invisible, although I think getting a good finish on the bulkhead is going to be difficult.
As because of the galv the surface isn't exactly smooth, we'll see, plenty of flatting back I would think.

Garage cleared out and chassis rolled in for safe keeping until next weekend.

I now have some dilemma's, now at this stage I would usually fit the engine/gearbox/props etc, but I don't have any and need to find another
And then move onto paint, starting with the bulkhead.
Well that's something else.. I now need to choose a colour
I can never make my bloody mind up Now when I started this project I had told myself I would paint it deep bronze green, with a possibility of Keswick green or pastel green.
Well I've kinda' gone off the deep bronze green and I'm fancying a lighter colour, I just can't make my mind up..
I also can't find either/or in 2k which I would usually use.
But I need to figure out what colour and what type of paint I will be using pretty soon.
It is a little cold for painting at the mo, but my thoughts are if I can get the bulkhead painted it will free up a lot of work like fitting the wiring loom and dash, plus the peddle boxes and heater box etc..
Which by the time that is done it should be slightly warmer and could move onto painting the tub.
I'm also tempted to assemble the body, well bulkhead, tub, doors, sides, windscreen and roof prior to any painting whatsoever, just incase I have to fettle the bulkhead at all for fitment.
And I think I may start looking for a new compressor, the 100L one I have at the mo just doesn't cut it, especially when doing things like the tub, or more than one panel at a time. It has done me well but I think it's time to upgrade, but space will be the limiting factor as always.
Similar threads
- Replies
- 16
- Views
- 1K
- Replies
- 2
- Views
- 662
- Replies
- 3
- Views
- 413