90 defender rebuild

This site contains affiliate links for which LandyZone may be compensated if you make a purchase.
More

The front wings were straightened and flatted , then it was paint again.

IMG_5877.jpg

I cant believe how much work goes into getting these straight - I can see why so many people use chequer plate .

IMG_5878.jpg


A little more shiny than the original Nato Green

IMG_5884.jpg


Bonnet being colour sanded between coats of Metallic Black - Its a colour that takes no prisoners

IMG_5862.jpg


Bonnet fitted - you will notice the hinges are now black to match the bonnet and the window surround is also fitted .

IMG_5885.jpg


Hope you like - more soon
 
Last edited:
I've just acquired an old 90LR 4C. I am thinking about starting a rebuild. Unfortunately my mechanical skills aren't as good as yours, so mine might take a few years.

I might be mad even starting this, and I will definitely be asking around for help!!!

However, seeing the nice job that you have done with your 90 has given me the motivation.....
 

Attachments

  • 90bulkhead.JPG
    90bulkhead.JPG
    230.1 KB · Views: 624
  • 90Moldlowres.jpg
    90Moldlowres.jpg
    224.5 KB · Views: 496
I've just acquired an old 90LR 4C. I am thinking about starting a rebuild. Unfortunately my mechanical skills aren't as good as yours, so mine might take a few years.

I might be mad even starting this, and I will definitely be asking around for help!!!

However, seeing the nice job that you have done with your 90 has given me the motivation.....

This is the first time I have touched a Landrover - and trust me they are really easy to work on - they all unbolt and then bolt back together - Very little welding and very few box sections to rot out .

Just take it all apart and look at what you have got - then choose an end to start at and get the chassis sorted - then get the body back together and away you go - You can even get a new chassis if you need .

Everything you need is available and is not expensive if you do a bit of shopping about - The big bits are cheep because they take up lots of space ( just what I have found )

I have gone over the top just because I want to achieve a certain thing but lets be fair most people want to use a landy for what it was designed - not as a shopping trolley .

Im sure that with a little motivation you will get what you want .

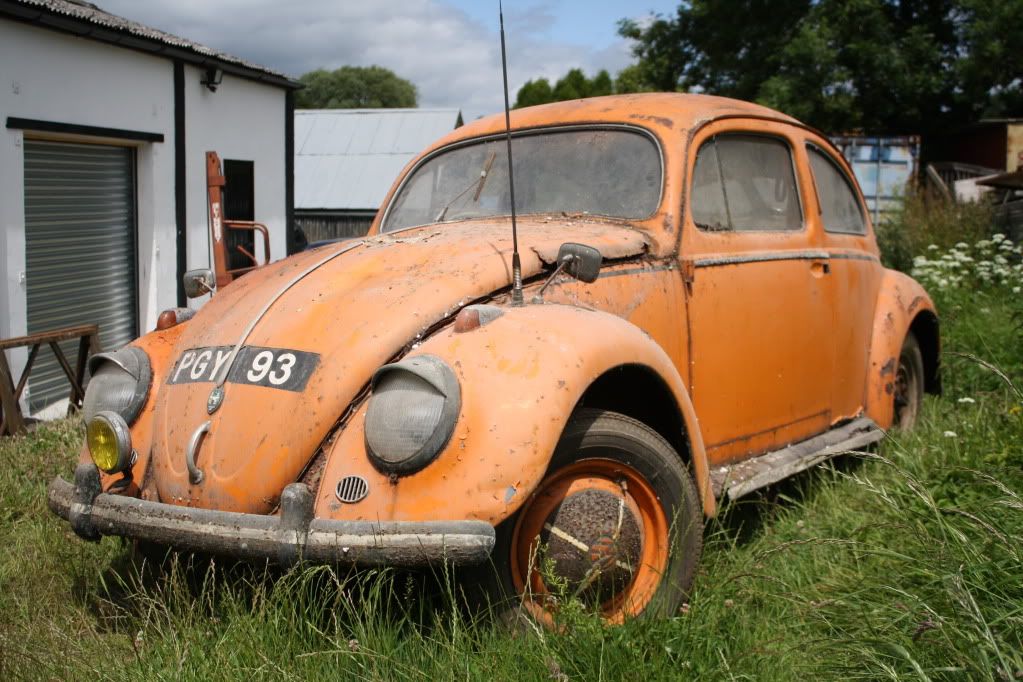
They are alot easier to work on than my usual projects - This is one of my VW's " as found " - its a 1952 and was in the same shed for 40 years before I unearthed it .

IMG_4101.jpg
 
Thanks for the encouragement. Your VW looks in a lot worse state than the 90 I have, so maybe there is hope for the old truck yet.

It's not like I need the 90 as a daily driver. I've got my 5 series as a daily driver and my pride-and-joy 110 300tdi for the weekend.

Think I will ask father Christmas to bring me a new socket set and get cracking on the 90 over the Christmas break!
 

Attachments

  • 110 low res.jpg
    110 low res.jpg
    458.7 KB · Views: 509
Thanks for the encouragement. Your VW looks in a lot worse state than the 90 I have, so maybe there is hope for the old truck yet.

It's not like I need the 90 as a daily driver. I've got my 5 series as a daily driver and my pride-and-joy 110 300tdi for the weekend.

Think I will ask father Christmas to bring me a new socket set and get cracking on the 90 over the Christmas break!

Sounds like a plan :cool:
 
Time to start putting it back together .

wing tops and fronts on , also the grill surround - all loose for a bit of adjustment

IMG_5886.jpg


bonnot fitted , a better idea of the 2 tone look

IMG_5887.jpg


grill and surrounds going on

IMG_5888.jpg


new side lights and indicators

IMG_5889.jpg


all sorted - I have used all white front lights and will change bulbs in indicators - They are correct indicators with new lenses , so the bulbs fit ;)

IMG_5890.jpg


once the wiring was sorted I could put the side panels on - lots of F'ing and B'ing later , they were on . You need the hands of a 6 year old to get these on !!!!!

IMG_5891.jpg


Lights all working .

IMG_5892.jpg
 
I have had to move a load of cars around in the workshop so that gave me an opportunity to get the 90 outside for a bit , I had to take the rear sides as they were not attached :eek:

IMG_5896.jpg


The colours look much better in natural light .

IMG_5897.jpg


Back inside and time to tackle the roof
This has a number of dents as well as lots of flakey paint

IMG_5898.jpg


I wanted it to look good so I decided that when I removed the metal plate that was riveted on, the best thing to do was to mirror the rivets on the other side - They are marked out here ready for drilling

IMG_5899.jpg


Once drilled , the roof was stripped to bare metal

IMG_5901.jpg


The rivets were then replaced and the whole thing etch primed , then primer was applied .

IMG_5902.jpg


Once flatted back it it was time for some black - This is after a couple of light coats .

IMG_5910.jpg
 
:D some great progress could do with some of them heaters to do mine, as u seem a to be a paint guy whats the coldest recommended temp to spray celly in? Sam

Hi Sam - I'm not a paint man at all - making it up as I go along - I use 2k which is a chemical reaction - the heat helps it settle flat - celly would require heat to help it go off so I guess at least 10 degrees
 
Nice to see time spent doing the prep work, and a bit of care.

Half the resprayed defenders I have seen just seem to have paint thrown at them from 10 yards!

This makes me want to give mine a refresh.
 
i really do like that car, can i ask, ate you keeping the rivets unpainted? only asking as i may leave mine unpainted and just after some opinions from you. ta
 
i really do like that car, can i ask, ate you keeping the rivets unpainted? only asking as i may leave mine unpainted and just after some opinions from you. ta

Yes - I will keep all the rivets down the sides and at rear in bare steel - I think it looks good against the shiny paint - not sure what it would look like on a green one !!
 
Nice to see time spent doing the prep work, and a bit of care.

Half the resprayed defenders I have seen just seem to have paint thrown at them from 10 yards!

This makes me want to give mine a refresh.

I always wanted to make it look tidy - possibly too good really but it's what I wanted .
Glad you like it , I'm really enjoying doing it , most of my customers cars take months if not years to finish - this is about 10 weeks from start to finish
 
Back
Top