200Tdi

This site contains affiliate links for which LandyZone may be compensated if you make a purchase.
Have a look at post 93 , I posted a pdf of the 200tdi overhaul manual got all,the torque figs and how to do what you doing 😀
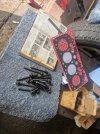
Sorry Mate I forgot you posted that I have downloaded the 200tdi one. Found the torque it is 130 to 136 nm, worried now that the bloody bolts may snap or stretch, as I will be doing it twice, once to plastigauge then again to finally fit.
 
Bit farther forward, bearings and crank fitted, Head back from machine shop pressure tested and skimmed, bores honed with new rings, timing case and pump back on. Just waiting on sealer for ladder frame and sump also head gasket kit.
Not sure which to do first though.
 

Attachments

  • 20250531_195528.jpg
    20250531_195528.jpg
    274.9 KB · Views: 19
  • 20250603_121429.jpg
    20250603_121429.jpg
    470.9 KB · Views: 20
  • 20250530_191143.jpg
    20250530_191143.jpg
    227.8 KB · Views: 19
Sealer has not come yet for sump so fitted head with new bolts, went by the book first torque 40nm then 2 60 degree turns, hope Ive done it right. Also fitted rocker arm and push rods etc. Can the timing belt be fitted now ? or do I need the flywheel on first ?
 

Attachments

  • 20250608_100442.jpg
    20250608_100442.jpg
    579.1 KB · Views: 21
  • 20250608_111437.jpg
    20250608_111437.jpg
    332.3 KB · Views: 23
Sealer has not come yet for sump so fitted head with new bolts, went by the book first torque 40nm then 2 60 degree turns, hope Ive done it right. Also fitted rocker arm and push rods etc. Can the timing belt be fitted now ? or do I need the flywheel on first ?

Need flywheel for timing pin.
 
I would remove the rocker shaft.
You now have some open valves.
Which could be an issue turning the engine to time it right.

J
 
Not sure what you mean, watched a couple of vids on youtube and copied what they done,
What Marjon means is with the rockers fitted and no cambelt, if/when you rotate the engine to line up the timing marks any open valves could make contact with the pistons.
So safest to remove rocker gear then fit belt etc.
This why when engine has a cambelt change during normal works you line up marks before removing the belt.

Ps do not believe all you see on youtube, joke in the mechs and other trades is the customer said it looked easy on youtube:p
 
That's how I did it on my rebuild and it runs great. Flywheel has a locating dowel so providing your crank is aligned properly the flywheel peg will fit.

I guess using the flywheel pin would be slightly more accurate than the mark, but the teeth on the belt limit how much fine tuning you could do anyway.
 
Engine off stand and on bench now so Think I will fit flywheel and seal first jut to be safe, , been dreading this as Manual does not really say much about it and cant find much on google etc. I do have the seal and gasket, think it is just the cheaper version, Any Hints or tips on fitting will be appreciated. Thanks
 

Attachments

  • 20250611_194734.jpg
    20250611_194734.jpg
    454.6 KB · Views: 12
  • 20250611_195938.jpg
    20250611_195938.jpg
    356.9 KB · Views: 12
I would fit an OEM/JLR part rather than the £5 version.
I have know a few people that have developed a leak after a couple of years (some sooner) whereas originals tend to last for a lot longer.

 
Plus one on the above regards Original seal.
Not sure about the one in post above as see no guide.
OEM seal that comes with a plastic guide to get it in place correctly, also OEM gasket for housing that has pre applied sealer on it.
Fitting, The seal is a ptfe type and must be fitted dry, no oil on crank land.
I like to fit the seal into housing on the bench before fitting housing on to engine [ others are happy to do the other way around.]
The last seal I did was stubborn to go in and rather than risk distorting it put it in freezer for an hour to shrink after that it went in fine.
Trailerfitters tool box video on the you tube is useful info.
It is a lot of time and work to do this job again so doing it first time is good. Hope this helps. Good luck.
PS A friend had his 300tdi out three times before he got it right! But then the 300's seal housing is a pita of a design.
Thanks Been watching a few vids , and guides seems people have there different ways, on this vid he puts sealer around the outside of seal in the housing, few others do it to. Gonna try my local landy shop hoping they have a better seal and gasket in stock.
 
Be careful not to contaminate running surface if you add sealer [ original seal had a sealer already on the outside]
Locating seal in housing can be done by careful tapping around the seal if seal fitting tool not available.
One chap on here made his own turned from wood, rather neat.
 
Be careful not to contaminate running surface if you add sealer [ original seal had a sealer already on the outside]
Locating seal in housing can be done by careful tapping around the seal if seal fitting tool not available.
One chap on here made his own turned from wood, rather neat.
Thanks Again. Cant get better seal untill next week, so just gonna use what I have got, bloody sick of getting held up waiting for parts to get delivered. Will have a go anyway then if it goes bad will have to order. .
The seal I have is mentioned on this vid he says they go in easier so will find out, Mind you I dont have any special tools or anything so will just have to Improvise.
 
I don't have the special tool either and have just carefully tapped around the seal to seat it'
I do second @miktdish above re the seal, those brown ones fit easy enough but do not last in this situation and many have started to leak in a few thousand miles.
The plastic seal protector you get with an OEM Dowty seal does the job just fine as one wiggles the housing back into place. It is your choice but some patience here will pay off in the long run.
 
Back
Top