- Posts
- 16,482
A new How To.....
Got a phone call from the girlfriend Monday saying when she parked the L322 up there was odd whirring and grinding noises, the odd squealing and what smelled like burning rubber coming from under the bonnet.
Also the power steering was intermittent, and the dash was showing odd warnings...including the usual ABS/HDC/EAS warnings etc.
I umm'd and ahh'd and deduced by the description it was either the PAS pump or the Alternator.
So I got home from work just after midnight and had a look. Opened bonnet, got a torch and started the engine, it struggled to start as if the battery voltage was getting low.
Loud squealing, lots of rubber smoke in the torch light, engine struggling a bit, had a goosey, and the Alternator pulley wasn't spinning and the smoke was coming from the pulley where the belt was rubbing on it.
Alternator fecked....
Went inside and did some research, apparently the bearings seizing is more common than I first thought, quite a few reports of it happening on BMW forums, and also a few on Landy forums too....
The M62TUB44 alternator is a sealed unit that sits in a water jacket for cooling so there is no chance of feeling or hearing bearings breaking down until it happens! You may be able to pick up a faint grumbling, but with the sound of the engine and the fan, plus the position of the Alternator being quite low down on the side of the engine means it is very difficult to hear!
Bugger it I thought.
The M62 Alternator is quite an expensive item. Can be had for around the £250-260 mark or as much a £1100.....unfortunately at the moment we are potless...so a new/re manufactured unit is a bit out of our price range currently...couldn't have happened at a worse time at the moment!!
So I trolled the popular internet auction site and found a second hand unit from a company I have used a few times previously and specialise in breaking Range Rovers.... The Furness Car Company....it came with a 90 day warranty, free delivery and also next day delivery....£100, that'll have to do!
If it gives us 3 months or motoring until we can clear some funds and get a re-man or a new one, happy days!!! Besides I have used this company before for tail gate locks, door latch, rear parcel shelf, cup holders etc on previous Range Rovers so I had confidence in them and their supplied parts.
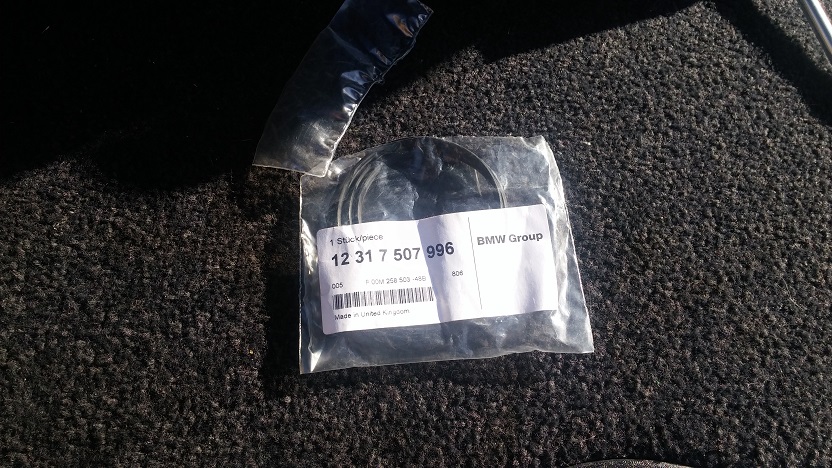
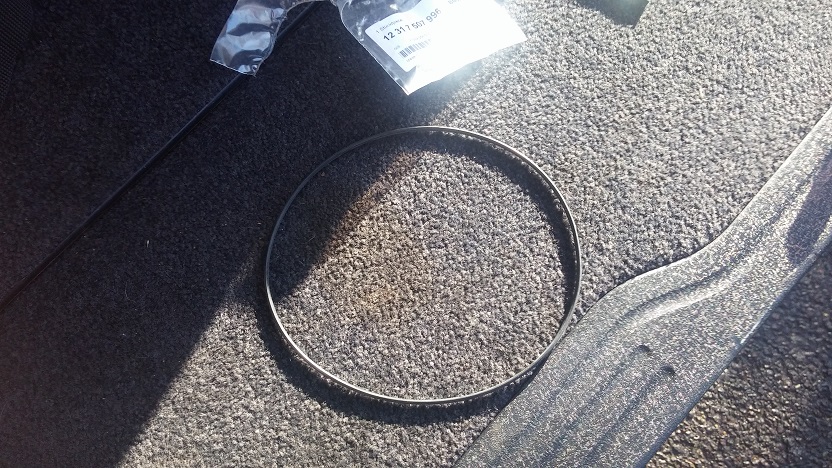
After ordering the Alternator and it arriving....I forgot I would also need the sealing O ring....ball-cocks...
Island 4x4 do supply but they do say it is a non-stock item and could be a couple of days....tried my local Main Dealer who could get one next day for £18 odd, tried a Land Rover Franchised Parts/Service place called Conrico, they said the same!!
So I tried my favourite BMW dealers (Coopers of Cobham) which is up the road and on the way home!
They had one in stock on a dusty shelf and put it aside for me! £13.60 odd...super!!!!
I was sure I knew how to do the job, but research and reading others methods plus plenty of RAVE reading doesn't go a miss.....one chap said he took just over 3.5 hours to change it out....really?? What was he doing?? I managed to get to a point I could undo the 6 mounting bolts in just under 25 minutes....Alternator out, new one prepped, mating faces cleaned and ready to go in took another 10 minutes....re-assembled in 45 minutes (trying to get the fan to thread is always a pain the backside) then the usual filling up with coolant and bleeding the system took about another 30 minutes cos you have to wait for the engine to be fully warmed up, heater matrix has been filled and bleed through etc....so I would say it was about 1hr 40m - 1hr 50m .... or so......say 2 hours to give yourself some wiggle room!
Here's how to change the Alternator.....
First thing is bonnet in service position (read my other How Tos for how to do that!)
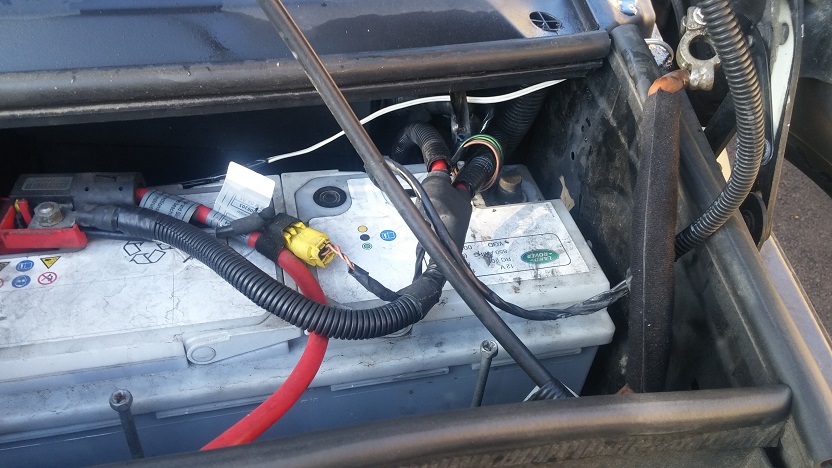
Wait for the Sat Nav drive light to go out and disconnect the battery.
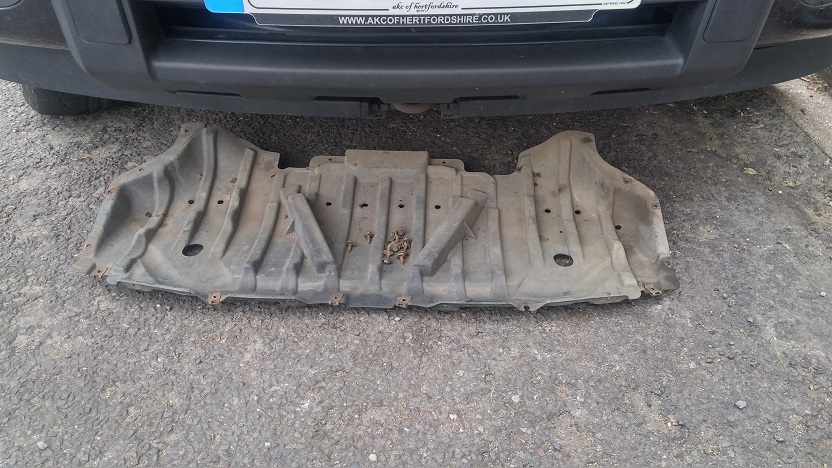
Undo and remove the under tray
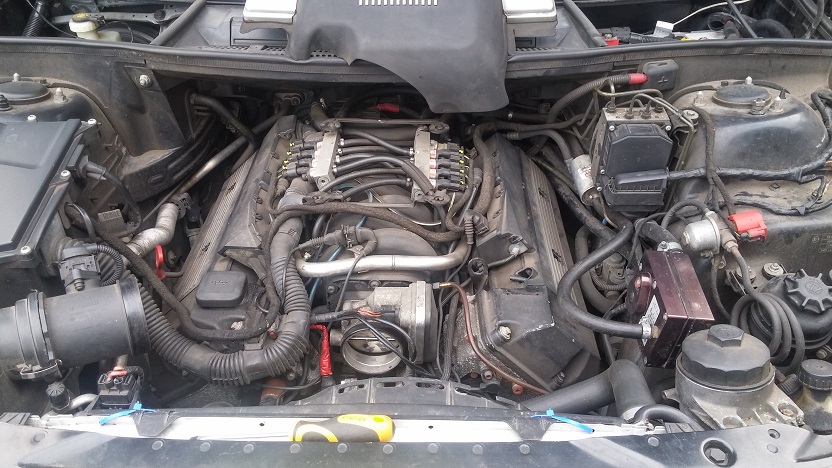
Remove the acoustic cover and the intake duct
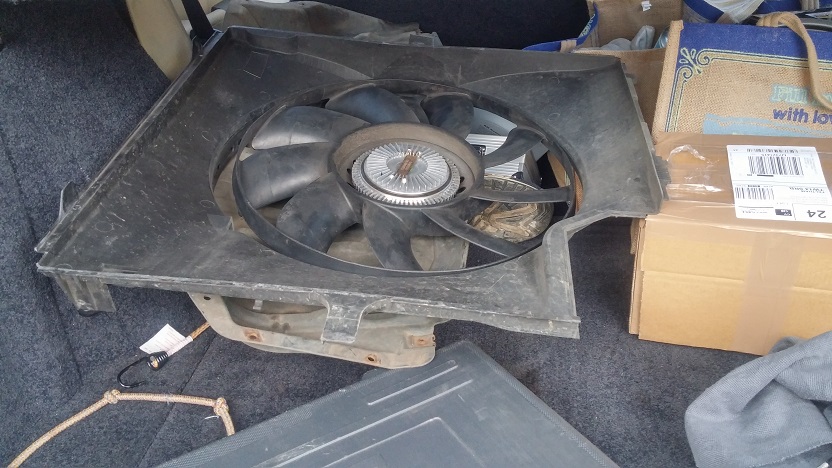
Undo the fan and, remembering to unclip the pipes on the side and underneath the cowl plus the electrical bits on the side, remove the cowl and fan together
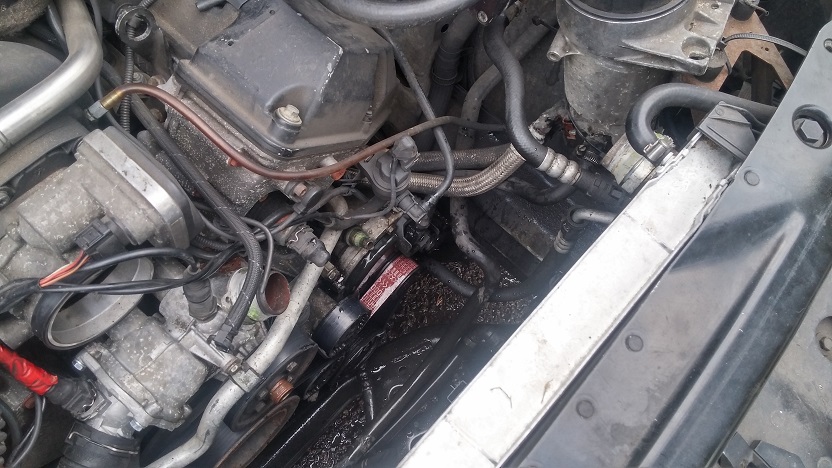
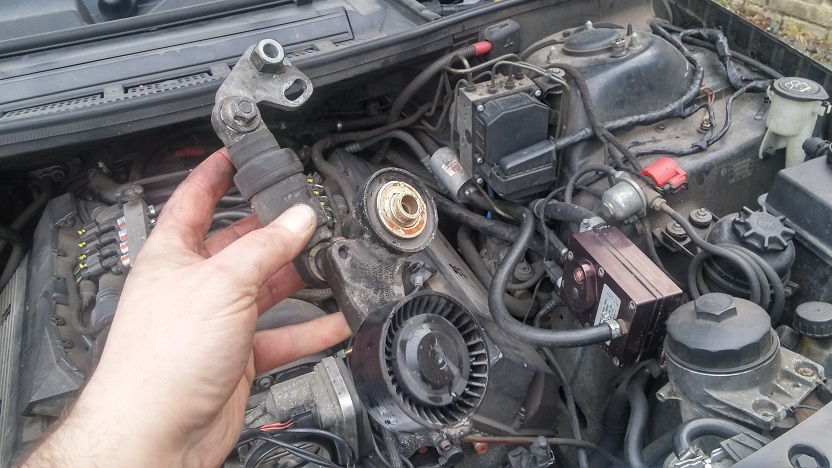
Next, lift the clips and remove the radiator top hose from the top of the rad, the top of the alternator housing and the top of the water pump and put to one side....no need to remove from the gearbox oil cooler!
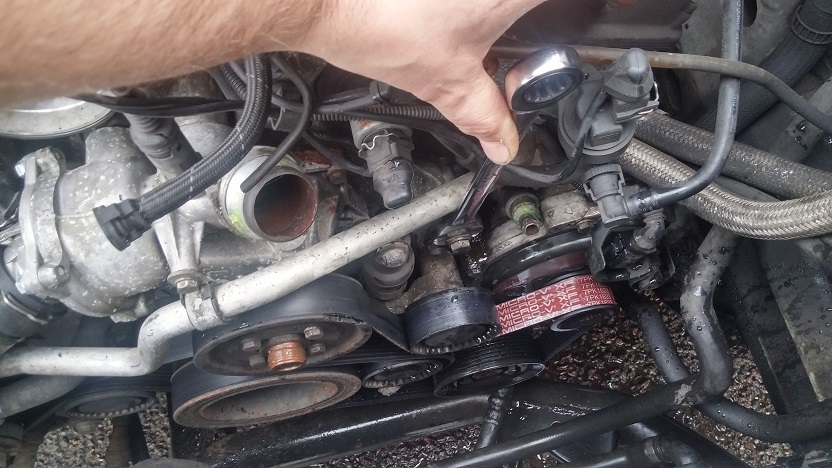
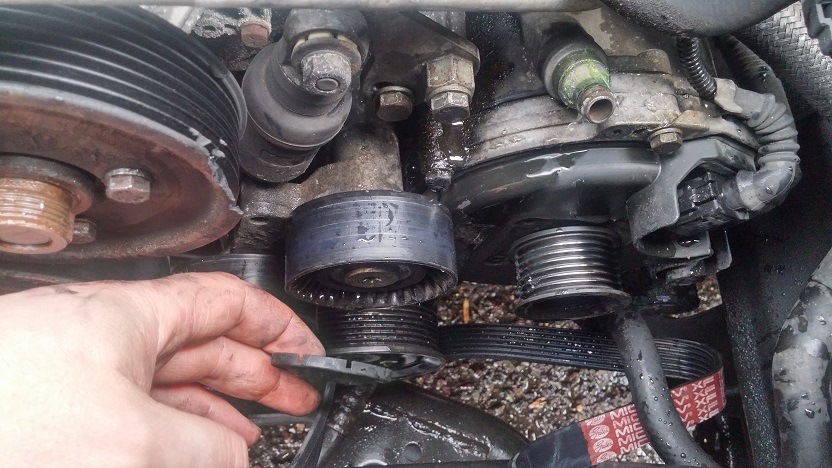
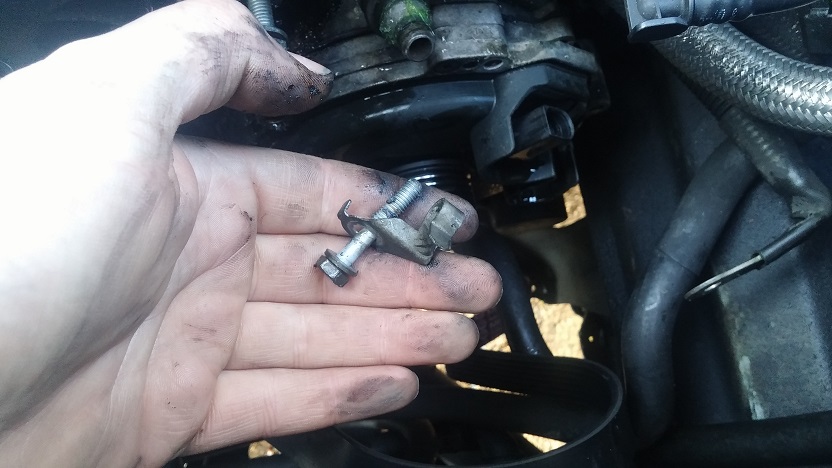
The fiddly part is next....using a 17mm spanner, hold the belt tensioner in place while you loosen the two 13mm clamp and mounting bolts. Its fiddly cos I have big hands and you have to hold the spanner and also undo the two bolts with not a lot of room for both hands !!!
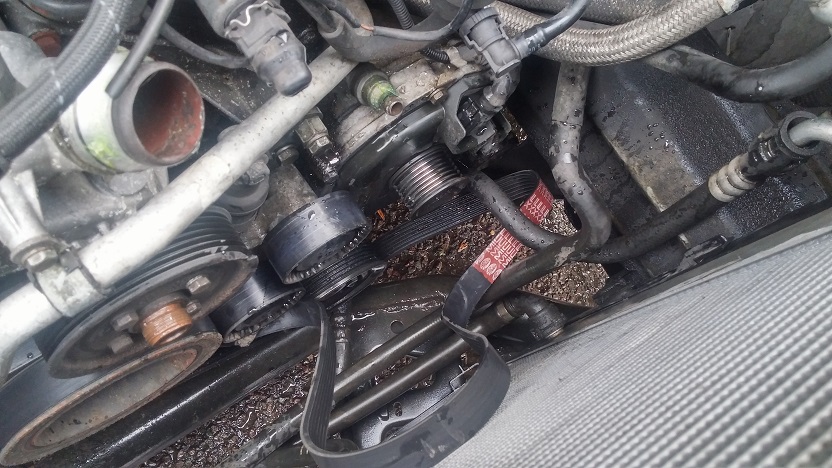
Slip the belt off
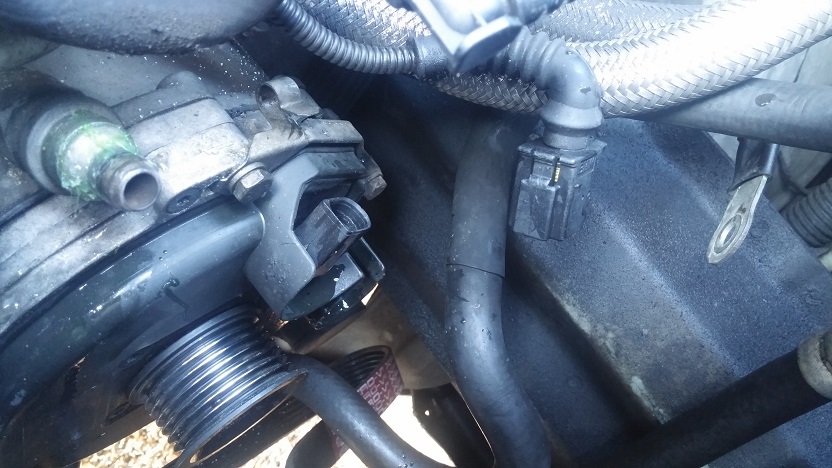
RAVE says to remove the whole tensioner assembly (I did this) but you could get away with just removing the upper idler wheel and leaving the hydraulic piston and brackets in place.
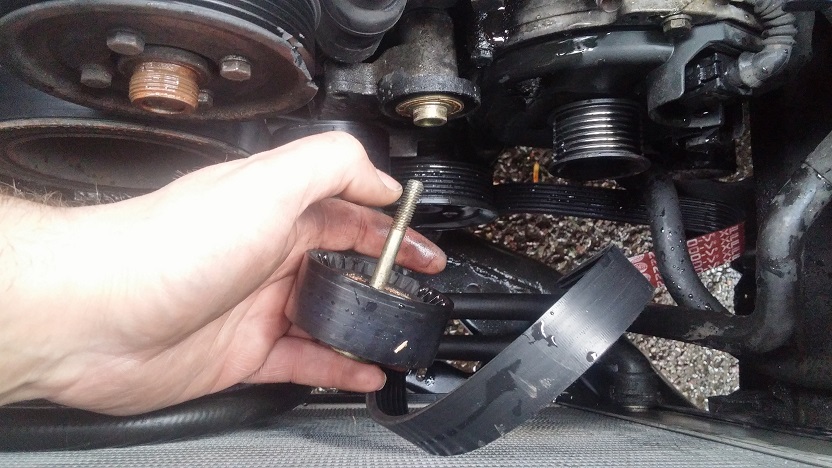
Remove the dust cover
The Upper idler wheel is secured using a T50 Torx bit bolt...so make sure you have one!!
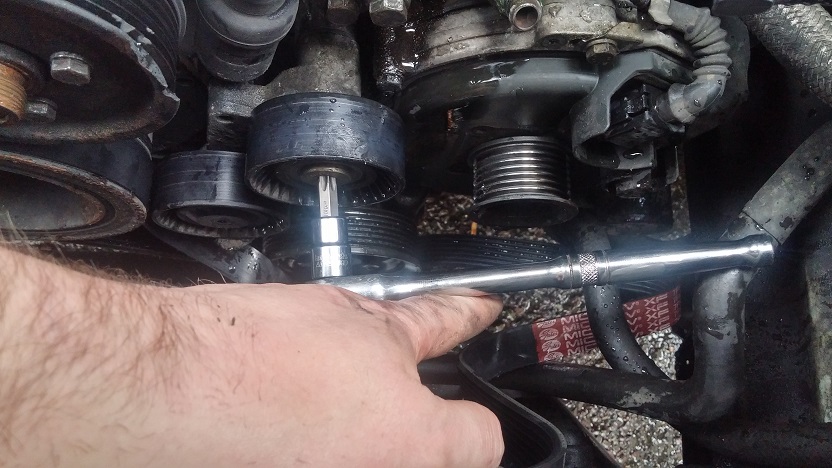
Undo this...(I hate Torx bits...they have a habit of rounding off!! so do it carefully)
Then undo the two mounting bolts fully and remove the tensioning assembly
Using a 17mm socket, undo the Battery B+ connection to the front of the Alternator
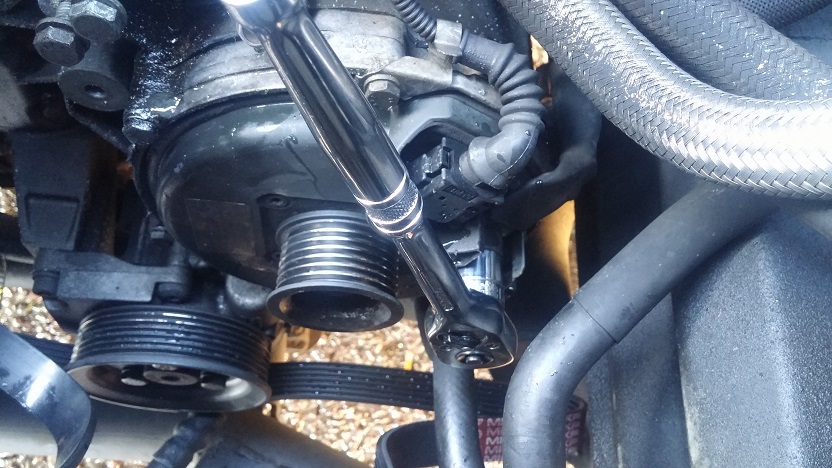
It is a plastic coated nut, so make sure you are square on and go easy!
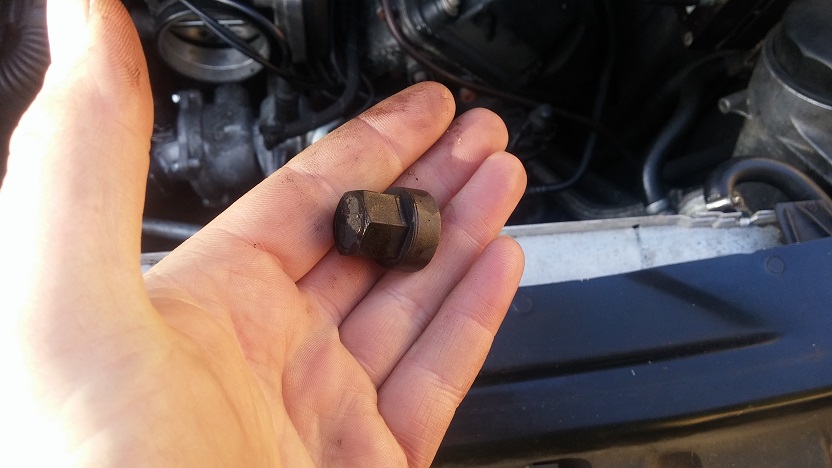
And remove the battery cable and place to one side
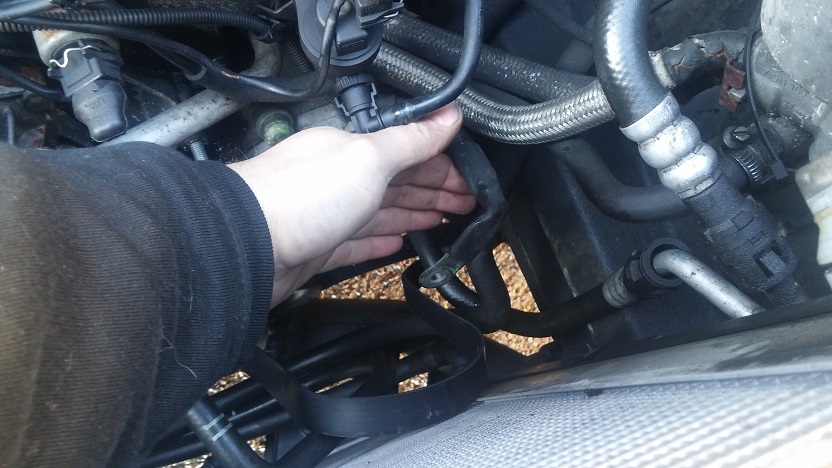
Disconnect the multi-plug from the top of the Alternator and unclip from the securing clip, place to one side
Now undo the 6 mounting bolts. The top one secures the wiring clip in place, so don't forget to recover this!
With a bit of a wiggle and jiggle, release the Alternator from its housing
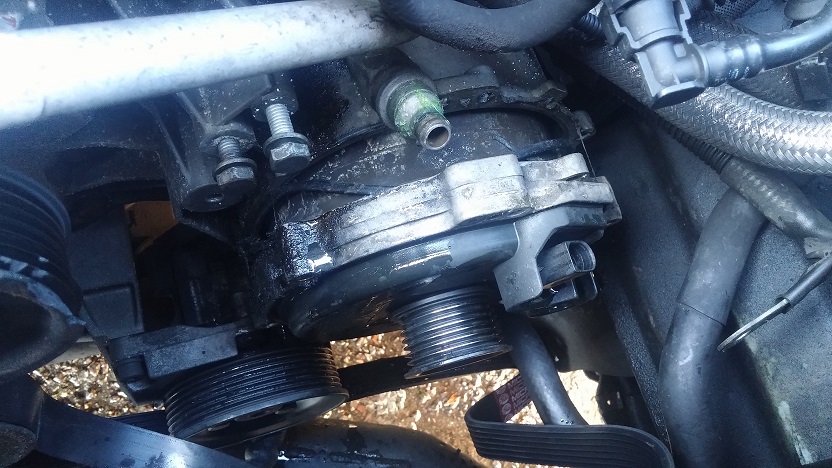
Being very careful as it is a tight squeeze between the engine and the radiator, lift the heavy Alternator up and out....being careful not to damage the radiator....maybe placing a bit of card against the rad to protect it wouldn't go a miss!
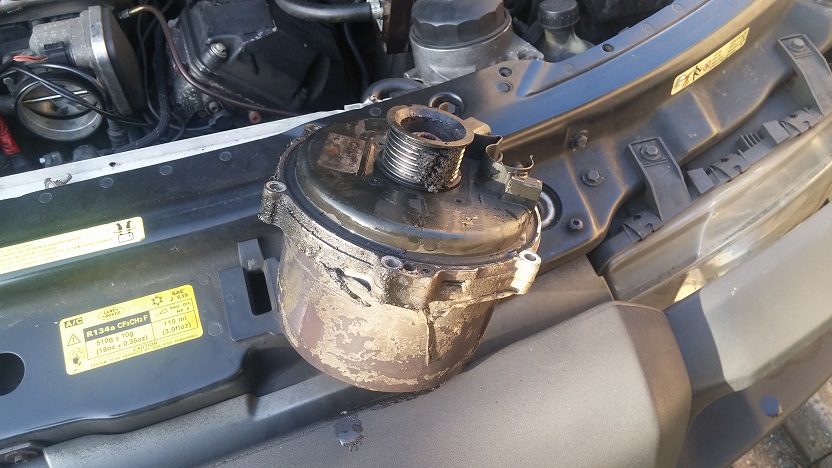
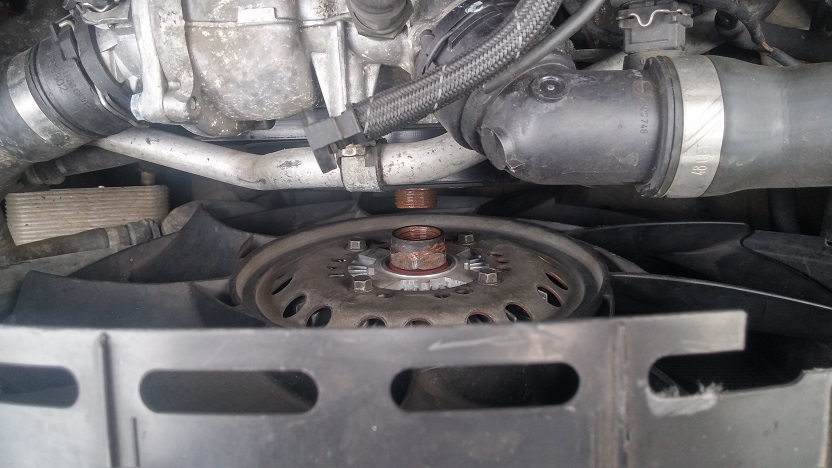
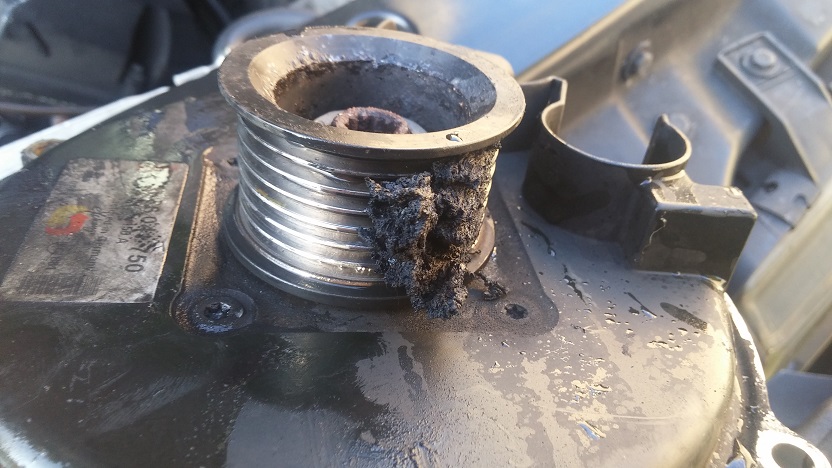
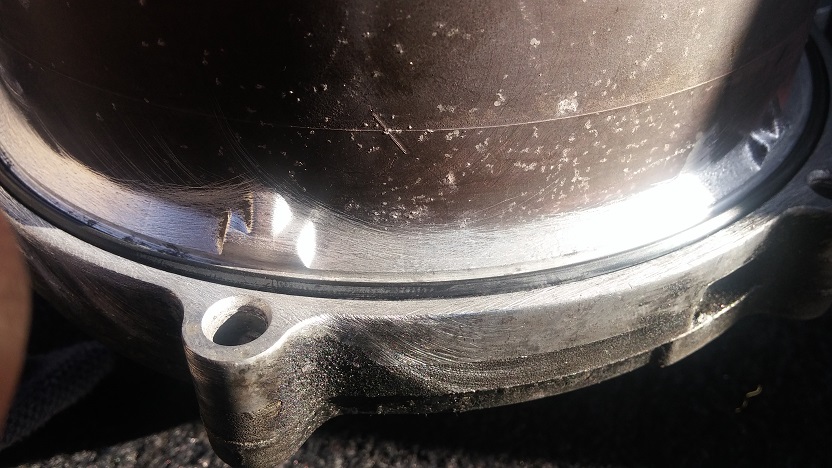
As can be seen, the belt had started to leave deposits of itself on the pulley......I'll replace the belt when the funds allow!
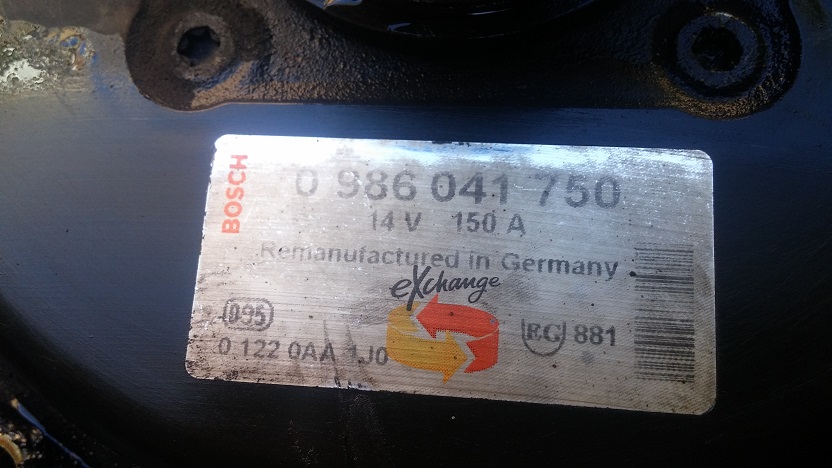
On closer inspection, it looks like the Alternator was a Bosch Re-manufactured unit in the first place....so this engine has gone through at least one before! (I have owned her now for almost 4 years and she is on 196k miles....original engine was replaced at 121k miles before my ownership by Land Rover and a call to Land Rover when I bought it confirmed this, but they didn't tell me why!)
So this re-manufactured unit probably lasted around 75k miles....
New O ring came curled in a small packet making the BMW parts guy query if it was the right one until he opened it and realised it was curled up!
Clean up the mating face on the engine timing cover
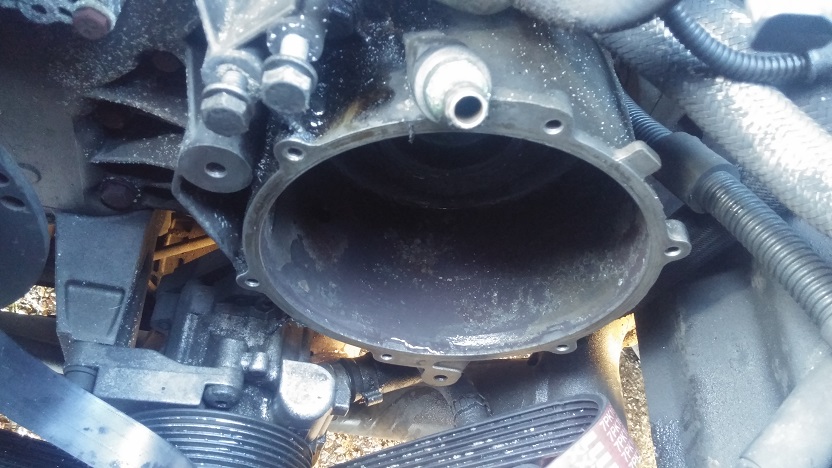
And as the replacement unit was second hand, I cleaned up the mating face and lubed the O ring with Petroleum Jelly (Vasoline) before fitting.
Refitting is (to copy the famous Haynes line) the reversal of the removal...it is that simple!
Reconnect the battery, refill the cooling system, bleed it through, check for leaks, check the battery voltage level and tidy up....
Job done fella!!!!
Got a phone call from the girlfriend Monday saying when she parked the L322 up there was odd whirring and grinding noises, the odd squealing and what smelled like burning rubber coming from under the bonnet.
Also the power steering was intermittent, and the dash was showing odd warnings...including the usual ABS/HDC/EAS warnings etc.
I umm'd and ahh'd and deduced by the description it was either the PAS pump or the Alternator.
So I got home from work just after midnight and had a look. Opened bonnet, got a torch and started the engine, it struggled to start as if the battery voltage was getting low.
Loud squealing, lots of rubber smoke in the torch light, engine struggling a bit, had a goosey, and the Alternator pulley wasn't spinning and the smoke was coming from the pulley where the belt was rubbing on it.
Alternator fecked....
Went inside and did some research, apparently the bearings seizing is more common than I first thought, quite a few reports of it happening on BMW forums, and also a few on Landy forums too....
The M62TUB44 alternator is a sealed unit that sits in a water jacket for cooling so there is no chance of feeling or hearing bearings breaking down until it happens! You may be able to pick up a faint grumbling, but with the sound of the engine and the fan, plus the position of the Alternator being quite low down on the side of the engine means it is very difficult to hear!
Bugger it I thought.
The M62 Alternator is quite an expensive item. Can be had for around the £250-260 mark or as much a £1100.....unfortunately at the moment we are potless...so a new/re manufactured unit is a bit out of our price range currently...couldn't have happened at a worse time at the moment!!
So I trolled the popular internet auction site and found a second hand unit from a company I have used a few times previously and specialise in breaking Range Rovers.... The Furness Car Company....it came with a 90 day warranty, free delivery and also next day delivery....£100, that'll have to do!
If it gives us 3 months or motoring until we can clear some funds and get a re-man or a new one, happy days!!! Besides I have used this company before for tail gate locks, door latch, rear parcel shelf, cup holders etc on previous Range Rovers so I had confidence in them and their supplied parts.
After ordering the Alternator and it arriving....I forgot I would also need the sealing O ring....ball-cocks...
Island 4x4 do supply but they do say it is a non-stock item and could be a couple of days....tried my local Main Dealer who could get one next day for £18 odd, tried a Land Rover Franchised Parts/Service place called Conrico, they said the same!!
So I tried my favourite BMW dealers (Coopers of Cobham) which is up the road and on the way home!
They had one in stock on a dusty shelf and put it aside for me! £13.60 odd...super!!!!
I was sure I knew how to do the job, but research and reading others methods plus plenty of RAVE reading doesn't go a miss.....one chap said he took just over 3.5 hours to change it out....really?? What was he doing?? I managed to get to a point I could undo the 6 mounting bolts in just under 25 minutes....Alternator out, new one prepped, mating faces cleaned and ready to go in took another 10 minutes....re-assembled in 45 minutes (trying to get the fan to thread is always a pain the backside) then the usual filling up with coolant and bleeding the system took about another 30 minutes cos you have to wait for the engine to be fully warmed up, heater matrix has been filled and bleed through etc....so I would say it was about 1hr 40m - 1hr 50m .... or so......say 2 hours to give yourself some wiggle room!
Here's how to change the Alternator.....
First thing is bonnet in service position (read my other How Tos for how to do that!)
Wait for the Sat Nav drive light to go out and disconnect the battery.
Undo and remove the under tray
Remove the acoustic cover and the intake duct
Undo the fan and, remembering to unclip the pipes on the side and underneath the cowl plus the electrical bits on the side, remove the cowl and fan together
Next, lift the clips and remove the radiator top hose from the top of the rad, the top of the alternator housing and the top of the water pump and put to one side....no need to remove from the gearbox oil cooler!
The fiddly part is next....using a 17mm spanner, hold the belt tensioner in place while you loosen the two 13mm clamp and mounting bolts. Its fiddly cos I have big hands and you have to hold the spanner and also undo the two bolts with not a lot of room for both hands !!!
Slip the belt off
RAVE says to remove the whole tensioner assembly (I did this) but you could get away with just removing the upper idler wheel and leaving the hydraulic piston and brackets in place.
Remove the dust cover
The Upper idler wheel is secured using a T50 Torx bit bolt...so make sure you have one!!
Undo this...(I hate Torx bits...they have a habit of rounding off!! so do it carefully)
Then undo the two mounting bolts fully and remove the tensioning assembly
Using a 17mm socket, undo the Battery B+ connection to the front of the Alternator
It is a plastic coated nut, so make sure you are square on and go easy!
And remove the battery cable and place to one side
Disconnect the multi-plug from the top of the Alternator and unclip from the securing clip, place to one side
Now undo the 6 mounting bolts. The top one secures the wiring clip in place, so don't forget to recover this!
With a bit of a wiggle and jiggle, release the Alternator from its housing
Being very careful as it is a tight squeeze between the engine and the radiator, lift the heavy Alternator up and out....being careful not to damage the radiator....maybe placing a bit of card against the rad to protect it wouldn't go a miss!
As can be seen, the belt had started to leave deposits of itself on the pulley......I'll replace the belt when the funds allow!
On closer inspection, it looks like the Alternator was a Bosch Re-manufactured unit in the first place....so this engine has gone through at least one before! (I have owned her now for almost 4 years and she is on 196k miles....original engine was replaced at 121k miles before my ownership by Land Rover and a call to Land Rover when I bought it confirmed this, but they didn't tell me why!)
So this re-manufactured unit probably lasted around 75k miles....
New O ring came curled in a small packet making the BMW parts guy query if it was the right one until he opened it and realised it was curled up!
Clean up the mating face on the engine timing cover
And as the replacement unit was second hand, I cleaned up the mating face and lubed the O ring with Petroleum Jelly (Vasoline) before fitting.
Refitting is (to copy the famous Haynes line) the reversal of the removal...it is that simple!
Reconnect the battery, refill the cooling system, bleed it through, check for leaks, check the battery voltage level and tidy up....
Job done fella!!!!
Last edited:
")