Speedex750
Member
- Posts
- 93
- Location
- North East England
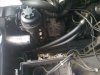
I've read in threads on here horror stories of stripping the oil cooler threads trying to get the oil cooler pipes off and didn't fancy trying to get them off. I also didn't fancy buying hoses with a new cooler and taking the old one out. Mine have wept a little ever since I got the car. I took some heart from one of the local specialists who say they often leak between the hose and the crimped ferrules but he's never known one come off; mine lasted 50K miles and didn't seem to be getting worse but...
From some suggestions in the threads I decided to cut the old flexibles from the steel end pipes and fasten in a new length of hose.
After removing most of the air filter box, intercooler ducts and tying back the EAS dryer both the top and bottom crimps are reasonably accessible. There's an EAS tube just beside the lower end under the filter box; tie it out of the way with a bit of string. The crimped ferrules can be cut with the edge of a small grinderette, slice lengthways down the ferrule. Most of it is quite thin but the part next to the steel pipe goes right down to the pipe. Very carefully work your way down without catching the steel pipe - or you'll have trouble getting a seal with the new pipe. Once you've made one cut through I found the flexy can be rotated about 120 degrees and make a second slice. The bit in between can be prised out and the hose can be pulled off. But I left mine on until all the cutting was done to stop the bits getting into the oil system. The bottom connection at the front is the trickiest, be patient and mind that EAS pipe! Oh and don't make the same mistake as me, I failed to work out that removing the hose would spill oil all over the place - doh - be prepared!
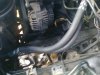
I measured the steel ends of the pipe at 5/8" or just over 16mm diameter. I used 5/8 100R6 hose, you'll have a few centimetres left out of a metre length. This hose is rated for oil and can take a lot more pressure and temperature than the engine will throw at it. I've also used it on other cars oil coolers and even after 20+ years they were soft and flexible so I was confident in it. I prefer the double eared crimps (like you should have on your welding set hoses) that are clenched up with a pair of pincers. I initially used 23-27mm crimps and they were a size too big, even when clenched right up both sides I had a weap. I've now fitted 22-25mm crimps, they're a bit tight on the hose which makes the hose a tight push fit on the steel stub ends - be careful the stubs rotate in the cooler and you could damage the seal on the end. Hose and clips are available on Ebay, less than a tenner for the hose and a quid or so for each clip. Cut the hose with a Stanley knife rather than a saw so no bits get inside it.
The stub end of the steel pipe is smooth and parallel but will be slightly nipped and the diameter reduced slightly where the ferrule was crimped. You've probably touched it a bit with the grinder (I did). Eye up a good spot on the pipe where you haven't caught it, probably just at the end. You need to get one clip where the diameters change slightly so it has something to grip and a second clip where the tube can be well sealed - at the end. Getting the pincers in to clench the clips is a bit tight for the bottom hoses but you can half clench one side and rotate the clip round to clench the other ear fully. Make sure the hose isn't taught, it shouldn't have any creases but be shaped in a gentle curve like a big question mark ?
I did this with an oil and filter change. Fill up, clean up all the historic oil leaks on the chassis leg etc, start up and quickly check there's no leaks before it makes a big mess. Further clench the clips if you have a drip. Everything back together and job done for less than £20 and a couple of hours work.
From some suggestions in the threads I decided to cut the old flexibles from the steel end pipes and fasten in a new length of hose.
After removing most of the air filter box, intercooler ducts and tying back the EAS dryer both the top and bottom crimps are reasonably accessible. There's an EAS tube just beside the lower end under the filter box; tie it out of the way with a bit of string. The crimped ferrules can be cut with the edge of a small grinderette, slice lengthways down the ferrule. Most of it is quite thin but the part next to the steel pipe goes right down to the pipe. Very carefully work your way down without catching the steel pipe - or you'll have trouble getting a seal with the new pipe. Once you've made one cut through I found the flexy can be rotated about 120 degrees and make a second slice. The bit in between can be prised out and the hose can be pulled off. But I left mine on until all the cutting was done to stop the bits getting into the oil system. The bottom connection at the front is the trickiest, be patient and mind that EAS pipe! Oh and don't make the same mistake as me, I failed to work out that removing the hose would spill oil all over the place - doh - be prepared!
I measured the steel ends of the pipe at 5/8" or just over 16mm diameter. I used 5/8 100R6 hose, you'll have a few centimetres left out of a metre length. This hose is rated for oil and can take a lot more pressure and temperature than the engine will throw at it. I've also used it on other cars oil coolers and even after 20+ years they were soft and flexible so I was confident in it. I prefer the double eared crimps (like you should have on your welding set hoses) that are clenched up with a pair of pincers. I initially used 23-27mm crimps and they were a size too big, even when clenched right up both sides I had a weap. I've now fitted 22-25mm crimps, they're a bit tight on the hose which makes the hose a tight push fit on the steel stub ends - be careful the stubs rotate in the cooler and you could damage the seal on the end. Hose and clips are available on Ebay, less than a tenner for the hose and a quid or so for each clip. Cut the hose with a Stanley knife rather than a saw so no bits get inside it.
The stub end of the steel pipe is smooth and parallel but will be slightly nipped and the diameter reduced slightly where the ferrule was crimped. You've probably touched it a bit with the grinder (I did). Eye up a good spot on the pipe where you haven't caught it, probably just at the end. You need to get one clip where the diameters change slightly so it has something to grip and a second clip where the tube can be well sealed - at the end. Getting the pincers in to clench the clips is a bit tight for the bottom hoses but you can half clench one side and rotate the clip round to clench the other ear fully. Make sure the hose isn't taught, it shouldn't have any creases but be shaped in a gentle curve like a big question mark ?
I did this with an oil and filter change. Fill up, clean up all the historic oil leaks on the chassis leg etc, start up and quickly check there's no leaks before it makes a big mess. Further clench the clips if you have a drip. Everything back together and job done for less than £20 and a couple of hours work.
Attachments

Last edited: