1997 Wolf XD Bonnet Disassembly.

This site contains affiliate links for which LandyZone may be compensated if you make a purchase.

Wolf Pack

Active Member
Posts
257
Location
Portsmouth
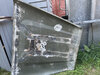
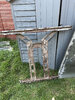
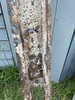
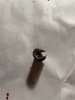
I am 80% of the way through a complete disassembly of the bonnet and most of the sealant behind the support braces has just fallen away, however, the extreme rear rail, through which the hinges attach, is still glued in place at each side.

Has any one here completely disassembled their bonnet and how did you deal with the sealant?

I'm loth to use heat with the chance of warping the aluminium.

Any advise appreciated.
 
Can't see why you'd want to strip/remove the rear frame section unless your frame is totally shot. When restoring a bonnet disassemble the primary components. Buzz back to bare metal, prime, respray and re-assemble...adding any sealer required at re-assembly.
 
Because some of the support framework needs welding up and a new central base plate fitting.

The original was tissue paper.

Sometimes it's makes more economical sense to buy a replacement...plenty of good condition second hand bonnets out there. Buy new bonnet, buzz back, transfer military components to new bonnet; job done.

Note you're in Portsmouth, there's a very good condition bonnet on FB for £40 in Salisbury...not too far for you

https://www.facebook.com/search/top?q=land rover bonnet

eta: when I replace big old parts I hang them in the garage as "objet d'art..." :cool:
 
It would make sense, but I want to restore the original frame, it's what I spent five years learning to do.

My welder is going to fill in the holes with some good old, very slow, gas welding
 
Et, voilá!

The right strut is blown through in two places.
 

Attachments

  • IMG_1769.jpeg
    IMG_1769.jpeg
    438.1 KB · Views: 118
  • IMG_1770.jpeg
    IMG_1770.jpeg
    599.7 KB · Views: 89
  • IMG_1771.jpeg
    IMG_1771.jpeg
    464.5 KB · Views: 94
@Wolf Pack , that's great work there - it's not easy detaching bonnet support frames from the upper.

Thank you.

Lots of drilling, deft use of three cold chisels and a sawn down broom handle and a mallet to drift the frame out of the back.

Drilling out the sheared off striker was great fun.

Not my finest feat of drilling ever, but I collapsed it, it's out and the female thread is intact.
 

Attachments

  • A striker.jpeg
    A striker.jpeg
    268.7 KB · Views: 82
Back
Top