If you wanted a Defender why did you get a Freelander? Was it a price thing?39 pages I have just sat a read the full lot, what an inspiration you guys are I only have a freelander I bought this week as a toy to start scaring my hands on lol will deffinetley be moving up to defender next year
You are using an out of date browser. It may not display this or other websites correctly.
You should upgrade or use an alternative browser.
You should upgrade or use an alternative browser.
1965 Series 2a Station Wagon in Holland
- Thread starter Stretch
- Start date
This site contains affiliate links for which LandyZone may be compensated if you make a purchase.
Well I'd better finish off that part of the project then! What you kindly referred to as multi-tasking is by many viewed as chaos. Imagine a Magpie seeing glittery things - that's me => oh that's nice - yeah but what about that - I should really start that - how about this - oh bugger I've broken that bit - need to order that now don't I? (And so it goes on)That's the one. My whole landy is shabby but that's how I like it. Those two panels though are taking the pist. At some point I will have to tidy the body up, the paint is literally falling off in flakes. Those are the only two panels that actually need changing. Your post (page 35) will be a great help. Ta very much.
Col
########
Speaking of which - I've been chasing down gucci tools and period optional accessories.
I got the tool kit a few months back (a good few months back) in original tool roll
(Which was nice)
I've had a bit of trouble finding a jack (I have a Shelley Tangeye but that's a tad too new for 1965) and I've also had trouble finding the standard delivered stirrup pump.
I have discovered that a company called Aerite made the stirrup pumps (now this might not be the only company used so don't quote me as saying only Aerite is correct or anything like that - Dunlop for example could have supplied stuff as well).
I've asked about on the series 2 club forum about the optional foot pump but nobody up until now has been able to tell me who made or supplied that. I don't think many people have seen "an original series 2a foot pump" any way.
So anyway I've been lurking on ebay looking at stuff and found this Aerite foot pump with original flexible tube and connector for a reasonable price =>
Now I don't know for sure if this is the "correct" optional extra but it most certainly looks the part! It is after all green so it'll go with the vehicle's body colour...
Colthebrummie
Well-Known Member
- Posts
- 9,870
- Location
- Thatcham
I'll keep an eye out for a stirup pump at car boots and classic car shows for you. I went to one in Newbury last week and because the weather was nice, it had a very good turnout. Lots of lovely old cars but not many stalls selling treasure.
Col
Col
CraigLandRover
New Member
- Posts
- 9
- Location
- Glasgow
If you wanted a Defender why did you get a Freelander? Was it a price thing?
A price thing and a 7 week old baby thing lol once she's a bit older we can bounce about a little more
BULKHEAD (partial) DAY EIGHTEEN
I know this is tedious - but the only way to stop me from posting up more metal bashing pictures is for you lot to start doing these types of repairs for yourselves!
Today I made a start on the upper A posts. (These are the hidden strength that is not normally visible on the bulkhead corners)
I thought I had made a picture using the MTAD method for the curve I want to copy but it seems as though I didn't. Oh well here's a bit of wood about to get cut to shape and abused.
View attachment 129543
Trim along the masking tape to get the shape you want and then trace along side with a pencil / marker
View attachment 129544
Cut the wood with a jigsaw (technical I know but it has to be done)
View attachment 129545
Make a second hammer form by tracing around what you've already got and clamp metal between the two
View attachment 129546

(Stop - hammer time)
View attachment 129547
(Yawn yawn - working from the joint between the bits of clamped wood - hit it from the crease and bend the metal upwards (or downwards if you're so inclined))
View attachment 129548
Ignore the pointy crease and keep on hitting from below and then a little bit higher and eventually you'll get it to stretch over the form you want
View attachment 129549
This corner ended up being "higher" than the rest of the flange because the metal has to go somewhere so I trimmed it with tin snips to get this =>
View attachment 129550
I'm now wondering if it was smart to make this edge first - may be - may be not - we'll see. I might make the other inner A post structure differently...
...er - to be continued (I'm off making another bigger hammer for for the next stage)
BULKHEAD (partial) DAY NINTEEN
Continuation of the upper A post manufacturing =>
I'm happy to make some wooden parts to help make this / these parts but I'm trying not to fall into the trap of spending too much time wood working - as it turned out I think spending more time with the wood might have helped - I dunno...
...Here's where I woz before
I'd got a bent flanged edge that was the start of the upper A post.
I then needed to work out where the next fold needed to be made, so I did the old MTAD
Removed masking tape and marked out the shape on the sheet
Instead of making complicated wooden shapes and hammering I thought I might be ale to do the necessary with a combination of the bead roller and tipping wheel...
...the vice mounted bending jaws...
...and the hammer and chisel and the hard wood "V" blocks...
Turned out to be a blinking disaster - teddy got chucked out the cot.
To be honest I'm not quite sure where I went wrong but the bead roller seemed to add in a curve in the wrong plane - I'm sure it was the bead roller and not the operator!
^^^^
As you can see the panel is now bending the wrong way - it should be straight. Arse buckets.
############
The problem above prompted this little aside - a little diversion - a wee purchase.
Such quality!
Look at that =>
It says "innovation" so it must be the dog's bollocks right?
Actually, despite the dubious references to Germany (note not actually "made in Germany") and the low price tag I'm quite surprised. It isn't total ****.
It came with tools!
And best of all it came with a pirate's sword!
'King excellent! A pirate's sword - never 'ad one of those before arrrgh

(Not at all camp)
Anyway the point is I can now cut deep / thick bits of wood for making hammer forms that will survive a good hard ****ting
#############
Despite the new purchase I decided to carry on with the mistake panel - I decided to cut and shut. It isn't a brilliant solution - I'd prefer to have a nicely formed one piece panel if possible (partly for reasons of ego) but as this part won't be seen I guess it'll be alright to do the dirty...
The picture above shows just how far I'd have to stretch the sheet to get it to do what I want. I'm not sure I'm up to that level of metal working just yet (!)
So measuring a triangle
Trial fit =>
Bit of welding - bit of MTAD
Back in the bead roller to help score a crease for the next stage
Messing about with the new toy
Bit more cutting - some tapping with the hammer - will weld later
Quick comparison
That's about as far as I got today.
I ran out of time, mainly because of the hilarity of the pirate's sword - lots of dicking about and arrghing I'm afraid...
(But it wasn't at all camp)
- Posts
- 71,542
- Location
- Back in the Room
Well I'd better finish off that part of the project then! What you kindly referred to as multi-tasking is by many viewed as chaos. Imagine a Magpie seeing glittery things - that's me => oh that's nice - yeah but what about that - I should really start that - how about this - oh bugger I've broken that bit - need to order that now don't I? (And so it goes on)
########
Speaking of which - I've been chasing down gucci tools and period optional accessories.
I got the tool kit a few months back (a good few months back) in original tool roll
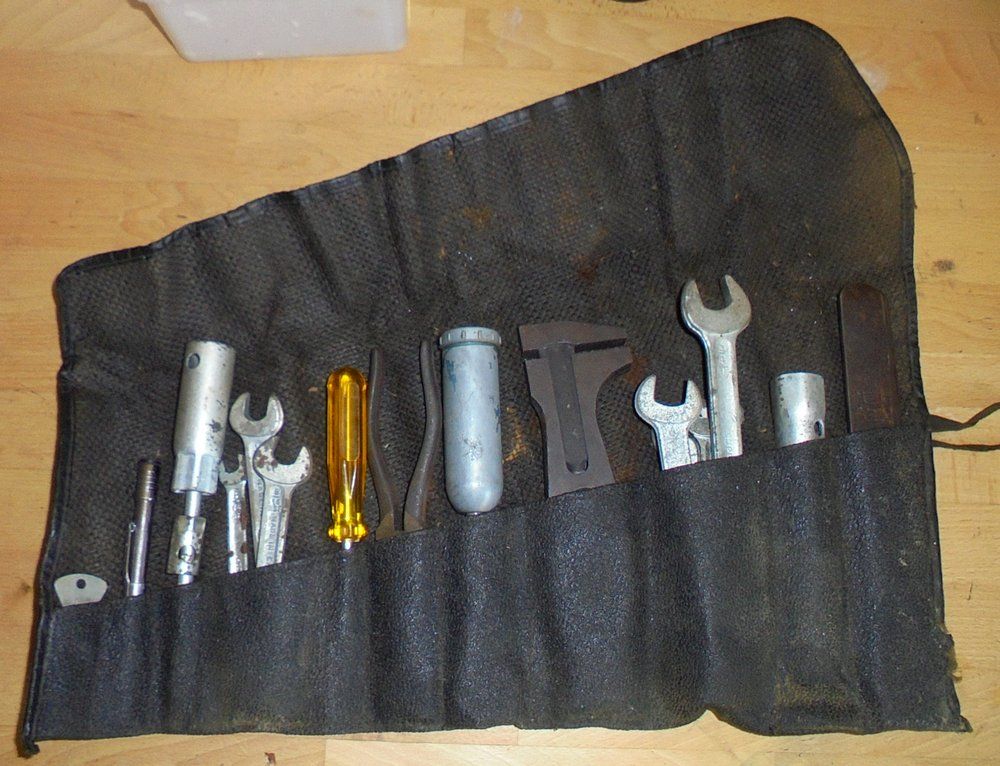
(Which was nice)
I've had a bit of trouble finding a jack (I have a Shelley Tangeye but that's a tad too new for 1965) and I've also had trouble finding the standard delivered stirrup pump.
I have discovered that a company called Aerite made the stirrup pumps (now this might not be the only company used so don't quote me as saying only Aerite is correct or anything like that - Dunlop for example could have supplied stuff as well).
I've asked about on the series 2 club forum about the optional foot pump but nobody up until now has been able to tell me who made or supplied that. I don't think many people have seen "an original series 2a foot pump" any way.
So anyway I've been lurking on ebay looking at stuff and found this Aerite foot pump with original flexible tube and connector for a reasonable price =>
View attachment 129709
Now I don't know for sure if this is the "correct" optional extra but it most certainly looks the part! It is after all green so it'll go with the vehicle's body colour...
I'd replace the rubber tube on the pumps anyway, there maybe some suppliers of fabric covered rubber tube on eBay, as this is a common item for car enthusiasts ...
Colthebrummie
Well-Known Member
- Posts
- 9,870
- Location
- Thatcham
Exactly how big is your workshop? You keep filling it with great toys, is there still room to move about?
Col
Col
It is difficult to say exactly - there's a kind of green house structure bunged on top of it! The floor space is a tad over 70 m^2 - that's about the same as the floor space for a modern house over here - so it might seem like luxury to some rabbit hutch dwellers...Exactly how big is your workshop? You keep filling it with great toys, is there still room to move about?
Col
...but seriously it is indeed a luxury - a bit too big for me really. I need to keep the collecting under control, which is why I go on about "wood being good" cos you don't feel bad about chucking it away. The thing that makes the space proper and good (and luxurious) is the ceiling height. The main main height below the green house roof structure is about 3.4m high. This is ideal and makes the space usable. If I didn't have my pallet racking I'd be tripping over stuff all the time.
The pallet racking is the dog's bollocks - it is the one thing that is continuously in use and continuously being useful. Sure bandsaws and blasting cabinets are gucci and good and all that but you only ever use them when you need them. The pallet racking is currently holding the parts of two dismantled vehicles - if I didn't have that it would be just like on of those 1990s "de-clutter you life" TV programs where they spread everything out over two football pitches and look at you with hurtful eyes whilst they tell you you are scum...
Colthebrummie
Well-Known Member
- Posts
- 9,870
- Location
- Thatcham
Ah yes, I know that look. I get it all the time from the missus.
Col
Col
I got that too - ended in divorce (well I think it was that wot did it!)Ah yes, I know that look. I get it all the time from the missus.
Col
Whilst I don't recommend divorce it does have its benefits. Today I picked up a little 3 phase electric motor with a hydraulic speed controller. Tiny little thing but could be useful for one of my little diversions.
Only cost me a tenner - I bet it leaks...
The new Mrs Stretch will be introduced to the workshop at an early stage - acceptance will also be promoted from an early stage - Love me: Love my shed!
Colthebrummie
Well-Known Member
- Posts
- 9,870
- Location
- Thatcham
Good for you, excellent buy. Do you have a3 phase supply as well? I bought a lathe last year with a 3 phase motor in it, my plan was to put a single phase one in but I can't find a good one that'll fit for the right price so I'm now considering a phase inverter or whatever they are called.I got that too - ended in divorce (well I think it was that wot did it!)
Whilst I don't recommend divorce it does have its benefits. Today I picked up a little 3 phase electric motor with a hydraulic speed controller. Tiny little thing but could be useful for one of my little diversions.
View attachment 129822
View attachment 129823
Only cost me a tenner - I bet it leaks...
The new Mrs Stretch will be introduced to the workshop at an early stage - acceptance will also be promoted from an early stage - Love me: Love my shed!
Col
I guess you mean a variable frequency drive (VFD)Good for you, excellent buy. Do you have a3 phase supply as well? I bought a lathe last year with a 3 phase motor in it, my plan was to put a single phase one in but I can't find a good one that'll fit for the right price so I'm now considering a phase inverter or whatever they are called.
Col
I think these are pretty confusing beasts but then I'm not one for electrickery. The problem with the ebay impression of these things is that everything can be done - you can buy systems that convert single phase to three phase for up to (and beyond) 3 hp motors so it looks like you'll be cooking with gas in no time. Unfortunately you can't get something for nothing - I think you need to consider your domestic supply first. This isn't made clear on nearly all of the adverts I've seen.
Ideally you need to set up your VFD / buy a VFD that is tuned to provide constant torque from your 3 phase motor (constant torque is desirable for cutting on a lathe as you might imagine). Unlike many "normal" electrickery situations where there's a surge or peak current use you're gonna be sucking at a continuous rate - you need to make sure that your single phase supply is up to the job.
(Here's an example of my situation - it might help you - perhaps?)
In my workshop there is a three phase supply. It isn't really a very good one. What the land lord has arranged is a splitter box that is positioned on the end of a rather long extension lead. 3 phase goes to this splitter box that simply allows you to plug a single phase plug into one of three "normal" trip switch protected power outlets. So you can draw up to 16 amps from group "A", "B" or "C" before the trip switches on the splitter box trip.
If I were to ignore the 3 phase availability (which I'll talk about in a minute) and pretend that I've only got a single phase 16 amp supply then the maximum safe VFD and motor combination I could use, is a system with a 1kW three phase motor. Here's a bit of information I've nicked from an ABB catalogue (note 1.1kW is too much for a 16 amp supply!) =>
You are really limited with standard domestic single phase supplies. In practical terms it is quite likely you'll need to get an electrician to wire in a dedicated supply especially if your garage is on the typical (for the UK) spur.
For the most easy to find 3 phase motors in Holland combined with the Dutch single phase 16 Amp domestic wiring: I'm stuck with a 0.75kW / 1hp motor and VFD combination - which for a lathe isn't going to be very jolly. I need to upgrade the supply to at least 20 Amps before I get into lathe propelling abilities.
The three phase situation in my workplace, however, also isn't very jolly because of all of the other "single phase users". They are drawing power too which means in most cases unless I'm there at 3AM the opportunity of three phase use is limited. During the day "Hans" just has to switch on his 2000W vacuum cleaner before he switches on his table saw and pooooof - the trip switch goes.
For the case of that little 3 phase motor I've just bought, however, I'm probably going to be OK because the current draw is shared across the three phases or in terms of the splitter box in my workshop the three groups: I'll be loading about 4 amps per group with that little motor so the trip switches won't be going off too frequently (I hope)...
Colthebrummie
Well-Known Member
- Posts
- 9,870
- Location
- Thatcham
Thanks for that very informative reply, I kinda knew the idea of a VFD wasn't a total solution. I've spoken to a couple,of sparkies and neither were fans of them. I also have a pretty good mig welder that I can't operate anywhere near full power from a standard 240v power outlet, so I'm thinking of getting a sparky to install a 32amp supply to my garage that will run either the welder or the VFD. the option of 3 phase is not feasable, the cost is very prohibitive. I keep looking for a small unit to rent that has a 3 phase supply so that I can get a car lift but I live in the wrong part of they country in terms of reasonable rent. My garage is being used to store motorbikes and landy spares so all repairs need to be done outside my house which is ok for general tinkering but a body off chassis fix would be a no no as too would be any welding, so I do envy you with your facilities.
Col
Col
Radiator panel today.
The lower edge has been cut out and now needs to be replaced with some 1.5mm steel.

(Oh boy wouldn't it be nice to have a decent guillotine instead of having to cut long lengths with an angle grinder and then trim them with shears...)
The bend was made with those vice mounted benders (oh er missus) - good purchase those things - hole positions for the mounting copied from the old bit of metal that was removed...

...half inch holes cleanly cut with hole punches - good purchase them there hole punches!
Figuring out roughly where the new bit needs to be trimmed: Marking edge with a pencil


As you can see cutting edges to fit with an angle grinder produces well wavy gaps - there's nothing much you can do about it except clean them up with a wire brush on an angle grinder and get welding

DC TIG welding - nice and slow - done in small sections after spot welding the closer to each other parts together

I've purposefully left the last bit undone: Until I get the new reinforcing piece fitted.
(I decided to just do the outer skin repair first - or most of it so I could check to make sure I'm getting decent weld penetration. If I had fitted the reinforcing piece to the new outer skin I couldn't necessarily be sure I'd have got it right)

You can see that bending the edge of the panel has made that corner a little out of shape. The other part (including the repair) is nice and flat...

...the plan is to clean up welds and smooth out the pretty side. Then fit the reinforcing piece then bend the corner back and flatten out any wobbles in that area before welding the last bit of the repair. (I know the amps setting on the welder so it'll come good now)
The lower edge has been cut out and now needs to be replaced with some 1.5mm steel.
(Oh boy wouldn't it be nice to have a decent guillotine instead of having to cut long lengths with an angle grinder and then trim them with shears...)
The bend was made with those vice mounted benders (oh er missus) - good purchase those things - hole positions for the mounting copied from the old bit of metal that was removed...
...half inch holes cleanly cut with hole punches - good purchase them there hole punches!
Figuring out roughly where the new bit needs to be trimmed: Marking edge with a pencil
As you can see cutting edges to fit with an angle grinder produces well wavy gaps - there's nothing much you can do about it except clean them up with a wire brush on an angle grinder and get welding
DC TIG welding - nice and slow - done in small sections after spot welding the closer to each other parts together
I've purposefully left the last bit undone: Until I get the new reinforcing piece fitted.
(I decided to just do the outer skin repair first - or most of it so I could check to make sure I'm getting decent weld penetration. If I had fitted the reinforcing piece to the new outer skin I couldn't necessarily be sure I'd have got it right)
You can see that bending the edge of the panel has made that corner a little out of shape. The other part (including the repair) is nice and flat...
...the plan is to clean up welds and smooth out the pretty side. Then fit the reinforcing piece then bend the corner back and flatten out any wobbles in that area before welding the last bit of the repair. (I know the amps setting on the welder so it'll come good now)
Colthebrummie
Well-Known Member
- Posts
- 9,870
- Location
- Thatcham
Nice welding.
Col
Col
That reminds me - I forgot to post about the importance of straight edges!Nice welding.
Col
I'm going to try some other methods of cutting - starting with nibblers I think. The problem with butt welds and (DIY) wavy edges is as follows =>
You have bits that end up being closer to each other and then seemingly random parts with huge (well they seem huge!) gaps between them. So as you go along the joint you need to add in variable amounts of filler rod. This is tricky. I haven't got to the stage where I can add in just the right amount for each part of the (variable) gap yet. I've been told it comes with practice...
...add too much filler and you can get distortion cos the mushroom top of the added metal cools and pulls the joint inwards and down - grinding it flat adds more heat and more of a chance of distortion...
...add too little and you've got a weak joint...
...I've reached the conclusion that it is better to spend more time trying to cut straight edges so the gaps are smaller / consistent.
It looks like I'm off shop shop shop shop shop shop shopping again eh?
Colthebrummie
Well-Known Member
- Posts
- 9,870
- Location
- Thatcham
Have you considered a plaster cutter? With use of a wheel guide and a straight edge to run alongside of you can get a pretty straight cut.
Col
Col
Colthebrummie
Well-Known Member
- Posts
- 9,870
- Location
- Thatcham
B'stard auto correct. Should have said plasma cutter.
Col
Col
Yes I have considered a plasma cutter but then again you end up with the compressor related problem - and the initial cost. I've already got an oxy kit so I'm not too sure the plasma is worth the dosh for my situation.
The guide is indeed the secret. Wood working is so much easier with those rail systems they've been selling in the last few years

I might look into adapting some form of cutting tool to fit into the DeWalt and Makita systems I've already got.
The cutting straight edges problem - however - is more of a problem for cutting metal that's already on a vehicle / panel where it is difficult to attach a guide. I've been thinking about multi-positioning radial saws...
My angle grinder + shears method for cutting new sheet works well enough for butt welding joints even though it takes ages to do. It is just difficult cutting on a car...
The guide is indeed the secret. Wood working is so much easier with those rail systems they've been selling in the last few years
I might look into adapting some form of cutting tool to fit into the DeWalt and Makita systems I've already got.
The cutting straight edges problem - however - is more of a problem for cutting metal that's already on a vehicle / panel where it is difficult to attach a guide. I've been thinking about multi-positioning radial saws...
My angle grinder + shears method for cutting new sheet works well enough for butt welding joints even though it takes ages to do. It is just difficult cutting on a car...
Had a bit of time today to make a small amount of progress on the starter motor whilst I was waiting for Zinga to dry on the radiator panel so I'll show that first.

I thought the big nut on the end of the pin that holds the lever that the solenoid pushes up against would be imperial - it probably is - but an 18mm socket seemed to fit best in the end
I dunked the nose cone in the parts washer and gave it a scrub...

...and that's where the intake manifold is! I've been looking for that!
Despite having the sand blaster the wire brush on the angle grinder is quickest for the odd small part.

Gave is a quick coat of Rustyco gel to make sure the dreaded oxidisation has had a really bad day today

I thought the big nut on the end of the pin that holds the lever that the solenoid pushes up against would be imperial - it probably is - but an 18mm socket seemed to fit best in the end
I dunked the nose cone in the parts washer and gave it a scrub...
...and that's where the intake manifold is! I've been looking for that!
Despite having the sand blaster the wire brush on the angle grinder is quickest for the odd small part.
Gave is a quick coat of Rustyco gel to make sure the dreaded oxidisation has had a really bad day today
Similar threads
- Replies
- 6
- Views
- 1K