1965 series 2a restoration

This site contains affiliate links for which LandyZone may be compensated if you make a purchase.
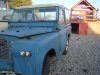
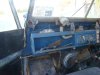
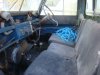
well here goes.i have been looking forward to this but also a little aprehensive as ive been told they can turn into money pits .ah well nothing ventured and all that.
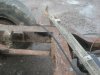
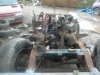
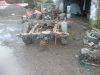
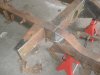
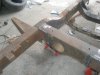
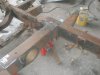
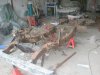
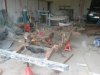
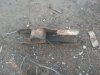
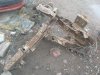
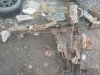
heres a few pics of how she was when i picked her up a couple of weeks ago.
 

Attachments

  • DSC07540.JPG
    DSC07540.JPG
    59.9 KB · Views: 314
  • DSC07541.JPG
    DSC07541.JPG
    58.7 KB · Views: 259
  • DSC07542.JPG
    DSC07542.JPG
    49.3 KB · Views: 242
  • DSC07547.JPG
    DSC07547.JPG
    44.8 KB · Views: 248
  • DSC07548.JPG
    DSC07548.JPG
    46.9 KB · Views: 261
after walking round her for a while looking at this and that i thought id throw a battery on and see what was what.
anyhow turns out she was seized so i took out the plugs and put some kerasene in the bores replaced the plugs and left her overnight.
next day removed plugs again retached battery and pushed the butten repeatedly ,the starter was just clicking but the engine was slowly starting to inch round then all of a sudden she flew round.after jumping round the yard for a mo i rigged up a temporary fuel tank from a 2 ltr drinks bottle and stuck some plugs in crossed everything and pressed the button ,no she never started first time but after a few minutes of cleaning flooded plugs manual choking and playing with the throttle she ran....
life after spending the last 7 years sitting doing nowt but rusting .amazing..
anyhow once she was sort of ok i just left her fast idle with the temp fuel tank hanging ,when she warmed up she was pumping water nicely and sounded great.:)
 
this i where i am at the moment.
ive stripped al the body off and the engine and box are redy to come out.
some pics also of the state of the chassis,the rear is well past it but the front is ok apart from the front dumbirons.
also pic of the new rear half chassis that was include with the sale.
 

Attachments

  • P2230402.JPG
    P2230402.JPG
    48.4 KB · Views: 283
  • P2230401.JPG
    P2230401.JPG
    81.8 KB · Views: 319
  • P2230400.JPG
    P2230400.JPG
    79.8 KB · Views: 329
  • P2230399.JPG
    P2230399.JPG
    78 KB · Views: 537
  • P2230398.JPG
    P2230398.JPG
    80.3 KB · Views: 472
Looks like a big project! Thanks for posting the pics and keep 'em coming.

Worryingly I seem to have started looking at ad's for a suitable restoration project
 
Looks like a big project! Thanks for posting the pics and keep 'em coming.

Worryingly I seem to have started looking at ad's for a suitable restoration project

there is certainly plenty to keep me busy for a while,plenty of pics to come of the repairs and build.
good luck with finding a suitable vehicle,atleast over there you have plenty to choose from.

ginge
 
well you didnt hang around there ginge, and is that chassis not beyond repair? noticed a rear chassis on ebay. think i would have to save up and get a galv chassis for it too.
looking forward to seeing the progress and pictures are a must.... (with instructions for idiots while doing it lol)
 
Are you going to have the chassie dipped after youve repaired it. Only realized how cheap it was when i looked at paint for mine. Be about 200quid for shot blasting and dipping. Worth every penny when you will spend nearly a hundred quid on paint!

Rob
 
Are you going to have the chassie dipped after youve repaired it. Only realized how cheap it was when i looked at paint for mine. Be about 200quid for shot blasting and dipping. Worth every penny when you will spend nearly a hundred quid on paint!

Rob
i thought it would be a lot more expensive than that.i would definately have it done if i could get it done for that price its worth it just for the piece of mind.
i managed to get the engine and box out today and will lose the front and rear axles tomorrow ,ill post some pics of the true horrors:D

ginge
 
had the grinders out today and cut the rear of the chassis off ready for attaching the new sections.the pics of the rear chassis on the floor is basically how it was after cutting it off,it just fell apart,not much left of the gearbox crossmember either.
the front half of the chassis seems to have been saved by the usual leaky engine and box,just needs front dumbirons.
anyhow nearly all welded now ,hopefully off to be dipped soon.
there are a couple of pics of the drawing i used for the measurements that i managed to download ,if anyone requires this i can send it via email.

ginge:)
 

Attachments

  • P3020425.JPG
    P3020425.JPG
    40.4 KB · Views: 310
  • P3020424.JPG
    P3020424.JPG
    50 KB · Views: 341
  • P3020423.JPG
    P3020423.JPG
    53.3 KB · Views: 1,568
  • P3020422.JPG
    P3020422.JPG
    50.3 KB · Views: 316
  • P3020427.JPG
    P3020427.JPG
    73.2 KB · Views: 335
  • P3020421.JPG
    P3020421.JPG
    54.2 KB · Views: 294
  • P3020419.JPG
    P3020419.JPG
    90.5 KB · Views: 303
  • P3020420.JPG
    P3020420.JPG
    90.2 KB · Views: 572
  • P3020418.JPG
    P3020418.JPG
    91 KB · Views: 383
  • P3020426.JPG
    P3020426.JPG
    31 KB · Views: 296
Looking good:). You've had to do a bit more to your chassis than i have.

Mine should be ready for dipping towards the end of next week. Ill post the pics and let you know what it comes out like.

Rob
 
Back
Top