Leak from Heater Box

This site contains affiliate links for which LandyZone may be compensated if you make a purchase.

border

Well-Known Member
Posts
3,517
Location
North East. UK
Bet yous thought youd heard the last of me for a bit and were going to get a rest from solving my problems :D.
Well just had MOT yesterday and found my first problem today.
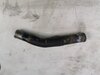
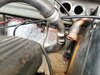
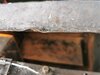
After giving its first few short runs down the dual Carriageway a few times I noticed it was loosing water, took ages to find leak but it is coming from the back of heater box, so take it that its the Matrix thingy.
Been looking at other posts, and think I need to get it out to take a look, now what's the easiest way to do this, anyone any Ideas. Although its not a bad leak it is getting worse.
 
Bonnet off, drill out the rivits, bend back the flap.
Was hoping that was a way to do it rather then take the whole dam thing out.
Mine has the pipes that curve down will I have to get the same as some others have them straight out ?
Or is there a way to actually fix the leak ?
 
When I changed mine went from curved pipes to straight no problem. It is just 4 bolts holding the box in but you do need a mate to hold a spanner on the other side of two of them. Sorted mine off the truck, this also gave a chance to give the foot well underneath some anti rust treatment. A new matrix will no doubt help with the heating.
 
When I changed mine went from curved pipes to straight no problem. It is just 4 bolts holding the box in but you do need a mate to hold a spanner on the other side of two of them. Sorted mine off the truck, this also gave a chance to give the foot well underneath some anti rust treatment. A new matrix will no doubt help with the heating.
Thanks think I ll do it Flossie s way, save taking all the other bits out to get to it. just hope my local Land place has one in stock, there open tomorrow morning,
 
It’s easier to take heater out. Not a hard job but as others have said it maybe useful to have a second person. I changed matrix to a bigger Alisport one which requires a bit of modification to heater box. Take the opportunity to fit new gasket between heater box & bulkhead at same time - you’ll need one. Guaranteed! Also gives you opportunity to make sure all the various flaps etc are moving freely & clean out the debris from the fan.
 
My Landy shop Cant get Matrix till Thursday, probably get one quicker of Ebay.
So if I join both hoses together as in above posts, will it be OK to drive as normal till then ?
Thanks
 
Yes. Just make sure you the pipes don’t make an air lock.
Connect & bleed the air.
My S1 is linked & no heater been like it for years;)
 
My Landy shop Cant get Matrix till Thursday, probably get one quicker of Ebay.
So if I join both hoses together as in above posts, will it be OK to drive as normal till then ?
Thanks
Yes. As birdbrain says (unless you're confident the heater flaps all move smoothly and you have no air from the fan escaping where it shouldn't) remove the box and give it a good clean inside and replace all foam seals while it's nice weather. Winter time is not great to find the heater is poorer than it should be.
For the bypass, from memory, I used 2 elbows and 3 short pieces of 15mm tube to make a 'n' shape,
 
Found this off an old Toyota, perfect for the job, no more leaks, waiting for matrix to come Thursday, was going to drill the rivets out ready but my bloody drills packed up :(, mind you its had some use during the rebuild.
 

Attachments

  • IMG_20200810_105359.jpg
    IMG_20200810_105359.jpg
    133.8 KB · Views: 50
  • IMG_20200810_110938.jpg
    IMG_20200810_110938.jpg
    210.5 KB · Views: 59
Got the old one out, ready for New one in.
first Pic shows flap open second closed, there was a thin layer of old foam, not much left of it now on the inside of this flap in first pic, not sure how Thick it was to replace. Also going to put some round the sides of new Matrix, but there is a large gap inside the box so will have to stick it on side of Matrix with something to hold in place, or would cable ties do wrapped round ?
 

Attachments

  • IMG_20200813_185034.jpg
    IMG_20200813_185034.jpg
    167.8 KB · Views: 53
  • IMG_20200813_185006.jpg
    IMG_20200813_185006.jpg
    296.8 KB · Views: 39
Camping mat and impact adhesive.
Glue it to the flap and wedge it shut for a day. Double up the mat for thicker gaps. The best mat is smooth and soft and warm to the touch, cheaper ones are more rigid and grainy looking. The nicer ones tend to be blue for some reason when I got some.
 
Camping mat and impact adhesive.
Glue it to the flap and wedge it shut for a day. Double up the mat for thicker gaps. The best mat is smooth and soft and warm to the touch, cheaper ones are more rigid and grainy looking. The nicer ones tend to be blue for some reason when I got some.
Thanks Ive got a couple of Gym Matts suppose near enough the same thing, will get a good look at them tomorrow. also got this stuff used for underlay for headlining about 10 mil thick,
 

Attachments

  • IMG_20200328_173821.jpg
    IMG_20200328_173821.jpg
    108.6 KB · Views: 49
Back
Top