Grrrrrr
Technician, Bodgit & Scarper Ltd
- Posts
- 20,038
- Location
- Buckinghamshire, UK. ('95 DT)
@brianp38dse popped up today and we had a go at my brakelines. As others have noted these are attached to the body of the car before it is lowered onto the chassis. Access is not easy. There are 2 layouts for RHD cars (mirrored for LHD). The pipes for the rear go down the drivers side on the underside of the body above the chassis rail. On early cars with a single exhaust both lines go above the suspension cradle part of the chassis and then use some flexis to reach the middle of the axle. From there they go to each brake along the axle. Later models with the twin exhaust stop at the first rear wheel and then a flexi goes to the first rear wheel and a further pipe crosses at the same point to the other side where another flexi takes it to the other rear wheel. From this perspective the later model is somewhat easier as you only have 1 pipe to thread through. The front has one across the bulkhead behind the top of the engine and one that goes down by the pressure switch and along. Neither of them tends to rust although the flexis degrade.
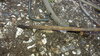
You need slightly more pipe for the early model, approximately 32' of 3/16" kunifer (copper nickel) for the rears. At the time of writing this was £18 for 25' from a reputable motor spares place. You can get it slightly cheaper on the Bay but look for the right grade and make sure they are trusted seller because there is a lot of fake stuff with no stamps on. You'll also need a load of replacement (metric) brake unions including the double-female ones on the bulkhead. You'll also need a pipe cutter, a flare tool and a pipe bender including one of those little spring ones as some of the bends are too tight for the lever type tool. Also, get yourself a full set of flexis. The reason for this is that almost everything will be corroded solid and fall apart when you touch it. Brian has the pictures on his phone but it was really quite scary: Brian just touched one pipe and a damp patch appeared. As soon as he put a spanner on it the pipe broke off. Any vibration off road could have led to catastrophic failure. My car is a '95 but if yours is over 20 years old I'd say replace them. If it is over 22 then you're on borrowed time.
To change the rear lines, put suspension on high then open the tailgate. Jack the drivers side up a few more inches and make safe with axle stands under the chassis rail. Front and rear wheel arch liners out. Next, trace the lines back from the front unclipping the pipes. Clips are eased gently open to the side and then a tug down to unclip the pipe. There's something metal that pops out and the odd one snaps but don't worry. Once free undo one pipe at the modulator and use a male blank to shut it off. After that, don't muck about, undo the union on the bulkhead (same pipe!) and just work your way back, cutting wherever there is a bend and yanking the bits out. Crimp the end of the new pipe shut. Starting at the front, feed the new pipe under the bumper, behind the wheel and down the chassis to the rear wheel. Pull enough through here to finish the run. Thread it through over the suspension cradle (make sure it is above all pipes and wires) and wriggle it down at the far side, bending as necessary. Cut the end off, deburr and using your flare tool (after putting the male connector on first) make the flare. Replace the flexi and then loosely tighten the joint up. Repeat with the other pipe noting which side the pipe lies each time. Once the second pipe is done work your way back to the front clipping them back into place and bending gently to make sure it isn't touching anything other than the clips. Use cable ties either side of the clips to make sure the pipes are held securely. After that, continue with the bits across the axle and the final flexis. Once you're happy, work your way along tightening all unions. Bleed brakes checking for leaks, liners in and thoroughly wash off any leaks of fluid.
The pipes will never be ruler straight without taking the body and stuff that for a lark. You're looking at the best part of a day to do the rears at an easy pace.
Last edited: