Series 3 109 Station Wagon, full ground up resto and 88 redo careless resto driving project

This site contains affiliate links for which LandyZone may be compensated if you make a purchase.
Still working on the N/S top bulkhead.
I think if treated regularly with waxoil or the like, a good bulkhead won't go bad!!
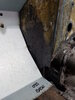
Have not removed my bulkhead from the chassis to repair because a couple of parts have been completely consumed by the tin worm, and the chassis makes the best jig for me.
20200424_212030.jpg
20200501_164449[1].jpg
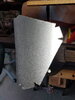
Making a stiffener plate to take the inside captive bolts that support the windscreen
20200502_161954[1].jpg
The Plasma cutter is a pleasure to use, I'm using galvanized steel thus the mask always..
20200503_111313[1].jpg
20200503_145304[1].jpg
20200503_162138[1].jpg
The stiffener May not be quite like tho origional, but from what I can glean from the other side - should do a great job and is really strong..
20200503_163449[1].jpg
Tomorrow I hope to weld the doorstop back plate with it's welded 10mm bolts. 1982 model and most of the stuff on the bulkhead are origional metric size.
The Bulkhead has got some extra bracing so I can cut out and completely replace the side and bottom of the A pillar, all YRM Metal Solutions Ltd and self fabricated, because it would seem nobody does the inside bits ?
Fabricated all the inside bits, but since I didn't need the full top corner and vent repair panel, was able to cut an inside vent repair section from what I had left.
Ref code 242 Bulkhead full repair panel pair at £80. so getting extra repair parts for really difficult to fabricate parts, ( inside vent area curved all the way round), made bying the full repair panel worth it.
My inside repair panel made of three welded sections, will be butt welded and made smooth,
 
Been busy butt welding the inside panel of the bulkhead together, which has caused some buckling unfortunately. However I took delivery of a shrinking hammer yesterday. We all need a shrinking hammer lol ! Used with a dolly I am trying to pull the panel tighter and flatten it a bit.
Ph 3243.jpg

The new door pillar and foot are welded in and everything is starting to fit together very slowly.
Ph 3262.jpg
The butt weld doesn't look so bad from engine bay side, and I need to start on the footwell 033/034 repair panels 21 each as a complete panel from YRM.
Ph 3261.jpg
The LHS full door pillar 047B £31.50, and LHS lower door pillar foot (YRM052) 047B 24.50. All the internal panel and stiffener and back brace to door stop both with welded captive nuts, yeh we all need them too lol _ I formed from 1.2mm galvanized steel sheet.
 
With the A pillar all welded in,moved on to the complete foot well repair panel and outer side.
This would be all very well exept the inner part of the foot well was corded at the bottom of the transmission tunnel
20200508_124927.jpg
So I made an inner repair panel, by making a paper template cutting 1.2mm galvanized steel then folding the edges.
20200508_170603.jpg
20200508_174030.jpg

However the inside part of the passenger foot well has other bends in it to wrap round the bell housing. So I replicated these using the repair footwell panel as a guide.

20200508_181532.jpg

20200508_182630.jpg
20200508_182633.jpg
Which doesn't fit too bad...
20200508_184428.jpg
 

Attachments

  • 20200508_124927.jpg
    20200508_124927.jpg
    388.5 KB · Views: 136
  • 20200508_170603.jpg
    20200508_170603.jpg
    353 KB · Views: 123
After carefully removing the nearside panel of the transmission tunnel, right hand side of the passenger foot-well. was able to do some test fitting of the complete repair foot-well panels.
20200509_144830[1].jpg
20200509_153915[1].jpg
I am using Tec screws to hold the panel parts together, at the right at least. Tec screws are self tapping metal roofing screws with a 10mm bolt head, when a 5 to 5.2mm hole is drilled they screw in pulling the two parts together. whe lots of holes have been drilled for plug welding, they are used to hold for welding. after the other holes are welded the screws are removed and also welded up.
20200509_144903[1].jpg
20200509_161637[1].jpg
Although I did drill all the holes and finish them in prep fir welding, I have no pics yet. Also I replaced a weak section of where the top of the foot-well will be welded, it was a bit thin with some tiny perforations.
I have a strong urge to crack on as we all do to get past this lockdown. But now is the time to replace small sections of thin weak metal, as once it's welded it will be much more difficult to do in the future; and the whole point is to rescue this best of British Classic. It's not about making a quick buck or just getting her back on the road which she has not seen for over a decade.
My hope is to make not only good long lasting repairs, but to partly re manufacture while retaining as much of the original vehicle as possible such as chassis, engine, gearbox, bulkhead. Thus assuring her heritage.
This model just got an alternator and bigger assisted brakes, With a Fairey overdrive I think she will be derivable enough, despite a lack of power and power steering. I will keep everything completely original except the type of paint which will be U-pol 2k urethane paint, in the original colours possibly with a clearcoat finish. I think this paint is amazing and very long lasting and tough. So hopefully I won't need to re-paint her for a couple of decades If I'm still permitted and able to drive her when she's nearly sixty years old, and if I am able lol.
Anyway dreams apart, tomorrow I hope to weld the passenger foot-well panels in and make good the Near Side of the bulkhead.
 
I seem to have been drilling welding and grinding for a long time and still have lots to do for the passenger foot well...
Perhaps I am making more plug welds than are needed, and I spent some time tidying the flange edges of the side panel I fabricated.
20200511_131243[2].jpg
20200511_131256[1].jpg
20200511_134013[1].jpg
20200511_193215[1].jpg
So I drill a 5mm hole through which is a good size for the Tec screws to pull everything tight. Then I use a larger drill to give good clean 45 deg edges to both panels for penetration and contact of the weld. Everybody plug welds slightly differently, some don't drill through but just into the second panel then clean with a larger drill so both parts present good clean metal.
I have been taking ages today cleaning up the excess of the plug weld with the grinder as I go so it looks nice, all quite unnecessary but rewarding in a strange way too. Is that just weird or what ? lol.
I know the driver side needs less work, apart from removal of the steering and brake components, but apart from the O/S door pillar A pillar foot having completely disintegrated, there are less full sections needed. So, hopefully, it will take a little less time and I think I am getting faster as I get to grips with the bulkhead's construction which is quite unlike anything else vehicle wise that I can think of.
The idea is to remove the bulkhead once it has been repaired, then I can spend some time finishing it to a better leval, prime it in high build 2k primer and put ut aside so as to concentrate on the rolling chassis which needs some repair, but is not all that bad. I bought a couple of bottles of Metamorphosis from Land Rover Blogger too, for the chassis, but I've been playing around with it a bit. It is acrylic based and seems to work best if it can't dry too quickly. I don't know how well it will bond with the metal compared to an acid etch primer followed by high build 2k, which I know works very well. I have even tried spraying it, the idea being to treat the inside of the chassis and then follow on with waxoyl. Some prefer Dinitrol, but I like Waxoyl and if the big pressure spray can is tossed in to a bucket of very hot water for a while, it spray's great.
What have other people found works best on their chassis ??
 

Attachments

  • 20200511_110506[1].jpg
    20200511_110506[1].jpg
    321.7 KB · Views: 146
  • 20200511_131243[1].jpg
    20200511_131243[1].jpg
    308.9 KB · Views: 141
  • 20200511_131256[1].jpg
    20200511_131256[1].jpg
    263.3 KB · Views: 178
  • 20200511_131318[1].jpg
    20200511_131318[1].jpg
    252.5 KB · Views: 195
  • 20200511_192527[1].jpg
    20200511_192527[1].jpg
    350.9 KB · Views: 139
Hi, looks like you’re making great progress now. Good work. I am using Corroless primer and topcoat on the outside surfaces of the chassis and Dinitrol on the inside. I’ve had great results using it on my other classics and it seems to be quite long lasting too.
 
Thank you,
Corroless paint looks good;
Have seen an Aussie who has done some genuine YouTube vids on his series two chassis using it too, although they don't live in the rust belt as we do lol.
Buckled the legs on my engine crane pulling stumps out [ATTAC
20200518_145749.jpg
H=full]209853[/ATTACH]
Oops,
So I've been repairing the legs, good practice as it's the same thickness as the landies chassis. I need practice using my old 1964 Oxford Stick welder. Which has been fun. Also welding an extra piece of 3mm steel plate on the top of the square section for more strength. But great practice for chassis repairs I will be doing after completing the bulkhead, which is taking a long time.
 
Welding an extra 3mm piece of steel along the top
15902362239752886803990062068983.jpg
Getting practice for the chassis

Would like to remove old patches and make a repair piece, removing and replacing the old metal. Because some of the old repairs just look nasty...
15902364780211295657018476335131.jpg
My welds are starting to look ok
15902365734007341189709834190454.jpg
This weld is just to add some strength to the top part of square section. So it doesn't need to be any thicker as it has really good penetration.
 
Thank you sir,
The plasma cutter was surprisingly good value on eBay. It needs a fairly big compressor and tank attached as it uses lots of compressed air when working. But it sure beats lots of cutting and endless grinding
 
Been finishing off the passenger side of the bulkhead.
The repair panels have a different outer upper edge than the original series 3
IMG_20200526_114415.jpg
IMG_20200526_114409.jpg
So I fabricated a small piece to fold and provide the original top edge to weld the corner bracket to.
Which was welded on to the top of the footwell and alowwed the original corner piece to be re-welded as it originally was
IMG_20200526_141927.jpg

Small section was made by paper copy of other side
IMG_20200526_161040.jpg
IMG_20200526_161113.jpg
IMG_20200526_161306.jpg
 
Looking good. I did the same with my replacement footwells. I’ve no idea what it does, perhaps adds some additional strength?
 
Maybe. Certainly the small shaped triangular part is bracing the A pillar to footwell. I presume it was simplified on later vehicles to make manufacturing cheaper, possibly. But when the officio ado's look, I would like them to think it is as it should be lol. Probably aiming too high there.
To get a British heritage looking and running box fresh, not for a museum, but to be running about on the roads, is the goal.
These old greats are most alive when one drives past. They stand out proud against the flow of modern day sameness. I just love it when something drives in the opposite direction that catches your eye, and flings you to a different era, it sort of reminds you we're all human somehow
 
Test fitted the window back on the Bulkhead today after adding a small patch to the top inside n/s corner.
IMG_20200527_173900.jpg
IMG_20200528_143442.jpg
It was necessary to do a little fettling to get everything straight again at the top. Two pieces of angle iron and a modified vice helped.
I was delighted the front window mounts fitted so well as there had been so little metal left and I had to replace everything, like inside and outside of vent upper portion and everything but the mount to the outer parts.
IMG_20200528_153841.jpg
the only problem found was the top part of the bulkhead, where it meets the window had pulled in too much and was not the same as the other side.
So I made a small patch to make it identical.
IMG_20200528_165905.jpg
IMG_20200528_172241.jpg

Which will get welded in tomorrow I hope
Them finally can replace the O/S A pillar and foot.
Somehow I'm thinking the other side may not take so long, as apart from a completely disintegrated foot it's nothing like as bad...
 
Back
Top