2.5NA rewire - Autosparks

This site contains affiliate links for which LandyZone may be compensated if you make a purchase.

gees a push

Member
Posts
27
Location
Glasgow
Hi all

looking to rewire my '88 90 2.5NA. Is there a cheaper option / supplier to go through rather than autosparks at a cost of about £750 all in?
 
Could you not build your own loom? I've done it to a series 3 in the past and I'll do it to my current rebuild, if it's being done as part of a vehicle restoration it's not that tricky as access tends not to be a problem. I've got no experience of early 90s electrics but can't imagine at 88 they had yet to get Canbus, ECU, OBD and the like that would escalate the buggerment factor greatly. You'll need to know what gauge of wire you will need for the various loads but you don't need an electronics degree lots of information on the web and lots of online suppliers of the bits you need. A link to one found at random below.

https://www.autoelectricsupplies.co.uk/product_list/255

hi


I also done the same on an old series as indeed cost of them were extremely expensive

Smoke started to pore out of the dashboard , when I removed the instrument panel there was , insulation tape, a lot of scotch locks etc

removed the loom as carefully as possible, went to a printer shop who enlarged and printed out the wiring diagrams , laid out the loom and replaced one wire at a time

also handy the length of the wires / diameters / colours are all on the wiring diagrams

saved a small fortune but know it does take time but was actually very therapeutic and of course handy as can be done in sections as per manufactures original design
 
Last edited:
.......went to a printer shop who enlarged and printed out the wiring diagrams , laid out the loom and replaced one wire at a time

also handy the length of the wires / diameters / colours are all on the wiring diagrams......

Excellent way to go about it and doable for anybody with an ounce of mechanical/logical aptitude. With a little more understanding it's possible to make your own "improvements" to the original. The series 3 I rewired was not my vehicle, I was asked to help out as the owner was carrying out an extensive rebuild and he wanted some changes. Long time ago now but additional fuse box added so the extra lights/electric fans and the rest didn't run thorough the original 4 fuses and the ability to cut power to the electric fan when wading in deep water so you didn't shower the engine bay in water spray a loud buzzer would sound so you did not forget and leave the fan off once out the deep stuff, where a couple of the additions I remember.

On my current rebuild I want to add multi connectors to the dash wiring so the dash and clocks can be removed easily, always hated the way anything that needs doing to the dash is a pain in the backside on a series 3 and the way in which fixing one dash fault usually results in a wire being dislodged somewhere else and creates another problem.
 
Get a decent crimping tool, dont buy cheap rubbish, use superseal connectors or similar or at the very least open barrel but dont use crappy insulated/none insulated connectors, blade fuse box, there is actually a lot of wires in an old 90, especially the main loom, but its doable. You could run the heater for instance through a relay instead of the switch, lights through relays, better earthing arrangements, starting from scratch with one of these is a good way to go if you have the time, knowledge and money.
 
Excellent way to go about it and doable for anybody with an ounce of mechanical/logical aptitude. With a little more understanding it's possible to make your own "improvements" to the original. The series 3 I rewired was not my vehicle, I was asked to help out as the owner was carrying out an extensive rebuild and he wanted some changes. Long time ago now but additional fuse box added so the extra lights/electric fans and the rest didn't run thorough the original 4 fuses and the ability to cut power to the electric fan when wading in deep water so you didn't shower the engine bay in water spray a loud buzzer would sound so you did not forget and leave the fan off once out the deep stuff, where a couple of the additions I remember.

On my current rebuild I want to add multi connectors to the dash wiring so the dash and clocks can be removed easily, always hated the way anything that needs doing to the dash is a pain in the backside on a series 3 and the way in which fixing one dash fault usually results in a wire being dislodged somewhere else and creates another problem.

hi

Must admit it was some years ago and took me weeks and weeks because I had never done a loom before so indeed just ensured I took me time

currently been adding aux fuse boxes in my lastest landy , know it’s a different model but thought the principle is the same and wished to share a few bits

have a split charge battery system fitted and that fuse box I fitted in the upper glove box runs the lower gauge panel I added, done it via a relay so when I turn the ign off it kills power to the fuse box and gauges , added a dual battery volt meter gauge

plus 1 ref the tools ,

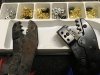
here’s a few pics and of course like all of us happy to help where ever I can , have had to do an extensive amount of wiring in mine to fix a lot of previous bodges etc so spent ages looking for different companies so kept the links so can easily share them

found a,so very helpful we’re pin connector removal tools, battery crimper which is so great when trying to crimp 16mm cables


where abouts are u in the uk plse

Hopefully u haven’t nodded off, lol

the 3rd pic I spent weeks adding an aux socket to the dashboard , hopefully it’s not to easy to spot because I wanted it to blend in

07893BA1-072B-4551-A3F6-2946A5FAB6DB.jpeg
5F5FA785-ADD0-4132-8A64-6C70633234B7.jpeg
ED2922FD-4C66-4D9A-BEEE-CD16C8437340.jpeg
E8C7ED8D-01A5-4F78-A6DA-A4C2883A4FCA.jpeg


E8DD3559-65D9-4071-81D8-A80BEE314BD9.jpeg
4BF74CDB-0C56-4FAE-AF81-B5866F86A6D3.jpeg
ATTACH=full]197866[/ATTACH]
189D4328-4223-4BC5-AA1A-A1EED7EF3188.jpeg
E34F5D4F-C787-4723-A3AE-81B3E8697F81.jpeg
BB43F045-1C3C-4664-956B-258DB26AFD44.jpeg
 

Attachments

  • CE866272-7DD0-4BF7-89E3-D07002483543.jpeg
    CE866272-7DD0-4BF7-89E3-D07002483543.jpeg
    264.6 KB · Views: 112
Last edited:
make your own, but it'll take time but it will be custom fit to the exact size as required.

The autosparks loom will have some extra no doubt to cover themselves
 
This is what I also done when I installed my split charge system, before hand fitted conduit and also got the conduit tees for them so they clipped together properly , inc the heat shrink to protect everything under the bonnet

yeh i know, I need to get out more , lol

E260DE56-F2F1-406D-B94E-CFA4A22E70A8.jpeg
36FE43EC-2E11-4898-91CA-03830D55D688.jpeg
0241D2AD-9FC2-4067-B600-EB663A9BFE5C.jpeg
 
where abouts are u in the uk plse

Lancashire, where the moors are red and skies are grey.

Neat install. In my experience the neater it's laid out and tidier it looks the better all the bits you can't see will be (crimping the terminals, proper grommets through bulkhead/panels) attention to detail tends to extend throughout.
 
Lancashire, where the moors are red and skies are grey.

Neat install. In my experience the neater it's laid out and tidier it looks the better all the bits you can't see will be (crimping the terminals, proper grommets through bulkhead/panels) attention to detail tends to extend throughout.

cheers , only reason I asked was if u had needed a hand , of course not telling u how to suck eggs but just making life a bit easier

many thks , know I’m my own worst enemy because I like things done just so and indeed easier to trace if it’s laid out neat and tidy, but know a lot of us here are the same with working on our pride and joys

also bought one of the soldering iron stations that also has the hot air gun , found it really handy to have for the heatshrink , but know some prefer a separate iron and hot air gun

think it’s just down to personal choice

069A2BE3-B758-4128-91EF-F67DD4F172E1.jpeg
 
cheers , only reason I asked was if u had needed a hand , of course not telling u how to suck eggs but just making life a bit easier

Kind offer many thanks. It's going to be some time before the wiring will be addressed. I did fit a second battery but simply wired it in parallel to the main battery (both batteries where same make, model and capacity). It did not cause me any issues but a split charge system would be an improvement and I'll know doubt be asking questions in due course. If you have not seen a few pics and notes on progress so far.

https://www.landyzone.co.uk/land-rover/bulkhead-recommendations-and-mot-tax-exemption.353700/

No probs and bless u for the link, will have a look
 
Sorry for the radio silence. Away on holiday just now and forgot to check back.

Is there a wiring diagram for the 2.5na that has the tracer colours and lengths on it? I think I did see one before but can’t see it for looking now.
Generally - would the old connectors still be ok to use? If I was to do a diy job
 
Just copy the existing, I would not be using bullet connectors if I was going to all that trouble.
 
I am looking to try get everything ordered in advance to save the downtime of not having it on the road

That would be one hell of a gamble, it will be a lot of work building a loom and a lot of money too if you get it wrong, down time wouldn't be too long, from stripping out, measuring, redesigning , ordering bits, building the new one, stripping it out would be the hardest, noting where everything goes and what it does. Also any alterations may have to be custom built during installation to make life easier. If you get it wrong it could well be a pig to diagnose once its all installed.
 
Ok. So with the rewire

Are there any suggested upgrades I should be making?
Is there a blade fuse box that people have recommendations for?
is there a 65amp alternator or higher that’ll swap in for the 45amp without any modifications?
 
Back
Top