Bankz's 110 Double Cab

This site contains affiliate links for which LandyZone may be compensated if you make a purchase.
So looking at hinges they are all FAR too expensive and just not interesting in spending that kind of money.

Falls to SPLR and their Piano Black hinges or standard hinges from MPS Trading coated in the usual Buzzweld paint. Should last... I hope both roughly the same price (after paint) but the MPS set includes the bomb proof hinge guards. Tempted.

MPS hinge guards anti theft? I'd get those mate
 
All the "security" hinges are £500+ for a 110

SP do a nice set but just found out they only do them for 90s so thats out.

Standard bare set from MPS it is then. Ill get some advice from buzzweld on painting.

Annoying thing is my mate was meant to be designing some security hinges but has been to busy at work to finish em :(
 
Why not knock the pin through/drill it out and go for an oversize stainless pin?

I saw it once and the guy tapped out the bottom of the hinge to accept a grub screw to hold the pin in and he also drilled and tapped the rest of the hinges and fitted a grease nipple to them so that they can be greased.
 
Thats basically what my mate suggested to start with however my hinges are buggered in more ways than one. Fronts have huge play (drivers is about 1/2" up and down!) paints peeling off all of them, where it isnt peeling its bubbling badly. On top of that some are rotting as well. They need replacing.

So gone for the MPS set - They usually sell decent bits at a good price from decent brands. With the Bomb Proof door hinge guards, so another layer of protection :)

Ordered all the various paints from Buzzweld so new hinges should last a fair while. Going away the weekend so hopefully if all arrives I'll have it done by then. Just got to hope the other doors last.... The mrs will not be please if a door falls off on our weekend away :oops::rolleyes:
 
Got a couple of these from Bluesea to sort out a couple wiring issues i have (because i was lazy the first time :oops:)
IMG-20180823-WA0018.jpeg

Basically the dascam, pas sensors, 12v socket and one or two other things are all piggy backed off the 12v socket - Done this way as I wanted them all on switched lives and was the most simple way at the time.

However often when I hit a hard bump or go off roading the earth often comes loose and thus i loose some leccy bits!

Plan is to try and fit a pair of the above behind the dash as a base for various switched lives and another for earths. Should solve the issue! Also should allow some easy expansion if needed i the future
 
I did the back, left side and half of the right side of the cab windows on my digger at work, used a mirrored tinting film, came out really nice, can't do the Disco as all the back windows are pock marked from previous welding and grinding :oops: :(
 
Busy day today!! Bit the bullet and decided to fit the VGS heated screen, fitting took roughly 3 hours without wiring. Overall reasonably easy to fit, surprised myself! The silicone sealant was a little messy but that is the nature of the stuff, at least with me :oops:

Start by pulling out the headling/trim, obviously snapping every trim clip as you go :oops::rolleyes: Fold down the rear seats as well.
20180827_142921_resized.jpg


Drill out the rivets around the window, theres a fair few. Need a 5mm bit
20180827_142925_resized.jpg


Window should pop out, with some persuasion and a flat head screwdriver. Took some effort to break the LR sealant and my the stuff I added. Comes out quite easy though

20180827_143045_resized.jpg


No turning back now! Start cleaning up the area, took a while to get all the old glue and sealant off. Bit of brake cleaner, elbow grease and about 6 sponges.

20180827_144240_resized.jpg


I soaked the new seal in a bucket of hot soapy water for about 15 mins to soften up and help it slide in. The seal supplied is longer than needed and must be trimmed, the instructions suggested fitting it as far as you can then cutting it back leaving roughly 1/2 inch, though I had to cut a touch more of so it would actually fit and not pop out. After two goes it went in and stayed in. Chose to put it "backwards" with the filler strip on the inside to make it a little more secure.

20180827_151503_resized.jpg


Now for the scary bit! Gently ease the glass into position, I started by dropping the bottom in then working from the right corner around. Working very slowly and carefully, also taking care not to add to much pressure. The tool supplied worked well

20180827_154349_resized.jpg


No pics of the next bit as it needed both hands and had to be done in basically one move! You must fill both the rubber seal to body side and glass side with the sealant supplied. Made a huge mess but eventually got it all sealed up! After that push the locking seal strip in place with the tool supplied, doing this will push the seal tight and more silicone will be pressed out and more mess made! Takes a while but cleaned it all up.

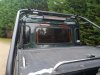
Got to say I am loving the new look! Really happy. Whole thing just needs a bloody good clean now!

20180827_180132_resized.jpg


Finally also finished painting the hinges. x3 Coats of Buzzweld EIO, x3 coats of Buzzweld Base Coat Epsom Green and x2 coats of Resin+ Lacquer which has given a wonderful deep shine. Now to let them dry for a good 24 hours! Coat of polish then the joy of fitting them + the Bomb Proof hinge guards and stainless security bolts.

20180827_140151_resized.jpg

20180827_140228_resized.jpg
 

Attachments

  • 20180827_175438_resized.jpg
    20180827_175438_resized.jpg
    610.9 KB · Views: 193
Yeah I absolutely love it. Can't stop looking at it haha, I was a little apprehensive that it would be too much/look a lil "gangster" but Im over the moon if Im honest!

As for the hinges now the lacquer has properly dried/hardened they look even better. Hats off to Buzzweld! Going to get a layer of polish on before I fit them which im sure will take a fair while!
 
Bit of a boost leak today! I wondered why it was smoking again and why i suddenly had 30psi of boost o_O:oops::oops:

Fixed it. Needs re doing properly on the weekend. Very lucky i didnt blow something!

received_276393932969926.jpeg
 
Back
Top