FreelanderKate
New Member
- Posts
- 2
I was just wondering if anyone had any experience in doing this or can confirm if this is a lengthy job.
I use the AUX port to plug in my ipod and unfortunately the pin on the cable broke off in the AUX connector. Subsequently I have tried using a new cable and by doing so have possibly distorted the connector.
My dealership said they have rectified the problem (charging me for it) but haven't as the connection is poor and doesn't come out of all speakers (think they just removed the broken fragment).
They now say it is an extensive job to have another look at it and would charge 2 hours labour but can't sell the AUX port as a separate component.
I was wondering how easy it would be to remove it and look at it myself?
Does this require removing the entire centre console and if so is this easy or can the AUX port be easily extracted.
I am sure if I can get it out it will just be a case of nipping the connector closed with a pair of pliers to make the connection better once replaced?
Any help appreciated.
Its on a Freelander 2 - HSE TD4 on 07 plate.
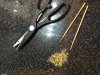
AUX connector is at the end of the console behind the cigarette lighter terminal.
Either I fix this or spend £350 on an kit that works off the steering wheel!
Pictures for reference attached


Any help appreciated
I use the AUX port to plug in my ipod and unfortunately the pin on the cable broke off in the AUX connector. Subsequently I have tried using a new cable and by doing so have possibly distorted the connector.
My dealership said they have rectified the problem (charging me for it) but haven't as the connection is poor and doesn't come out of all speakers (think they just removed the broken fragment).
They now say it is an extensive job to have another look at it and would charge 2 hours labour but can't sell the AUX port as a separate component.
I was wondering how easy it would be to remove it and look at it myself?
Does this require removing the entire centre console and if so is this easy or can the AUX port be easily extracted.
I am sure if I can get it out it will just be a case of nipping the connector closed with a pair of pliers to make the connection better once replaced?
Any help appreciated.
Its on a Freelander 2 - HSE TD4 on 07 plate.
AUX connector is at the end of the console behind the cigarette lighter terminal.
Either I fix this or spend £350 on an kit that works off the steering wheel!
Pictures for reference attached
Any help appreciated