wrickm
Active Member
- Posts
- 139
- Location
- Virginia, USA
First an acknowledgement. All this information is out there, I just don't like the way it is presented. Here I will give you my thoughts and procedure for modifying, tuning and monitoring your 200tdi engine.
More fuel = More power, but it also mean more pressure and heat. The richer the mixture burning in your cylinder the more heat is created and the more danger to your engine. Correct tuning is finding the most fuel you can inject without burning too rich, and distributing the new power throughout the rpm range.
First thing's first. I would not recommend attempting to tune your engine without both a Boost gauge and an exhaust gas temperature (EGT) gauge. If you are just relying on smoke to guesstimate your tune job I feel you are asking for trouble. Boost max ~1bar (~15psi) Not really a hard max, but I don't feel the injection pump is capable of delivering enough fuel for there to be reason to go any higher. EGT max 720C (1328F), this is a hard max. Don't touch it. If you tune to go to max one day an overly steep hill or a heavy load will have you going beyond it, and then there is a very real chance a piston will melt.

Once you have your gauges on it's time to add a little more air. To do this we're going to adjust the turbo wastegate. This is pretty simple. The wastegate has a threaded adjustable rod. Simply break the lock nut free on the rod, remove the retainer clip holding the rod to the valve on the hot side of the turbo, slide it off and then turning it to shorten the rod. You may well have enough room to make several turns. I recommend about 4-5 full turns. Snug the locking nut. then using pliers and some strength manually extend the rod back to return it to the valve. Replace the retainer clip and you're done. . . ideally. Sadly it is likely to be just a bit more complex as you may not have enough play in the rod to make the full 4-5 turns. In this case remove the female portion of the rod completely then use a small cutting tool (I recommend a dremmel) to remove 5mm or so of the male threaded portion of the adjustment rod. Do this carefully and file the edge to remove burs. Re-thread the female portion of the rod and adjust as above. Marking the threaded portion of the rod with original and desired depth will make keeping track of the adjustment easier. As stated above target is ~1 bar (15psi)
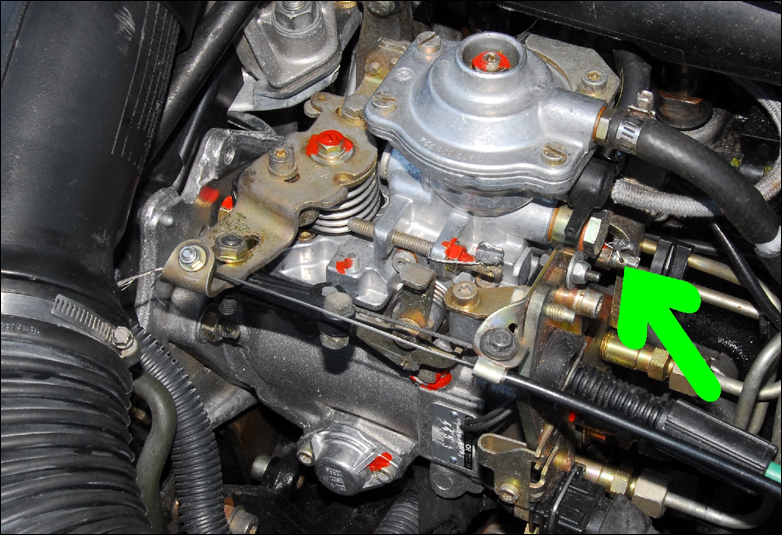

Now we can start adjusting fueling. And here is where I think a lot of the tutorials go awry. Start with the main fuel adjustment. We do this first as this is the adjustment that affects all the fueling and will have the most major affect on your engine. All the other adjustments only refine what we are doing here. The Main fuel adjuster is a flat head screw with a locking nut and a collar on the back of the pump. This may have some rubbish plastic bits on it that you can break off. Use a deepwell 13mm socket and remove the entire thing. A couple table spoons of fuel may drop out so catch them or, y'know, don't. Mark the current position of the 13mm lock nut to the screw. Paint markers work great. Next remove that anti-tamper collar. I did the in 5 minutes with a screw driver to pry it open and pliers with the screw driver to peel it off. You're modifying your engine so just get the collar off however works for you. Once that's done adjust the screw 1-2 full turns deeper into the lock nut (clockwise). Being careful not to allow any further adjustment (I used a drop of superglue like a weak locktite) re-insert the adjuster into the injection pump using the flat head to tighten. To be clear, do NOT use your 13mm socket to tighten it as it will screw up your adjustment. Now, start your engine. It will very likely idle high, and must be adjusted. The idle adjustment is on the left side (from facing the pump) just under the diaphragm housing. A 10mm lock nut is on the rear side. Loosen this nut and rotate the idle screw stop back. Using some penetrating lube will make this much easier. This was a big adjustment on my truck taking the idle from 2500rpm back to 750-800
Test drive now. Ignore smoke at pretty much anything other than full load. If at full load your get black smoke, back off you adjustment. Same goes if your egt's are too high. example: while hard accelerating to 70mph I see a max of about 1200F (649C) no smoke. That's pretty perfect. If you have no smoke and lower EGT's dial up the adjustment a bit, and retest. Once satisfied you have now adjusted the max power of your engine. Now let's refine it.


Now the fuel delivery rate adjustment. Think of this as the adjustment that determines how quickly and drastically your injection pump reacts to increased boost. This will have a big affect on acceleration. Remove the four flat head screws that hold on the diaphragm cover on the very top of your injection pump. Big honk'n screw driver for this so that you don't strip them out. Once removed you will see a metal disk with a nut in the middle surrounded by black rubber. This spins freely so don't do that! At least not until you have marked its original position. (woo paint marker) Now turn the diaphragm 90-120 degrees clockwise. I'd start with 90. Replace cover and test drive. You're looking for increased response in boost. Be careful of EGT spikes and black smoke at just below full load. You may see a little more egt at Full load but it should be largely unaffected. The path up to full load is really where this applies. Adjust more or less aggressively based on results.
Note: A lot of other tuning articles talk about adjusting the star wheel under the diaphragm, and even the spacer under that. I do not like nor recommend this. The star wheel adjustment weakens the spring tension holding up the diaphragm. It lets it move further under lower boost, but not further overall. In my opinion you're just lowering the boost at which you deliver full fuel so it effectively shortens the pedal travel needed. To me this decreases driver control of the power, and can cause you to over fuel until the boost matches the fuel. It's your choice of course but you are not creating more power with this adjustment. If anything I increase the pressure on the spring to have more even fueling as boost increases and so with it gain more power control.
Lastly the low pressure fuel adjustment or smoke screw. This is on the top of the diaphragm housing and may be covered with a plastic cap. Use a flat head to remove that cap exposing a 13mm lock nut with a T25 star bit screw in the center. Loosen the 13mm nut and turn the T25 screw clockwise to add fuel at lower pressures. This helps give you more kick off the line. I adjusted mine about 3 full turns. I get a little white smoke at start up but nothing unreasonable. If you are getting too much smoke (possible because of the main fuel adjustment we made earlier) simply back it off now. Test and adjust to taste. We're done now and I bet your 200tdi feels like a completely different animal!!
Extra info:
Smoke:
Black smoke is cool, but wasteful and can get you in trouble. It means you are over fueling and shooting carbon coated specs of un-burnt fuel out of your tailpipe. Ideally be patient and adjust your fueling as above just until the black smoke is completely gone. That sweet spot just after the last black haze is gone is where you are burning efficiently and powerfully.
White smoke is not cool and wasteful. It is completely un-burnt fuel and if you have done everything above and you are seeing it at anything but start up then something is wrong. A little as your engine starts and warms is natural as the engines ability to efficiently burn fuel increases as it get hotter.
Fuel Economy:
We keep talking about adding fuel and it may seem natural to think you will have a decrease in fuel economy. Truth is, with the power increased you should spend much less time hard on the go pedal and fuel economy should not suffer much at all. The essential fuel economy part is the automated bio-electric fuel/power monitor. Keep it well rested and fed and it should be able to give you whatever economy vs. power results you prefer.
Intercooling:
Cooling the turbo charge is essential for maxing performance. I highly recommend upgrading your intercooler as large as you can. Diesel don't really have lag issues at this level. Cooling and thus making the air more dense as it enters the engine will allow for much greater adjustment of the fueling and yield really nice results while keeping the engine a little safer.
I know this was long-winded but I felt it needed to be covered in more detail and in a more logical order than had been done in other places. Feel free to disagree. I hope this helps you get the most enjoyment out of your truck.
Sources:
http://www.landyzone.co.uk/lz/f48/egt-range-200tdi-240516.html
http://www.stonefisk.com/doc-arc/def_man/ThermoGuard_Tdi_Tuning_Rev.2.pdf
Turning up the pre 94 Ram diesel injector pump
More fuel = More power, but it also mean more pressure and heat. The richer the mixture burning in your cylinder the more heat is created and the more danger to your engine. Correct tuning is finding the most fuel you can inject without burning too rich, and distributing the new power throughout the rpm range.
First thing's first. I would not recommend attempting to tune your engine without both a Boost gauge and an exhaust gas temperature (EGT) gauge. If you are just relying on smoke to guesstimate your tune job I feel you are asking for trouble. Boost max ~1bar (~15psi) Not really a hard max, but I don't feel the injection pump is capable of delivering enough fuel for there to be reason to go any higher. EGT max 720C (1328F), this is a hard max. Don't touch it. If you tune to go to max one day an overly steep hill or a heavy load will have you going beyond it, and then there is a very real chance a piston will melt.
Once you have your gauges on it's time to add a little more air. To do this we're going to adjust the turbo wastegate. This is pretty simple. The wastegate has a threaded adjustable rod. Simply break the lock nut free on the rod, remove the retainer clip holding the rod to the valve on the hot side of the turbo, slide it off and then turning it to shorten the rod. You may well have enough room to make several turns. I recommend about 4-5 full turns. Snug the locking nut. then using pliers and some strength manually extend the rod back to return it to the valve. Replace the retainer clip and you're done. . . ideally. Sadly it is likely to be just a bit more complex as you may not have enough play in the rod to make the full 4-5 turns. In this case remove the female portion of the rod completely then use a small cutting tool (I recommend a dremmel) to remove 5mm or so of the male threaded portion of the adjustment rod. Do this carefully and file the edge to remove burs. Re-thread the female portion of the rod and adjust as above. Marking the threaded portion of the rod with original and desired depth will make keeping track of the adjustment easier. As stated above target is ~1 bar (15psi)
Now we can start adjusting fueling. And here is where I think a lot of the tutorials go awry. Start with the main fuel adjustment. We do this first as this is the adjustment that affects all the fueling and will have the most major affect on your engine. All the other adjustments only refine what we are doing here. The Main fuel adjuster is a flat head screw with a locking nut and a collar on the back of the pump. This may have some rubbish plastic bits on it that you can break off. Use a deepwell 13mm socket and remove the entire thing. A couple table spoons of fuel may drop out so catch them or, y'know, don't. Mark the current position of the 13mm lock nut to the screw. Paint markers work great. Next remove that anti-tamper collar. I did the in 5 minutes with a screw driver to pry it open and pliers with the screw driver to peel it off. You're modifying your engine so just get the collar off however works for you. Once that's done adjust the screw 1-2 full turns deeper into the lock nut (clockwise). Being careful not to allow any further adjustment (I used a drop of superglue like a weak locktite) re-insert the adjuster into the injection pump using the flat head to tighten. To be clear, do NOT use your 13mm socket to tighten it as it will screw up your adjustment. Now, start your engine. It will very likely idle high, and must be adjusted. The idle adjustment is on the left side (from facing the pump) just under the diaphragm housing. A 10mm lock nut is on the rear side. Loosen this nut and rotate the idle screw stop back. Using some penetrating lube will make this much easier. This was a big adjustment on my truck taking the idle from 2500rpm back to 750-800
Test drive now. Ignore smoke at pretty much anything other than full load. If at full load your get black smoke, back off you adjustment. Same goes if your egt's are too high. example: while hard accelerating to 70mph I see a max of about 1200F (649C) no smoke. That's pretty perfect. If you have no smoke and lower EGT's dial up the adjustment a bit, and retest. Once satisfied you have now adjusted the max power of your engine. Now let's refine it.
Now the fuel delivery rate adjustment. Think of this as the adjustment that determines how quickly and drastically your injection pump reacts to increased boost. This will have a big affect on acceleration. Remove the four flat head screws that hold on the diaphragm cover on the very top of your injection pump. Big honk'n screw driver for this so that you don't strip them out. Once removed you will see a metal disk with a nut in the middle surrounded by black rubber. This spins freely so don't do that! At least not until you have marked its original position. (woo paint marker) Now turn the diaphragm 90-120 degrees clockwise. I'd start with 90. Replace cover and test drive. You're looking for increased response in boost. Be careful of EGT spikes and black smoke at just below full load. You may see a little more egt at Full load but it should be largely unaffected. The path up to full load is really where this applies. Adjust more or less aggressively based on results.
Note: A lot of other tuning articles talk about adjusting the star wheel under the diaphragm, and even the spacer under that. I do not like nor recommend this. The star wheel adjustment weakens the spring tension holding up the diaphragm. It lets it move further under lower boost, but not further overall. In my opinion you're just lowering the boost at which you deliver full fuel so it effectively shortens the pedal travel needed. To me this decreases driver control of the power, and can cause you to over fuel until the boost matches the fuel. It's your choice of course but you are not creating more power with this adjustment. If anything I increase the pressure on the spring to have more even fueling as boost increases and so with it gain more power control.
Lastly the low pressure fuel adjustment or smoke screw. This is on the top of the diaphragm housing and may be covered with a plastic cap. Use a flat head to remove that cap exposing a 13mm lock nut with a T25 star bit screw in the center. Loosen the 13mm nut and turn the T25 screw clockwise to add fuel at lower pressures. This helps give you more kick off the line. I adjusted mine about 3 full turns. I get a little white smoke at start up but nothing unreasonable. If you are getting too much smoke (possible because of the main fuel adjustment we made earlier) simply back it off now. Test and adjust to taste. We're done now and I bet your 200tdi feels like a completely different animal!!
Extra info:
Smoke:
Black smoke is cool, but wasteful and can get you in trouble. It means you are over fueling and shooting carbon coated specs of un-burnt fuel out of your tailpipe. Ideally be patient and adjust your fueling as above just until the black smoke is completely gone. That sweet spot just after the last black haze is gone is where you are burning efficiently and powerfully.
White smoke is not cool and wasteful. It is completely un-burnt fuel and if you have done everything above and you are seeing it at anything but start up then something is wrong. A little as your engine starts and warms is natural as the engines ability to efficiently burn fuel increases as it get hotter.
Fuel Economy:
We keep talking about adding fuel and it may seem natural to think you will have a decrease in fuel economy. Truth is, with the power increased you should spend much less time hard on the go pedal and fuel economy should not suffer much at all. The essential fuel economy part is the automated bio-electric fuel/power monitor. Keep it well rested and fed and it should be able to give you whatever economy vs. power results you prefer.
Intercooling:
Cooling the turbo charge is essential for maxing performance. I highly recommend upgrading your intercooler as large as you can. Diesel don't really have lag issues at this level. Cooling and thus making the air more dense as it enters the engine will allow for much greater adjustment of the fueling and yield really nice results while keeping the engine a little safer.
I know this was long-winded but I felt it needed to be covered in more detail and in a more logical order than had been done in other places. Feel free to disagree. I hope this helps you get the most enjoyment out of your truck.
Sources:
http://www.landyzone.co.uk/lz/f48/egt-range-200tdi-240516.html
http://www.stonefisk.com/doc-arc/def_man/ThermoGuard_Tdi_Tuning_Rev.2.pdf
Turning up the pre 94 Ram diesel injector pump
Last edited:
")