JJSeriesiii88
New Member
- Posts
- 5
- Location
- USA, North Carolina, Raleigh
(No idea why that photo won’t load right side up, I can’t rotate it.).
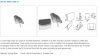
Having looked in YouTube and other places, I never really found a good set of pictures to help me through it so wanted to post here for others in case someone is thinking of doing same. I’m no mechanic nor handyman, but used the parts catalog and Haynes manual to help a bit. The parts manual was most helpful as the diagrams helped me know where unseen screws were etc
Key Points:
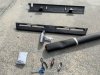
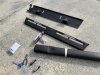
1) Lots of screws. Get ziplock bags and sticky notes to help remember where they all came from. I ordered a new set of dash screws and binacle screws on eBay.
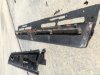
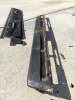
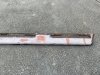
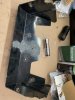
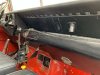
2) Two pieces. Although it appears easy to do in some books, I could not get the top panel off by itself had to remove the dash support as well, because there were screwed together in a hidden way I could not understand until I removed them.
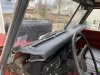
3) Rust on the metal- you will likely need to sand it and paint over it to prevent further corrosion
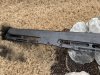
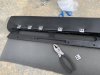
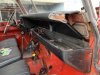
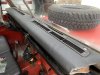
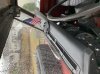
4). Foam and vinyl. Very hard and brittle. I removed some of it especially in the thin parts around the vents. But the rest I dealt with this way: for the large cracks in the vinyl and foam, used a dremel tool to cut a trench or a v shaped channel where the vinyl had been sticking up. To get it to be level after bondo. Then I filled in with bondo and sanded it all down for smoothness. I chose a vinyl covering with some padding which was a good idea because the padding has masked any ridges or imperfections in my sanding job and looks good. I ordered some upholstery clips on eBay which are the silver things you can see in the pictures and also the highest quality spray adhesive and carefully wrapped and glued the covering on.
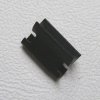
5). Instrument panel sits in a plastic interior housing which was broken in two. I used a putty epoxy to join the two pieces together and it worked really great. Also, one of the binnacle screw holes was half missing which had required previous owner to use a zip tie to secure the panel. I used that same epoxy putty to create the other side of the missing screw receptacle (put the binnacle screw in, covered with a bit of paper then applied a golf ball sized bit of epoxy putty and formed it around the screw. Let it set, the unscrewed it before getting too firm. Now it holds great
6) I got everything for this project off of eBay and most of it using the search “Land Rover series 3 dash”. Which presented me a variety of screws and bulbs and other idea generating items.
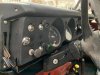
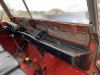
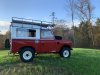
Very happy with it now, it was looking very shabby as you can see in one of the photos, and now I’m proud to look at it. Took me a few days because of the bondo and sanding. Otherwise could have been done in a day or two. Definitely a bigger project than I thought it would be so set some time aside if you have a cracked dash or rusty parts.
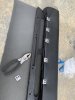
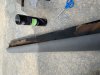
7). The external vents. You will need to disconnect and remove those controls to do this job. Therefore it is a good time to replace the foam rubber vent seals as you do this job. When I did that, I found the seals from Bearmach we’re about half an inch too narrow and so I had to stretch them a bit to have them fit. The act of removing the small screws from the underside of those exterior vents and putting them back on was not easy for me. Takes a good bit of patience and contortion to get it all done.
My next effort will be to restore the instrument panel and gauges a bit. Can’t figure out how to remove the light switches which have the two dimples on the front side which appear to require a special tool. Also the wiring is a bit daunting. Next week....
Hope these pics help someone.
James Jinnette
Raleigh NC USA
1972 Seres 3 SWB
Attachments
-
 CD6D5A87-C119-4ACB-939D-EB6C11B98084.jpeg31.8 KB · Views: 716
 -
 29CF6A7E-D80C-403A-B692-0EE6C0A3BF03.jpeg581.7 KB · Views: 1,057
 -
 72435183-8EFD-473B-AA9F-13CB5F21E1FC.jpeg81.7 KB · Views: 680
 -
 CA4F4599-8B34-47A2-97CE-12A5E66A380E.jpeg303.3 KB · Views: 668
 -
 A888FAF2-C43F-4F65-9501-96021AE8EDB4.jpeg95.9 KB · Views: 659
 -
 BF8D18FB-9933-46A8-88B6-D25A6656D9A4.jpeg73.9 KB · Views: 658
 -
 70B103E8-1163-46D6-8A6E-E22C4BD1F596.jpeg74.5 KB · Views: 655
 -
 93EAB801-910B-4774-9497-88F26899FAF7.jpeg51.2 KB · Views: 669
 -
 E2355875-B9F2-4F71-8F75-0D85C2E5EBB6.jpeg65.9 KB · Views: 656
 -
 17712A80-6944-4BD7-8358-5E7D0D6221B2.jpeg54 KB · Views: 713
 -
 215ECEE3-0D05-41C5-9908-DF21C199D191.jpeg300.2 KB · Views: 657
 -
 E1526800-8509-45FB-9D9D-51D52881C450.jpeg62 KB · Views: 678
 -
 090B3CDE-F9D1-48B2-BFA0-8B7B7925D242.jpeg49.9 KB · Views: 693
 -
 7C96FC93-F556-4D18-A895-F4209BCFBDA2.jpeg49.9 KB · Views: 695
 -
 054EEE75-6AD2-43BB-AD39-7C23751D556F.jpeg60.4 KB · Views: 692
 -
 0705906C-735F-4B58-BB19-CDC0D10FF12A.jpeg58.5 KB · Views: 704
 -
 55C44630-EACB-4277-8D61-DCE68B6D934F.jpeg223.2 KB · Views: 675
 -
 C93C02A1-99BF-4AD9-B627-E210AB96278C.jpeg429.5 KB · Views: 675
Last edited: