Series 3 109 Station Wagon, full ground up resto and 88 redo careless resto driving project

This site contains affiliate links for which LandyZone may be compensated if you make a purchase.
Getting busy with flatting and filling
IMG_20200723_182846.jpg
IMG_20200723_182914.jpg

And after loads of sanding it all back off again,
IMG_20200724_143529.jpg
or so it feels, more protective Raptor
IMG_20200724_143429.jpg
 

Attachments

  • IMG_20200723_182914.jpg
    IMG_20200723_182914.jpg
    343.3 KB · Views: 122
Have been reading this as you have worked through it.

You have done a cracking job on that bulkhead:).
Now for the next bit:)

Good progress and enjoying the posts keep it up:)

J
 
Just needing to try and get the bulkhead as good as I can, and because the Raptor Epoxy paint works so well with Epoxy filler; have the opportunity to work over it several times and build up a nice finish
15956817885667336380605327148637.jpg
 
IMG_20200725_161903.jpg

More fill and sand
IMG_20200725_171843.jpg

Followed by a good coat of the Raptor anti corrosive Epoxy Primer.
IMG_20200725_173215.jpg
IMG_20200725_173221.jpg
IMG_20200725_173322.jpg

Got a some runs in the centre, but they will flat out later, the butt weld join is undetectable and it's like magic winding back the years.
The recommendation is for three coats of the Raptor to get maximum corrosive protection.
IMG_20200725_173330.jpg
IMG_20200725_173719.jpg
IMG_20200725_174203.jpg
epoxy filler can be used with this primer for three days without sanding. I will leave the bulkhead as is for a while, and with minor sanding to flat the paint and key for topcoat, it is good to store and leave to fully cure.
Yes Marjon, it is time for the next big bit . Maybe I'll get the engine and gearbox out and make a start on the chassis
 
IMG-20200729-WA0000.jpeg
IMG_20200730_104610.jpg
IMG_20200730_112053.jpg
IMG_20200730_142309.jpg
IMG_20200730_112328.jpg
CH]
There was no engine lifting bracket at the back, so I made one.
IMG-20200730-WA0000.jpeg

So time to get the engine out and have a good look at the chassis.
IMG_20200730_104552.jpg

Which came out no problem in the limited height space, and revealed a mouse motel in the bell housing
IMG_20200730_104610.jpg
IMG_20200730_112053.jpg
I've rigged up a small winch to pull the car back into the garage, or to manoeuvre outside up an incline. It connects to a 12v battery and is handy when I've been working outside on the drive. Also a lot of passers by stop and have a chat, some have wonderful stories like the time they had to change the universal joint on the prop, in the middle of the Sahara dessert. To look at this little lady now in her later years you would never have imagined that of her. So my eyes have been somewhat opened over lockdown and latterly my annual leave.
I used a very scary but powerful twisted wire brush to clean as much as I could
IMG_20200730_112117.jpg
IMG_20200730_142309.jpg
The chassis was full of fine compacted mud/dirt and latterly I spent hours with a jet wash jetting into every hole for ages and watching really dirty water com
IMG_20200730_155629.jpg
ing out of other holes further down.
IMG_20200730_112328.jpg
Some holes must have been hidden under the body for years, and where caused by solid mud deposits collecting and sitting in one place for decades.
Sorry I lost the page so all the pics got lumped together at the end.
Tomorrow I must decide how bad all this chassis rust is and If my repairs would last for long enough to compare with getting a shiny new chassis. I will put pics of the damage up and ask for your opinions as to repair or replace. I don't want to repair the chassis to have it go somewhere else in a few years time.
 
I’ve seen much worse than that........mine :D
Depends on what you want at the end of the day and how much you have to spend. You can get pretty much every repair section that you would need and the rest can be made.
It’s only original once I guess, but there is an argument that a new chassis would be a quicker build, a bit easier to put together and most likely a bit stronger than a repaired one.
 
Morning GSF 109,
That's the thing! If a replacement chassis is stronger. The replacement ones are made of four sides welded together with no internal extra bracing as the original has, but apparently from slightly thicker metal. So they should be as strong, and if properly internally sprayed with Waxol, also painted externally with Raptor which is good to go directly to galvanized metal, and finally painted with a top coat of 2k black for that factory fresh finish. Hmmm that would work, be worth doing and should outlast me !
But I have a huge sheet of 3mm steel a 1964 restores Oxford stick welder, plasma cutter and all I need to cut and replace any rotten parts.
The question is, if I really took my time and replaced all the corroded bits. How long with full preventive treatments and careful maintenance, could the repaired chassis last ?
IMG_20200730_112404.jpg
IMG_20200730_112334.jpg
IMG_20200730_112404.jpg
IMG_20200730_112334.jpg
IMG_20200730_112328.jpg
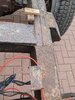
and a new rear end needs to be made more tidy, I guess they fitted it with the body still on
IMG_20200730_112323.jpg
IMG_20200730_112256.jpg
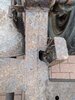
A nasty replacement outrigger weld
IMG_20200730_112222.jpg
IMG_20200730_112132.jpg
would need to replace the cross member that has the steering box in, which refuses to come out and I could carefully release by cutting it out lol,
IMG_20200730_112126.jpg
IMG_20200730_112123.jpg

Some areas of the top rails are a bit pitted so I assume the metal must be thinner and need replacement too.
When a bad section is cut out, I suppose you get a good view inside to see how bad or good the rest is. Just don't want to put in a hundred day's work on the chassis if I cannot make it as strong and last as long as a new one.
Also who does a good quality replacement chassis, several maker's and there must be variation in quality...
 

Attachments

  • IMG_20200730_112317.jpg
    IMG_20200730_112317.jpg
    499.8 KB · Views: 105
  • IMG_20200730_112301.jpg
    IMG_20200730_112301.jpg
    558.7 KB · Views: 108
I was lucky in that my main rails front to rear were largely okay apart from the front of rear spring outriggers, and the rear crossmember so it was worth saving. If you need repairs everywhere, then maybe better to go for a new chassis. A friend of mine has a galvanised chassis for sale which has never been used. It is van spec so needs a couple of brackets changed to suit a station wagon. There are a few manufacturers of oem quality chassis out there such as Marsland and Richards. I haven’t used either company, but maybe some other forum users will have and can pass comment.
 
It's interesting that apart from damage about the rear shock mounting areas and just before the spring outriggers all caused at the top from permeant mud build up
15963621347543677311540183458098.jpg
Most of the corrosion is to new parts fitted such as outriggers
15963622613686851117975000921827.jpg
It's quite new looking otherwise
15963623713501737736070651239451.jpg

But has some nasty welding
1596362435756976829718300199494.jpg

It's the same at the front, again a replacement outrigger. In this case with a bit of angle iron which is too thin butt welded in
1596362589043862220184833697389.jpg
15963626429566095713178618866658.jpg
It's hard to show but the micrometer has 3.4mm
original and 2.2mm for the replaced bit.
It will be replaced both sides with some more substantial angle iron
 
1596363200710560364867666127213.jpg
most of the rest is not too bad just surface rust
15963633261643854827265952034179.jpg
and yes that's a peerless 801 transaxle I've just rebuilt for my Westwood, and it took ages to find all old new parts like selector keys
15963635061194208954002526824635.jpg
but it's like new now. So I can get back to Landy Land
 
So I've been researching chassis restoration, and there's not very much out there. There's lots on chassis repair, but very little restoration. Came across this
IMG_20200813_120815.jpg
looking like a serious restoration process, but there is no part three or four.... But the idea of repairing a c section by cutting just before the weld and having access to all the inside appeals
IMG_20200813_120733.jpg

Being able to see any other internal corrosion and re fabricating the section and butt welding and lap welding the top and bottom. This would have the end result of a clean strong invisible restoration, while having a museum like maintenance of the original, and allowing deep access for Waxol internal application for e long lasting chassis.
I did look and the only company who did the original C section chassis only has one with four flat bits welded together. This would be strong but absolutely not original, so no good for me.
I want this car to be as was made and the wrong chassis replacement would not be right.
I was in Tesco and they were selling child's play sand 2 big bags for £4. Also I've ordered a cheap sand blaster.
My drive needs about three bags of sand sweeping into the lockblock.
Blasting sand which can cause silicosis and requires a full face mask and respirator.
Blasting sand or any small quantity is expensive, and I will sweep the excess into the drive.
image_136035635_2823588.png

This is very cheap, but I have a big compressor to power it and lots of sand
IMG_20200815_203502.jpg
So we shall see
 
So thanks to my flatbed trailor and B + M Steel, was able to get a 2x1M sheet of hot dip galvanized steel sheet of 2mm thickness.
15979426278871101260631820233708.jpg

After much searching It is clear the original rails on my Series3 chassis are 2 mm and the cross sections and outriggers 3mm.
To have remanufactured half U sections out of 3mm steel may put stress on other parts, and wanting to restore as opposed to repair, 2mm galvanised feels the clear choice for me.
15979429199008836494076621106264.jpg

All shiny, and the galvanisation I hope will give some protection to the welds too as it protects for a couple of inches beyond.
15979431454834582207015898211584.jpg

The 2 and 3mm sheets.
I rather think my car may not see inside the garage for a while. As restoration of the chassis may take like forever, or at least feel like it.
But if I can get as good as new, and better than replacement's alternative design and construction. Then all the more genuine the auld girl will be.
Some people fit an electric motor beyond the transfer box though and building a hybrid is rather tempting and I can't think of a more ideal car to add an extra 100 hp to!
Would this be sacrilege ?
That is the question !
 
I absolutely love watching these projects come along, it just makes me want to go and take mine apart...more than the usual that is

Keep up the good work
 
We'll work has been getting in the way too much the last few weeks.
Working as a technician in a school is quite challenging with Covid.
But I've ordered a needle de-scaling air powered tool off eBay
61bNLpEj-qL._AC_SX355_.jpg
The idea is to clean most of the rust and paint off with this tool first, the use the small sandblaster which is good on very small areas, oh and great at laying sand down on my lockblock drive too.
Blasting sand isn't cheap, but the child's play sand is, it's just a bit too damp and I now have it in a big tub drying slowly
15987776087876503050749177373271.jpg
Just like new
15987776727787237429462449076147.jpg
But quite slow
 
Just read through this entire thread. absolutely brilliant. Great skills and determination. I can see where you are coming from re the replace or restore method . Its easy enough to buy what you need but if you have time and skills you can restore what you have and save a small fortune in cash but invest more time, Being a hobby time isnt an issue the hourly rate is sheer satisfaction..

Ive been picking a lot of brains and there are conflicting thoughts on the Galv Chassis . When I realised they were fully fabricated from flat profiles I was kinda surprised . Ive been told that they can crack . That probably depends on the use to which the finished vehicle was being put, and probably one in a hundred might have a problem , or perhaps a less than fully penetrated weld seam being ground down excessively or maybe even embrittlement due to the heat in the galvanizing process .. either way, if mine is to far gone I might decide to take the path of least resistance .. :)

Watching this thread and looking forward to updates .
 
Last edited:
Back
Top