Series 3 109 Station Wagon, full ground up resto and 88 redo careless resto driving project

This site contains affiliate links for which LandyZone may be compensated if you make a purchase.

Wagon Loon

Well-Known Member
Posts
526
Location
Aberdeen
Hi,
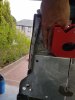
I'm in Aberdeen and have recently got a 109 Series three for a complete ground up restoration.
So far I have removed the safari roof, taken all the body except the bulkhead off.
So I have a rolling chassis and bulkhead. I am rebuilding the bulkhead using repair panels, a plasma cutter, mig and lots of fettling!
This is my first Landy, she is blue and limestone white, and due to the lockdown I have made a good start, and pulled muscled and tendons I didn't knoe I had. thank goodnes for Kinesio tape to keep me going, and a few cold millers lol.
I am having a time getting the old hinges off, they don't accept being drilled out at the screws, and the only thing able to release them seems to be carefully with my plasma cutter burning/vaporizing the screw shaft lol...
I know I am at the beginning of a very long journey, at first I estimated three years, but when the car arrived from Bath, changed my estimation to five years to complete.
I have all the skills built up over the last fourty five years to do this, have a big compressor and good experiance with 2K paint and delvilbiss paint guns etc.
But it's a huge task of many parts, and so much Landy stuff to learn.
One step at a time...
20200416_165415.jpg
20200424_212030.jpg
 
Last edited:
it's being supported as I cut away the rot by a wee welded frame and bolt for the windscreen mount which can be removed and screwed back into position, 12 turns on the thread lol., so everything should keep in the exact positions for when I can fit the repair panel.
thanks
20200425_110616[1].jpg
 
Welcome Aboard :)

Good Intro :) - makes a nice change ;) Watched.

Brave too - like the "12 turns" of a bolt o_O :D - looks like it'll make a good one ..... soon ;);)

Got any pics of "her" as purchased ?
 
Cutting out the bad tin worm eaten metal, and replacing with new metal
20200429_131922.jpg
and stitching them in
20200429_141755.jpg
more stitches
20200429_152917.jpg
and blending
20200429_172214.jpg
It,s slow going, and I don't want to grind ans sand back too much where the many small welds join the fresh good metal in; because then it may get too thin in places. I'm only human and a little bog will give the final finish. For me the important thing is that the metal is all good solid and strong.
Not that many repair panels are available such as inside the bulkhead, or the top parts or A pillar stiffener which since mine was completely disintegrated, I need to recreate from scratch...
20200414_154812.jpg
I quite enjoy making a repair panel, but need to know what was there before lol.
Best I could find was another member who had been making a custom wide body bulkhead. They appear to be much more professional than me, know their stuff and must have gas mig. I have flux cored simple mig, but find the key to getting a good weld is making shure the flux cored wire is very dry; just like stick welding. Some put their welding rods in the oven on low about 70 - 80 Deg C for a couple of hours.
If your flux is dry there is very little spatter. If damp it's all a spattery mess !!
Tomorrow is another Lockdown day to weld and form
: ¬ )
 
Just saw this after replying to you on my project thread. You are doing great, but you obviously have the optional lightened bulkhead :D. The chassis looks pretty good, much better than mine was! Great progress.
 
Lol,
I restored a 93 sprite caravan, and found the non setting mastic sealant used in it's rebuild hard to beat. Silkoflex and U-Pol Tigerseal are good, but that auld mastic just never sets lol, baths apart.
It astonishing just how much bodyfiller I have peeled off and put in the bin. Mostly on the aluminium panels too, so a magnet would be a waste of time lol.
Now I need to find out what an optional lightened bulkhead is, because I am a newbie to the Landy and here to learn.
However did manage to reconstruct another panel from mirroring the other side and using good old paper and a pencil to make a pattern.
I should really buy some panel hammers and dollys to do a better job, but here's what I managed from a sheet of galvanised steel today
20200430_180956.jpg
20200430_180942.jpg
I will use the later type door seals which are push on, so didn't need the lip used for a riveted seal.
Although wanting to keep everything original, the sills and B and C pillar ore assembled units I have got only fit the later type push on door seal. However I did get the P section to attach to the sills and take the bottom door seals. Later Defenders, I am told have their bottom door seal on the door not the sill..
 
Lol,
I restored a 93 sprite caravan, and found the non setting mastic sealant used in it's rebuild hard to beat. Silkoflex and U-Pol Tigerseal are good, but that auld mastic just never sets lol, baths apart.
It astonishing just how much bodyfiller I have peeled off and put in the bin. Mostly on the aluminium panels too, so a magnet would be a waste of time lol.
Now I need to find out what an optional lightened bulkhead is, because I am a newbie to the Landy and here to learn.
However did manage to reconstruct another panel from mirroring the other side and using good old paper and a pencil to make a pattern.
I should really buy some panel hammers and dollys to do a better job, but here's what I managed from a sheet of galvanised steel todayView attachment 207650 View attachment 207651I will use the later type door seals which are push on, so didn't need the lip used for a riveted seal.
Although wanting to keep everything original, the sills and B and C pillar ore assembled units I have got only fit the later type push on door seal. However I did get the P section to attach to the sills and take the bottom door seals. Later Defenders, I am told have their bottom door seal on the door not the sill..
I was just being funny by suggesting your bulkhead was ‘lightened’ by the lack of metal! It might as well have been an option as every old landy seems to have a frilly bulkhead! Looking like you are doing a great job. Maybe I should take notes.....;)
 
Lol,
I'm being far too series !!
It would not have been hard for the great destroyer of British car manufacturing - Leyland - to have painted and waxoiled the unseen parts of the bulkhead. It would have made a tremendous differance for their longevity. But that was not the way of their management at that time.
Think of the illuminating fun we could have had when welding them for repairs lol.
The chassis of mine has some repair patches which I will redo. I don't like patches over holes because the overlap makes for future problems.
They will be cut out and the sections replaced with replicated patches which will look like and fit snug for a butt weld.
The chassis has been regularly waxoiled and it had made a huge differance to the general condition.
Unfortunately there are some areas like the tub supports front of rear spring hanger forward part, where dirt has accumulated and made a nice home for the tin worm to fester.
I guess you really do need to get the tub off to find these things.
I have restored a 1967 Oxford Arc welder for welding the chassis, since it's just over 2mm thick, and the stick welder will get better penetration and give a lovely finish. My wee Mig is not as powerful as some...
IMG-20200428-WA0000.jpg
 
Lol,
I'm being far too series !!
It would not have been hard for the great destroyer of British car manufacturing - Leyland - to have painted and waxoiled the unseen parts of the bulkhead. It would have made a tremendous differance for their longevity. But that was not the way of their management at that time.
Think of the illuminating fun we could have had when welding them for repairs lol.
The chassis of mine has some repair patches which I will redo. I don't like patches over holes because the overlap makes for future problems.
They will be cut out and the sections replaced with replicated patches which will look like and fit snug for a butt weld.
The chassis has been regularly waxoiled and it had made a huge differance to the general condition.
Unfortunately there are some areas like the tub supports front of rear spring hanger forward part, where dirt has accumulated and made a nice home for the tin worm to fester.
I guess you really do need to get the tub off to find these things.
I have restored a 1967 Oxford Arc welder for welding the chassis, since it's just over 2mm thick, and the stick welder will get better penetration and give a lovely finish. My wee Mig is not as powerful as some...
View attachment 207663
I replaced my front of rear spring outrigger and made up the support brackets from 3mm steel plate. I find it helps having the tub in place as long as you can to get the placement as close as possible.
 
Today was spent continuing to
20200501_181315.jpg
make the inside parts of the A pillar and bulkhead where it was peppered and disintegrated...
20200501_181245.jpg

Just one more plate with the 10mm nuts welded to the inside to weld to the repair section, then I can weld the back of the vent repair section in and the multi faceted panel to complete the N/S top corner.
 

Attachments

  • 20200501_181315.jpg
    20200501_181315.jpg
    259.1 KB · Views: 266
Back
Top