IrieLandy
Member
- Posts
- 88
- Location
- County Clare, Republic Of Ireland
Hi all, thought i'd do a quick run-down of my method for rust-proofing a standard steel replacement fuel tank on a defender 90, it's based on other posts i've seen here but i thought i'd add my tuppence worth...
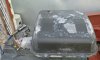
First i checked the new tank and found that it was well painted, no scratches and the paint is well adhered so would serve as a good base-coat.
Next, i set about sealing all the gaps between the tank itself and the welded-on protection plate on the underside of the tank. The gap was quite wide in some places so i stuffed in some plastic (rolled up pallet wrap, but you could use anything even newspaper) to fill against. The sealer was bought from a local builders merchant and is called "everbuild fixall", comes in a tube you can fit to a mastic gun. i used the black one, its fairly pricey - 8 euros a tube, but it is excellent stuff, very tough and sticks really well - i think its the same stuff as gasket-maker but in a bulk form!. i also sealed any major gaps in the seam around the tank as this turned into flaky pastry on my old tank. you might want to start by cutting the nozzle to a fine aperture for the small gaps then cut off progressively more for the larger gaps... i ended up with about a 10mm bore for the thickest parts. you can use a damp rag to smooth the bead and make sure its fully adhered.
i gave the tank a light sanding just to rough up the surface and provide a good key for the rust proofing. I used Dinitrol 479 in a 1 liter tin (not the spray stuff). Be aware, its VERY thick... like tar, best thing is to get it heated up by placing on a radiator, then you should be able to brush it on. i did two coats and applied it liberally, basically used up most of the 1 litre tin. you will either want to seal off the holes for lift pipe, fuel guage, etc or fit the parts first (i did the latter). i also sanded down and painted the supprt bracket that goes at the front of the tank as this was getting fairly rusty too. one thing dinitrol dont tell you on the tin is that it is oil-based, so you will need white spirit to clean your brush.
Regarding removing the old tank and fitting the new... i had to destroy most of the bolts due to rust and also the circlips, so be prepared for that and have new fittings available. removal wasnt too difficult, its best to push it out towards the front of the vehicle and twist anti-clockwise whilst pulling down on the front. it will most likely get stuck at some point, all you need is a bit of leverage with a piece of wood or prybar. in fitting the new tank i did the same in reverse. i found that the front-left of the seam around the tank got caught under the protrusion on the chassis where the support bracket goes, but all it took was a little leverage with long flat-blade screwdriver to pop it up and over the chassis.
once you've fitted the tank, check it for any scuffs where you might have pulled the paint off in fitting and touch them up.
one thing i have tried on this occasion although i'm not sure if it will help in the long term is once i'd fitted the new bolts and circlips and tightened them up fully, i coated the fixings with a liberal dollop of vaseline to keep the corrosion off them... but it will probably just fall off, so we'll see!
Hope this helps someone in the future.. good luck!")
First i checked the new tank and found that it was well painted, no scratches and the paint is well adhered so would serve as a good base-coat.
Next, i set about sealing all the gaps between the tank itself and the welded-on protection plate on the underside of the tank. The gap was quite wide in some places so i stuffed in some plastic (rolled up pallet wrap, but you could use anything even newspaper) to fill against. The sealer was bought from a local builders merchant and is called "everbuild fixall", comes in a tube you can fit to a mastic gun. i used the black one, its fairly pricey - 8 euros a tube, but it is excellent stuff, very tough and sticks really well - i think its the same stuff as gasket-maker but in a bulk form!. i also sealed any major gaps in the seam around the tank as this turned into flaky pastry on my old tank. you might want to start by cutting the nozzle to a fine aperture for the small gaps then cut off progressively more for the larger gaps... i ended up with about a 10mm bore for the thickest parts. you can use a damp rag to smooth the bead and make sure its fully adhered.
i gave the tank a light sanding just to rough up the surface and provide a good key for the rust proofing. I used Dinitrol 479 in a 1 liter tin (not the spray stuff). Be aware, its VERY thick... like tar, best thing is to get it heated up by placing on a radiator, then you should be able to brush it on. i did two coats and applied it liberally, basically used up most of the 1 litre tin. you will either want to seal off the holes for lift pipe, fuel guage, etc or fit the parts first (i did the latter). i also sanded down and painted the supprt bracket that goes at the front of the tank as this was getting fairly rusty too. one thing dinitrol dont tell you on the tin is that it is oil-based, so you will need white spirit to clean your brush.
Regarding removing the old tank and fitting the new... i had to destroy most of the bolts due to rust and also the circlips, so be prepared for that and have new fittings available. removal wasnt too difficult, its best to push it out towards the front of the vehicle and twist anti-clockwise whilst pulling down on the front. it will most likely get stuck at some point, all you need is a bit of leverage with a piece of wood or prybar. in fitting the new tank i did the same in reverse. i found that the front-left of the seam around the tank got caught under the protrusion on the chassis where the support bracket goes, but all it took was a little leverage with long flat-blade screwdriver to pop it up and over the chassis.
once you've fitted the tank, check it for any scuffs where you might have pulled the paint off in fitting and touch them up.
one thing i have tried on this occasion although i'm not sure if it will help in the long term is once i'd fitted the new bolts and circlips and tightened them up fully, i coated the fixings with a liberal dollop of vaseline to keep the corrosion off them... but it will probably just fall off, so we'll see!
Hope this helps someone in the future.. good luck!