- Posts
- 4,971
- Location
- Rotherham
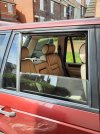
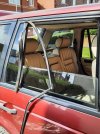
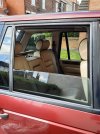
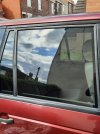
Both my rear door window trims have seen better days. The other day at breakers there were both sides available in better nick than mine so whilst there got my hand in pocket and splashed out.
First step today was to get old ones out. Its easier than I first thought.
Wind down window fully
Because the old ones were being thrown I didn't need to be to kind extracting them. Using a screwdriver and small plastic pry bar popped out the trim from the frame. once it's started to move just pulls off frame easy enough. The ends slide down between glass and frame.
Once pulled off cleaned up the frame where it seats with a small copper wire brush. IMPORTANT make not of how it comes off as they are handed so you don't fit the wrong one back in.
Lube the sides of the frame with WD40 or such like to help refitting. Being careful slide each side onto frame and downwards . There was enough room on mine to push the sides down so the trim slotted in place about an inch down from top. Then nice and gently slide it upwards into position. Be careful you don't bend the new trim when sliding into frame as this will kink it. Take your time. Did find once up into place to run window up and down to bed it in.
Took me about 3/4 hr to do both sides without rushing.
I know they are second hand looks 100% better than before.


")
