- Posts
- 968
- Location
- Shetland
I've been having injector problems (I think) recently. Searching the forum for answers has shown that the problems I'm having are pretty common with some drastic solutions.
First of all, my 3 door has been giving the following symptoms:
Poor starting with lots of white smoke for about 30 seconds after starting. Revving the engine clears the smoke reasonably quickly.
Once started, idling is lumpy and it seems worse if you hold the engine at 1500 rpm but gets smoother when you rev higher.
Once it's been driven normally for a while it almost seems to be running on three cylinders at low revs and is completely gutless until you give it some stick.
Given these symptoms and from what I've read here I thought one of the injectors might be dodgy so I thought I'd change them all as I couldn't determine which one was giving the trouble. As I have a spares car with a good running engine it wouldn't cost me anything to do, or so I thought.
All the injectors came out of the spares car with no trouble, giving me cause to think this was going to be an easy fix. However, I could only get one injector out of the 3 door, all the others seemingly welded in position. The torx head studs you use to extract them were just twisting and snapping. So I thoroughly soaked everything with penetrating oil and left overnight. The next thing I tried was levering the fuel connection against a spanner lying on the cam cover but all that achieved was to make the cam cover bend down and emit alarming noises so I stopped that before anything broke.
Then I tried levering the fuel connector from side to side on each injector and managed a few degrees of twisting motion in either direction, being severely limited by the intake mouldings. I thought if I managed to turn them enough from side to side it would loosen them somewhat. No such luck.
So I turned to Google trying to find extraction methods, not really liking the idea of smashing the cam cover to get enough space to get at the injectors, as one of the things I'd read on here. This led me to an eBay listing for the following tool:
Injector Puller
It's described as being suitable for Freelander TD4, and various BMW models sharing the same engine. It arrived today after a lengthy wait for the courier. Good job I'm not (yet) desperate to have the car on the road.
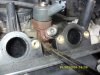
And what an entertaining afternoon I've had trying to use this tool. It is most certainly NOT suitable for the Freelander TD4, unless you get creative AND destructive. It's supplied with a long reach 29mm socket with a slot cut out of it to go over the injector electrical connector. This is so you can remove the electrical connector and the little bits in the top of the injector in order to screw the pulling tool into the top of it. However, it's so weak it just flares out at the open end and spins on the nut when you apply even the tiniest force so it won't undo the nut. It does turn the electrical connector though, shearing the embedded connections in the process. At this point I decided that sacrificing the injectors was the only way to go so I cut off the plastic heads with a hacksaw to give me enough room to get a normal socket on. The only size I had that fit was 1" 1/8 but it fit perfectly. So the tops of the injectors came off easily then.
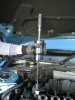
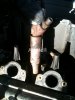
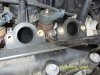
The next hurdle was actually mounting the pulling tool. It comes with four posts that screw into the cam cover bolt holes. You take out the required cam cover bolts and screw the posts in their place to sit the puller on top of. I'm sure this works brilliantly on BMWs which don't have the ridiculously complex cam cover with integrated air box like the Freelander. So unfortunately you have to cut a section of the airbox away to be able to mount the puller. (See the attached image. The other image is what's left of the butchered injector tops). Once you've made the decision that being destructive is the only way to go everything is much easier. The puller mounts nicely over the injector and pulling it out is easy. It's a good job the injector that did come out initially was the one next to the oil filler. I don't think the puller would have managed that one
So that's where I am now. I plan on putting everything back together tomorrow. If it displays the same symptoms after all this it's going over the nearest cliff.


First of all, my 3 door has been giving the following symptoms:
Poor starting with lots of white smoke for about 30 seconds after starting. Revving the engine clears the smoke reasonably quickly.
Once started, idling is lumpy and it seems worse if you hold the engine at 1500 rpm but gets smoother when you rev higher.
Once it's been driven normally for a while it almost seems to be running on three cylinders at low revs and is completely gutless until you give it some stick.
Given these symptoms and from what I've read here I thought one of the injectors might be dodgy so I thought I'd change them all as I couldn't determine which one was giving the trouble. As I have a spares car with a good running engine it wouldn't cost me anything to do, or so I thought.
All the injectors came out of the spares car with no trouble, giving me cause to think this was going to be an easy fix. However, I could only get one injector out of the 3 door, all the others seemingly welded in position. The torx head studs you use to extract them were just twisting and snapping. So I thoroughly soaked everything with penetrating oil and left overnight. The next thing I tried was levering the fuel connection against a spanner lying on the cam cover but all that achieved was to make the cam cover bend down and emit alarming noises so I stopped that before anything broke.
Then I tried levering the fuel connector from side to side on each injector and managed a few degrees of twisting motion in either direction, being severely limited by the intake mouldings. I thought if I managed to turn them enough from side to side it would loosen them somewhat. No such luck.
So I turned to Google trying to find extraction methods, not really liking the idea of smashing the cam cover to get enough space to get at the injectors, as one of the things I'd read on here. This led me to an eBay listing for the following tool:
Injector Puller
It's described as being suitable for Freelander TD4, and various BMW models sharing the same engine. It arrived today after a lengthy wait for the courier. Good job I'm not (yet) desperate to have the car on the road.
And what an entertaining afternoon I've had trying to use this tool. It is most certainly NOT suitable for the Freelander TD4, unless you get creative AND destructive. It's supplied with a long reach 29mm socket with a slot cut out of it to go over the injector electrical connector. This is so you can remove the electrical connector and the little bits in the top of the injector in order to screw the pulling tool into the top of it. However, it's so weak it just flares out at the open end and spins on the nut when you apply even the tiniest force so it won't undo the nut. It does turn the electrical connector though, shearing the embedded connections in the process. At this point I decided that sacrificing the injectors was the only way to go so I cut off the plastic heads with a hacksaw to give me enough room to get a normal socket on. The only size I had that fit was 1" 1/8 but it fit perfectly. So the tops of the injectors came off easily then.
The next hurdle was actually mounting the pulling tool. It comes with four posts that screw into the cam cover bolt holes. You take out the required cam cover bolts and screw the posts in their place to sit the puller on top of. I'm sure this works brilliantly on BMWs which don't have the ridiculously complex cam cover with integrated air box like the Freelander. So unfortunately you have to cut a section of the airbox away to be able to mount the puller. (See the attached image. The other image is what's left of the butchered injector tops). Once you've made the decision that being destructive is the only way to go everything is much easier. The puller mounts nicely over the injector and pulling it out is easy. It's a good job the injector that did come out initially was the one next to the oil filler. I don't think the puller would have managed that one
So that's where I am now. I plan on putting everything back together tomorrow. If it displays the same symptoms after all this it's going over the nearest cliff.