flat
Well-Known Member
- Posts
- 9,075
- Location
- Far away from you!!
Some clunking was occuring beneath my Landrover. After lots of poking about I ascertained it was either a) the front diff or b) the gearbox output shaft/transfer box input shaft wear. I have an LT77 Gearbox and an LT230 transfer box.
I started with examining the wear on the gearbox/transfer box - there was some on the transfer box gear but it was minimal. This wear is a well documented fault with the early LT230's were not enough oil gets to the splines causing wear and eventually loss of drive due to the splines stripping. Land Rover rectified this by introducing a retro-fit oil feed plate to direct oil at the splines, and they later introduced a cross drilled shaft in the transfer box. These 2 solutions essentially stopped the premature wear. Either one is effective, you don't have to do both. Ashcroft Transmission were excellent at giving me advice and providing me with an oil feed plate.
Here is how I went about fitting it:
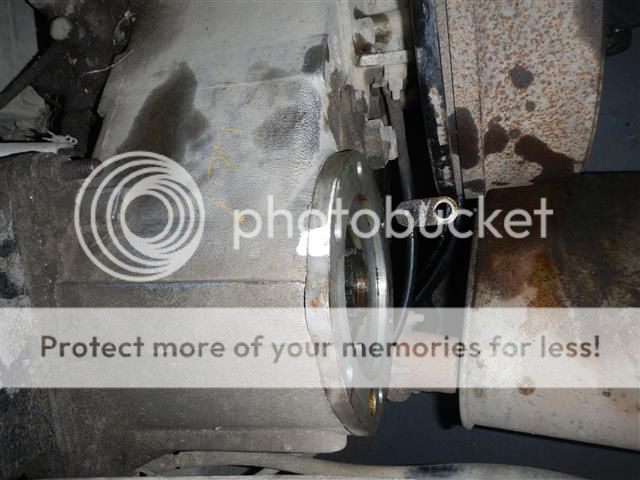
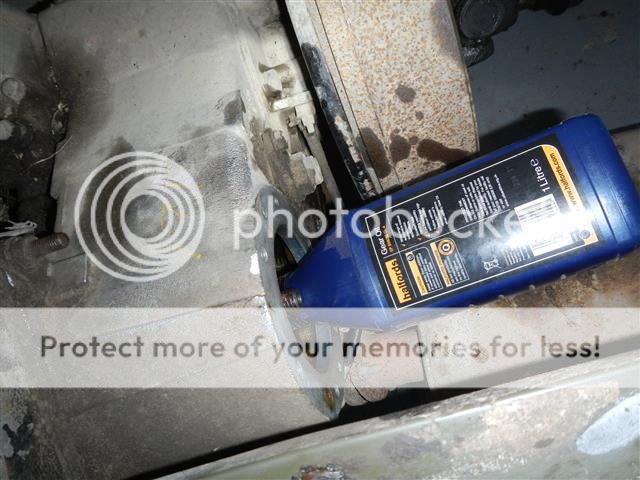
1. First take off your cubby box/centre seat and remove the access panel underneath in order to access the top of the transfer box. This is the view that you should see - mark a line across the top of the transfer box like I have (the white line) this is to help line it all up when you put it back together as the bolt holes are not evenly spaced around the PTO cover - undo these 6 bolts.

2. Remove the PTO cover plate, it may need a tap with a hide mallet to unstick it. You may or may not have a gasket underneath it, either re-use it, get a new one or some RTV sealant when you re-assemble.
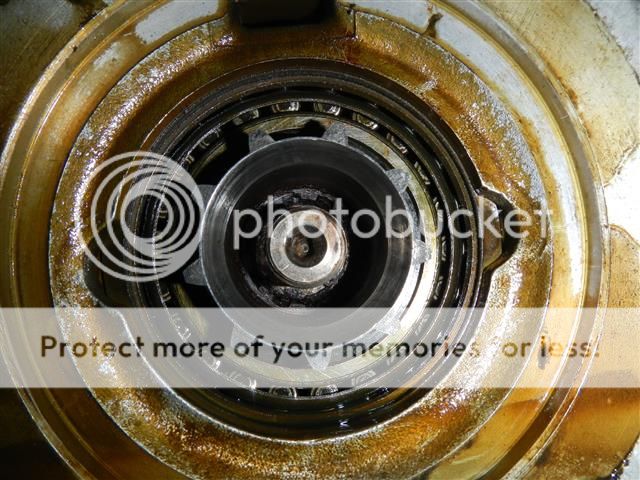
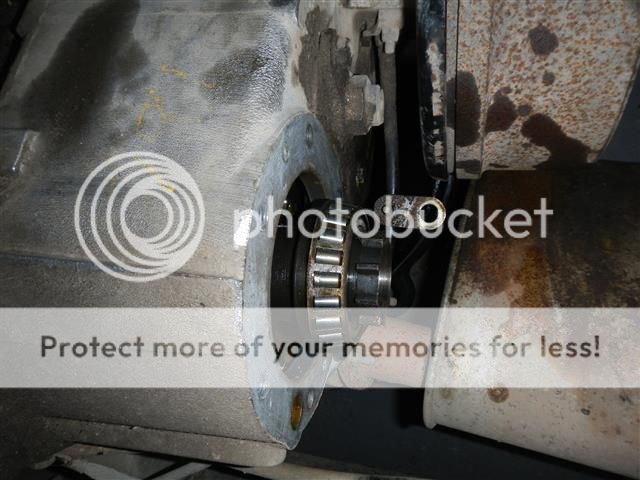
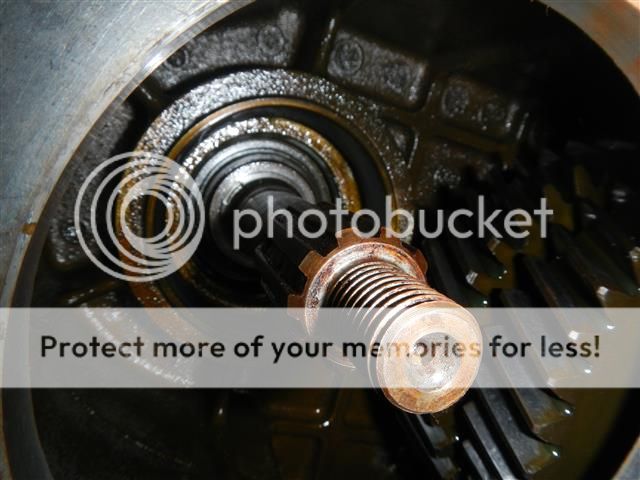
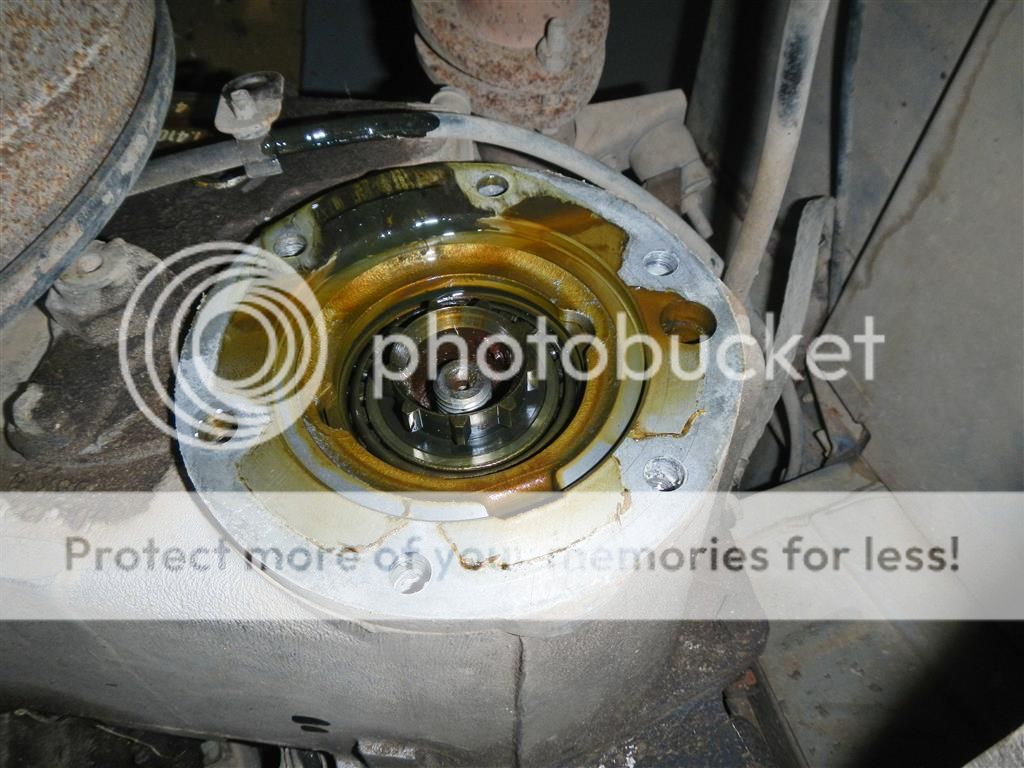
3.Now you are looking at the bearing carrier, if you can see a flat plate that says 'TOP' on it then you have an oil feed plate fitted already - just put your PTO cover back on, your splines are probably fine! If your transfer box looks like this pic then you dont have one already so carry on with the disassembly
4. Now its time to remove the bearing carrier that supports the transfer box shaft, on early boxes they are held in with 2 screws, on later boxes it is just a push fit - mine is push fit and needed a bit of encouragement with a hide mallet to get it off.
5. You should now be able to see the taper bearings on the transfer box input shaft, gently wiggle it and withdraw the shaft
6. I found I had to put the transfer box in neutral and wiggle the gear up and down and rotate it at the same time to get it out - perservere, it does just pull out. NB the gear will only pull out on 1.667 and 1.410 ratio boxes, 1.222 ratio boxes need the intermediate shaft to be aligned before removal and the 1.003 ratio unit cannot be withdrawn in situ on the vehicle. Finally it's out
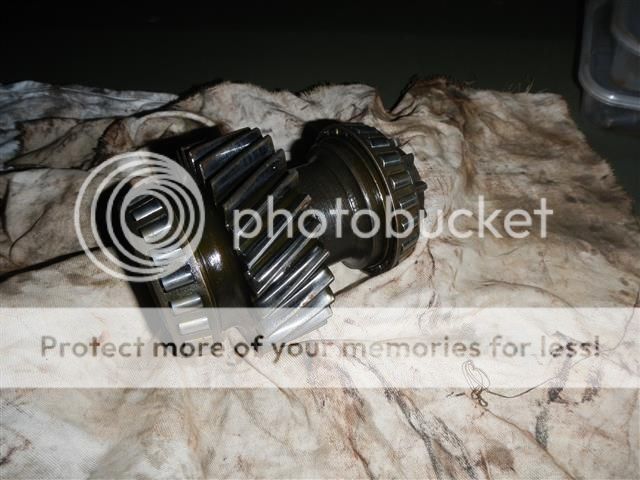
7. Examine the splines inside it carefully for wear, if excessive then the shaft and bearing can be replaced with a cross drilled one. Mine is quite good so I shall be re-fitting it.
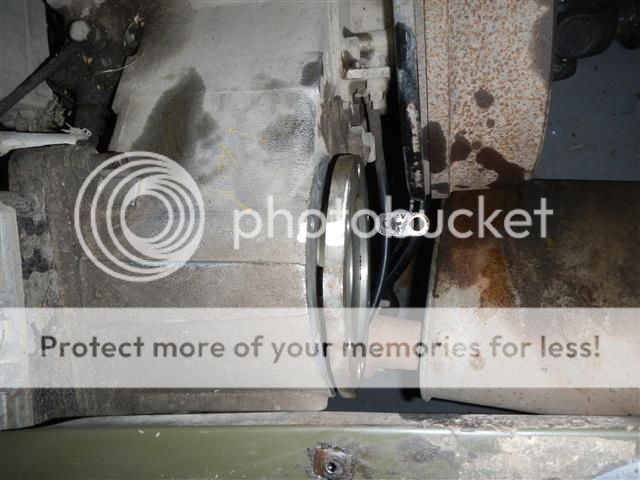
8. Your transfer box should now look like this, mine is empty of oil as I took the opportunity to change it whilst doing this job - its up to you whether you do this but I would do it personally.
(i topped up the oil now through the PTO hole (i found it easier) with fresh EP80/90- usual fill level - until it dribbles out the fill hole which in this case i am not using, but i had the plug out anyway!)
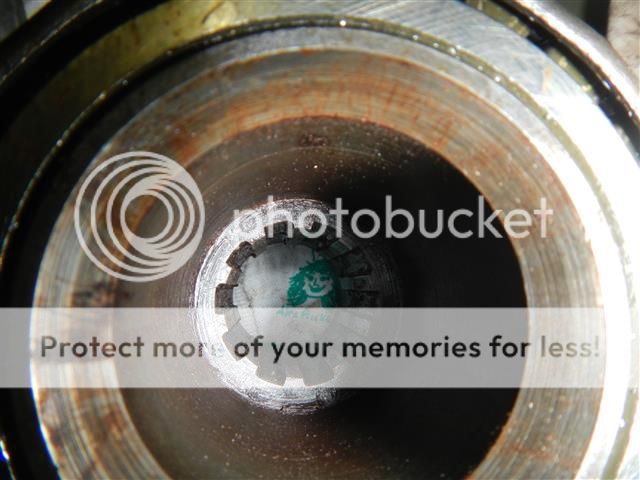
9. Wipe of your gearbox output shaft splines and inspect for wear - if these are excessively worn then its either new gearbox time or an expensive rebuild.
Mine were barely worn - phew!
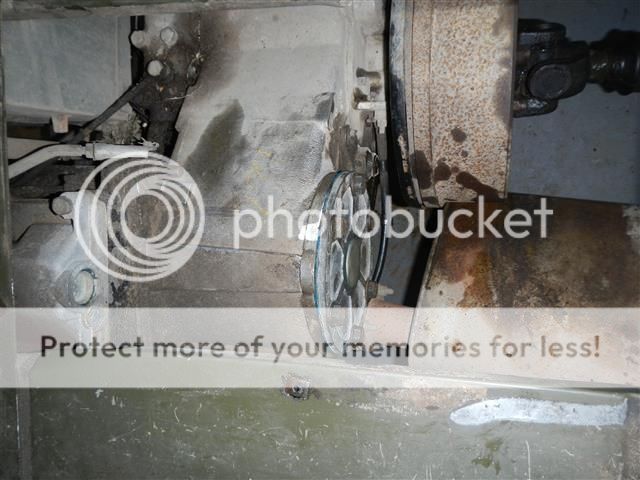
10. Now you should have all these pieces (the small disc in the middle i will explain in a minute). The oil feed plate is bottom left.
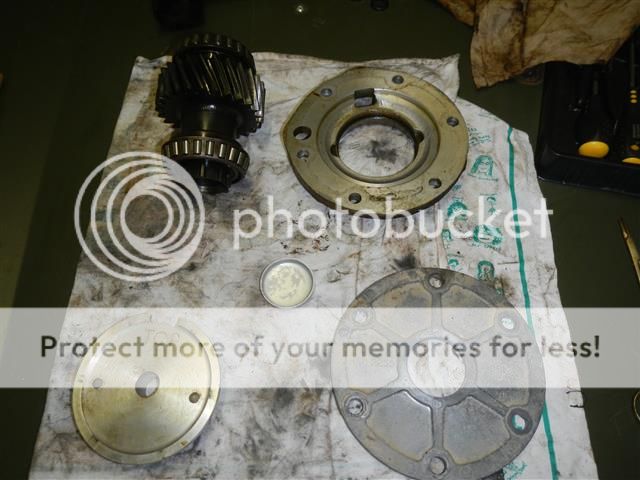
11. The small disc in the middle is the 'bung' similar to a core plug from the centre of my PTO cover. The covers are either pressed steel - this is not compatible with the oil feed plate - you need to upgrade to an aluminium one. The other type is solid aluminium, or aluminiun with a hole filled in with a blanking plug. Now on mine the blanking plug had been fitted by a monkey and it didn't give me enough clearance to fit everything back together. Ashcroft Transmissions advised to drift it out, and refit it backwards so the dished but is towards the inside of the transfer box. They said if it doesnt leak then this will be fine. It was a fairly tight fit, but i gave it a smear of RTV sealant anyway. Plenty of clearance now!
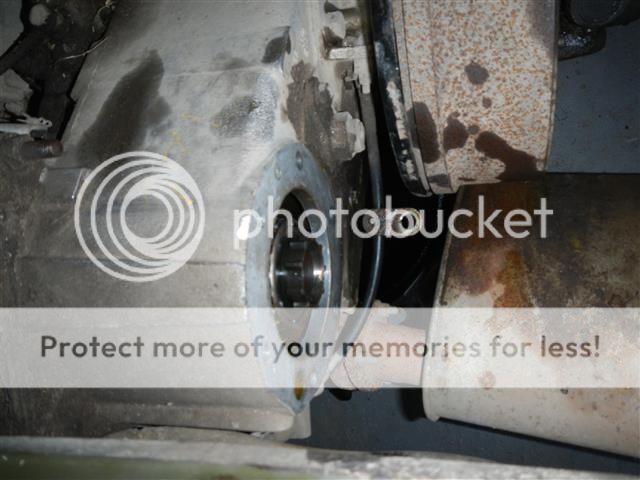
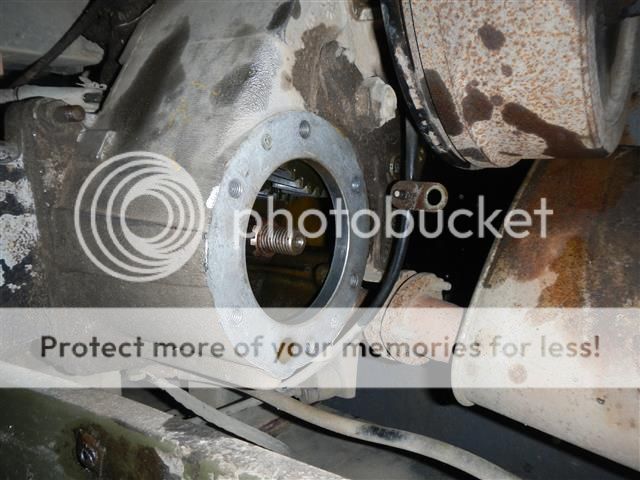
12. Now refitting is the reverse of assembly, if you changing your gears for cross drilled or new type then you will need to fit new bearings and adjust the preload - i didnt do this so i havent covered this. Google and your haynes/workshop manual can help with this, but basically you shim the bearing carrier so the gear isnt to tight or loose. Now it should look like this, a smear of EP80/90 oil on the splines helps with re-assembly). It should now look like this. It is worth noting that however the beraing carrier comes off must be how it goes back on, i.e if it has a gasket it must go back on with a gasket of the same thickness, if it has no gasket then it must go back on with no gasket (and no RTV sealant either) as the gasket, or lack of, is factored into the preload on the bearings and leaving it out/adding one in will affect your preload and cause bearing overheat and failure.. This is where the marks you made before disassembly come into their own as its a PITA to line up otherwise!
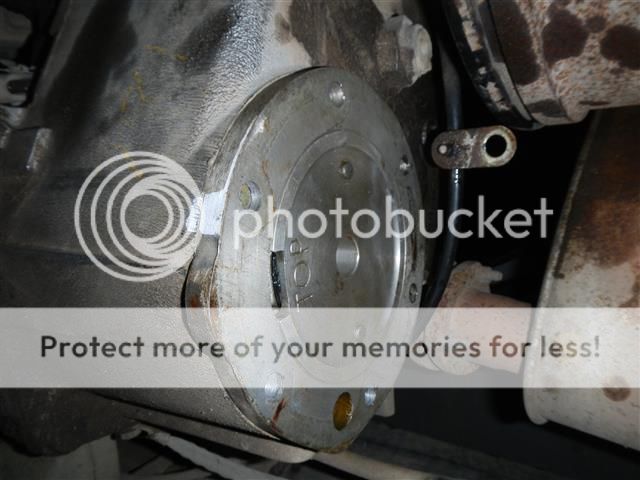
13. Now fit your oil feed plate over the top of the threaded shaft (you may have to drill it out slightly for it to fit, apparently there are differing varieties) some people suggest cutting off the nose of the oil feed plate but i was advised to drill it out if necessary as the nose actually help direct the oil. The plate is marked 'TOP', this goes to the top obviously and the cut out aligns with the similar shaped hole at the top of the bearing carrier. There are 2 lugs on the back that locate the plate and prevent it rotating.
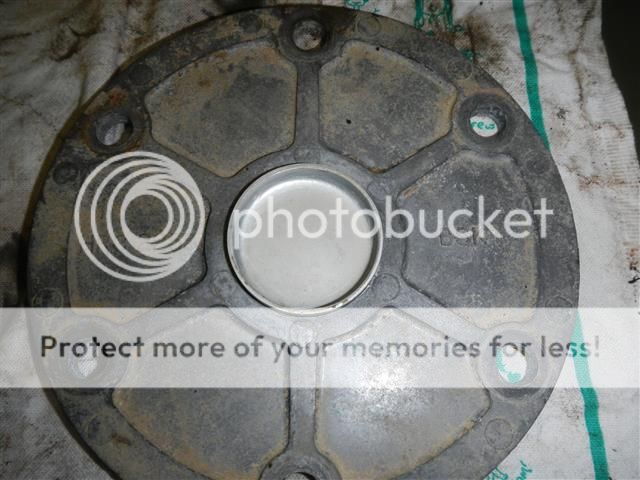
14. Bolt your PTO cover plate back on, a smear or RTV or a gasket on here is fine as this doesnt affect the bearing preload. I tightened the nuts by tightening the opposites so as to secure the plate flat and prevent weird stresses/warping
Tips -
- Mark the PTO cover, bearing plate and body of transfer box before removal to help with lining up and reassembly
- if you have a suffix A or B box then you cant fit cross drilled gears so have to fit the oil feed plate
- do not add in any gasket/sealant or leave any gasket out when refitting the bearing carrier
- renew your oil
- you can fit either cross drilled gears or the oil feed plate or both
- work from in the cab as access is easier
Hope this helps some people who are investigating clunks/transfer box issues, seems like it is my front diff that is clonking not my transfer/gearboxes!
Ed
I started with examining the wear on the gearbox/transfer box - there was some on the transfer box gear but it was minimal. This wear is a well documented fault with the early LT230's were not enough oil gets to the splines causing wear and eventually loss of drive due to the splines stripping. Land Rover rectified this by introducing a retro-fit oil feed plate to direct oil at the splines, and they later introduced a cross drilled shaft in the transfer box. These 2 solutions essentially stopped the premature wear. Either one is effective, you don't have to do both. Ashcroft Transmission were excellent at giving me advice and providing me with an oil feed plate.
Here is how I went about fitting it:
1. First take off your cubby box/centre seat and remove the access panel underneath in order to access the top of the transfer box. This is the view that you should see - mark a line across the top of the transfer box like I have (the white line) this is to help line it all up when you put it back together as the bolt holes are not evenly spaced around the PTO cover - undo these 6 bolts.

2. Remove the PTO cover plate, it may need a tap with a hide mallet to unstick it. You may or may not have a gasket underneath it, either re-use it, get a new one or some RTV sealant when you re-assemble.

3.Now you are looking at the bearing carrier, if you can see a flat plate that says 'TOP' on it then you have an oil feed plate fitted already - just put your PTO cover back on, your splines are probably fine! If your transfer box looks like this pic then you dont have one already so carry on with the disassembly

4. Now its time to remove the bearing carrier that supports the transfer box shaft, on early boxes they are held in with 2 screws, on later boxes it is just a push fit - mine is push fit and needed a bit of encouragement with a hide mallet to get it off.

5. You should now be able to see the taper bearings on the transfer box input shaft, gently wiggle it and withdraw the shaft


6. I found I had to put the transfer box in neutral and wiggle the gear up and down and rotate it at the same time to get it out - perservere, it does just pull out. NB the gear will only pull out on 1.667 and 1.410 ratio boxes, 1.222 ratio boxes need the intermediate shaft to be aligned before removal and the 1.003 ratio unit cannot be withdrawn in situ on the vehicle. Finally it's out

7. Examine the splines inside it carefully for wear, if excessive then the shaft and bearing can be replaced with a cross drilled one. Mine is quite good so I shall be re-fitting it.

8. Your transfer box should now look like this, mine is empty of oil as I took the opportunity to change it whilst doing this job - its up to you whether you do this but I would do it personally.

(i topped up the oil now through the PTO hole (i found it easier) with fresh EP80/90- usual fill level - until it dribbles out the fill hole which in this case i am not using, but i had the plug out anyway!)

9. Wipe of your gearbox output shaft splines and inspect for wear - if these are excessively worn then its either new gearbox time or an expensive rebuild.
Mine were barely worn - phew!

10. Now you should have all these pieces (the small disc in the middle i will explain in a minute). The oil feed plate is bottom left.

11. The small disc in the middle is the 'bung' similar to a core plug from the centre of my PTO cover. The covers are either pressed steel - this is not compatible with the oil feed plate - you need to upgrade to an aluminium one. The other type is solid aluminium, or aluminiun with a hole filled in with a blanking plug. Now on mine the blanking plug had been fitted by a monkey and it didn't give me enough clearance to fit everything back together. Ashcroft Transmissions advised to drift it out, and refit it backwards so the dished but is towards the inside of the transfer box. They said if it doesnt leak then this will be fine. It was a fairly tight fit, but i gave it a smear of RTV sealant anyway. Plenty of clearance now!

12. Now refitting is the reverse of assembly, if you changing your gears for cross drilled or new type then you will need to fit new bearings and adjust the preload - i didnt do this so i havent covered this. Google and your haynes/workshop manual can help with this, but basically you shim the bearing carrier so the gear isnt to tight or loose. Now it should look like this, a smear of EP80/90 oil on the splines helps with re-assembly). It should now look like this. It is worth noting that however the beraing carrier comes off must be how it goes back on, i.e if it has a gasket it must go back on with a gasket of the same thickness, if it has no gasket then it must go back on with no gasket (and no RTV sealant either) as the gasket, or lack of, is factored into the preload on the bearings and leaving it out/adding one in will affect your preload and cause bearing overheat and failure.. This is where the marks you made before disassembly come into their own as its a PITA to line up otherwise!

13. Now fit your oil feed plate over the top of the threaded shaft (you may have to drill it out slightly for it to fit, apparently there are differing varieties) some people suggest cutting off the nose of the oil feed plate but i was advised to drill it out if necessary as the nose actually help direct the oil. The plate is marked 'TOP', this goes to the top obviously and the cut out aligns with the similar shaped hole at the top of the bearing carrier. There are 2 lugs on the back that locate the plate and prevent it rotating.

14. Bolt your PTO cover plate back on, a smear or RTV or a gasket on here is fine as this doesnt affect the bearing preload. I tightened the nuts by tightening the opposites so as to secure the plate flat and prevent weird stresses/warping

Tips -
- Mark the PTO cover, bearing plate and body of transfer box before removal to help with lining up and reassembly
- if you have a suffix A or B box then you cant fit cross drilled gears so have to fit the oil feed plate
- do not add in any gasket/sealant or leave any gasket out when refitting the bearing carrier
- renew your oil
- you can fit either cross drilled gears or the oil feed plate or both
- work from in the cab as access is easier
Hope this helps some people who are investigating clunks/transfer box issues, seems like it is my front diff that is clonking not my transfer/gearboxes!
Ed
Last edited: