rangeroveroverland
Member
- Posts
- 14
- Location
- Cape Town
This is a repair guide if your central locking lock the door but do not unlock. This was from the front passenger door on a 2000 3 door. But think most will be the same.
The door lock got 2 motors inside. Logicly you would think one is for lock and one for unlock, but actually one motor lock and unlock, while the other motor do the "superlocking", meaning you cant open the door from the inside while it is superlocked. This is to stop somebody breaking the window and opening the door from the inside. I'm not too bothered about this so decided to use this motor to replace the normal locking and unlocking motor. It is always this motor that breaks, the superlock motor dont tend to give any problems.
First remove top door card. (2 bolts underneath cover of door handle, one behind pull handle, torx screws around)
Unclip the inner lock button. This just pull out away towards the outside of the car direction.
Unclip the outer door handle lever. This got a blue tab that needs to be pulled away with one finger while the others pull the lever towards the front of the car.
If you are doing the drivers door you need to undo the outer door handle to be able to undo that connection. I have not done this yet on the drivers door so will update more details when I do that.
Now undo the 3 T25 torx screws that hold the mechanism in place on the outside of the door. The inner door handle is still connected on a cable, but you can undo this when the mechanism is outside the door.
You can now unclip the electrical connection also.
Remove the door lock mechanism to the outside of the door, then unclip the inner door handle. There is a little door that clip open to give access to the cable.
You can now take the unit to your favourate sofa with some torx screwdrivers and normal screwdrivers.
Unclip the plastic cover and put to one side.
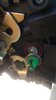
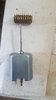
See photo 103522, red circled clip. This needs to be removed. Good luck trying not to break it. One side broke, but it was still usable. To be honest I dont think it is a big problem.
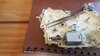
See photo 103545, you can now pull red circle nr 1 out. Then lever the steel part over the 2 plastic clips marked and circled as nr2.
Take note of the position of the levers, but I will show photos later of the positions also before assembly.
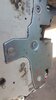
See photo 102614, undo the 4 torx screws as marked in the photo. The one screw need a bit of manuevering since the lever is in the way, but with the lever all the way in the one directions it will come out.
Next lever all the plastic clips loose all around the unit. Most of them will break, but try to keep some intact. The unit is held together by the 4 screws you just took out so not end of the world if they do break.
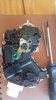
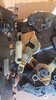
See photo 102321. After unclipping the unit you will see this, but with 2 motors. I'm showing the lock/unlock motor in his position here. The other position is the Superlock. To unlip the motor just lever it with a screwdriver and it will pop out.
Try the two motors on the bench with a little wire to the battery. You can also connect the unit back to the car and look at what the motors are doing. When you lock and unlock the car with the keyfob you should see the motors running for around 2 seconds. But most likely the lock/unlock motor will be broken. You can open him up and try to fix, but with my motor the brush fell out destroying the connections.
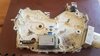
You can not just swap the motors around, since the gears are different sizes. So long nose pliers underneath the gear and tap from the top. Then continue tapping with a small screwdriver or something until gear is removed. See photo 103450. The back of the motor is removed here to see what was going on inside, but it was a lost case.
When both gears are removed fit the superlock motor gear onto the lock/unlock motor. Be careful not to buckle the shaft when tapping the gear on. I did this so my motor is a bit noisy but still work fine.
Fit the motor in the correct position and make sure you get 2 seconds backwards and forwards running when pressing lock and unlock on the fob.
The broken motor you can discard. The superlock postion in the unit will be without motor.
Fit the other half of the unit with the 4 torx screws and make sure the unit still work. Mine was catching inside and I had to sand down one corner inside. See photo 102334.
If the unit moves freely you can fit the unit together. There is 4 parts to make sure they are in the correct position. See photo 102737 and 102847
Fit the middle shaft/screw and clip if it is still half usable. Otherwise just fit the shaft.
Try the unit again. Also make sure you cant open the door from the outside when it is locked. That would mean you got the one lever in the wrong position. Keep in mind on the moment lock will be unlock and unlock will be lock. The polarity on the two motors are different so we still need to swap two wires around.
Fit the unit back in the car.
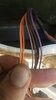
See photo 113721, cut these 2 wires and swap them around.
Now enjoy having a car with working central locking again! And it cost you nothing apart from time. And beers...
The door lock got 2 motors inside. Logicly you would think one is for lock and one for unlock, but actually one motor lock and unlock, while the other motor do the "superlocking", meaning you cant open the door from the inside while it is superlocked. This is to stop somebody breaking the window and opening the door from the inside. I'm not too bothered about this so decided to use this motor to replace the normal locking and unlocking motor. It is always this motor that breaks, the superlock motor dont tend to give any problems.
First remove top door card. (2 bolts underneath cover of door handle, one behind pull handle, torx screws around)
Unclip the inner lock button. This just pull out away towards the outside of the car direction.
Unclip the outer door handle lever. This got a blue tab that needs to be pulled away with one finger while the others pull the lever towards the front of the car.
If you are doing the drivers door you need to undo the outer door handle to be able to undo that connection. I have not done this yet on the drivers door so will update more details when I do that.
Now undo the 3 T25 torx screws that hold the mechanism in place on the outside of the door. The inner door handle is still connected on a cable, but you can undo this when the mechanism is outside the door.
You can now unclip the electrical connection also.
Remove the door lock mechanism to the outside of the door, then unclip the inner door handle. There is a little door that clip open to give access to the cable.
You can now take the unit to your favourate sofa with some torx screwdrivers and normal screwdrivers.
Unclip the plastic cover and put to one side.
See photo 103522, red circled clip. This needs to be removed. Good luck trying not to break it. One side broke, but it was still usable. To be honest I dont think it is a big problem.
See photo 103545, you can now pull red circle nr 1 out. Then lever the steel part over the 2 plastic clips marked and circled as nr2.
Take note of the position of the levers, but I will show photos later of the positions also before assembly.
See photo 102614, undo the 4 torx screws as marked in the photo. The one screw need a bit of manuevering since the lever is in the way, but with the lever all the way in the one directions it will come out.
Next lever all the plastic clips loose all around the unit. Most of them will break, but try to keep some intact. The unit is held together by the 4 screws you just took out so not end of the world if they do break.
See photo 102321. After unclipping the unit you will see this, but with 2 motors. I'm showing the lock/unlock motor in his position here. The other position is the Superlock. To unlip the motor just lever it with a screwdriver and it will pop out.
Try the two motors on the bench with a little wire to the battery. You can also connect the unit back to the car and look at what the motors are doing. When you lock and unlock the car with the keyfob you should see the motors running for around 2 seconds. But most likely the lock/unlock motor will be broken. You can open him up and try to fix, but with my motor the brush fell out destroying the connections.
You can not just swap the motors around, since the gears are different sizes. So long nose pliers underneath the gear and tap from the top. Then continue tapping with a small screwdriver or something until gear is removed. See photo 103450. The back of the motor is removed here to see what was going on inside, but it was a lost case.
When both gears are removed fit the superlock motor gear onto the lock/unlock motor. Be careful not to buckle the shaft when tapping the gear on. I did this so my motor is a bit noisy but still work fine.
Fit the motor in the correct position and make sure you get 2 seconds backwards and forwards running when pressing lock and unlock on the fob.
The broken motor you can discard. The superlock postion in the unit will be without motor.
Fit the other half of the unit with the 4 torx screws and make sure the unit still work. Mine was catching inside and I had to sand down one corner inside. See photo 102334.
If the unit moves freely you can fit the unit together. There is 4 parts to make sure they are in the correct position. See photo 102737 and 102847
Fit the middle shaft/screw and clip if it is still half usable. Otherwise just fit the shaft.
Try the unit again. Also make sure you cant open the door from the outside when it is locked. That would mean you got the one lever in the wrong position. Keep in mind on the moment lock will be unlock and unlock will be lock. The polarity on the two motors are different so we still need to swap two wires around.
Fit the unit back in the car.
See photo 113721, cut these 2 wires and swap them around.
Now enjoy having a car with working central locking again! And it cost you nothing apart from time. And beers...
Attachments
-
 20220201_103522.jpg322.2 KB · Views: 700
 -
 20220201_103545.jpg352.3 KB · Views: 683
 -
 20220201_102614.jpg462.3 KB · Views: 781
 -
 20220201_102321.jpg202.7 KB · Views: 643
 -
 20220201_103450.jpg466.3 KB · Views: 674
 -
 20220201_102334.jpg235.1 KB · Views: 645
 -
 20220201_102737.jpg535.9 KB · Views: 756
 -
 20220201_102847.jpg455.8 KB · Views: 700
 -
 20220201_113721.jpg283.6 KB · Views: 706