Irish4x4
Member
- Posts
- 88
- Location
- Malmo, Sweden
Hi Folks,
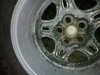
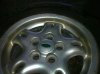
Here in Sweden we have summer and winter wheels due to the extreme winter conditions. When you buy a second hand car you usually get two sets of wheels. When I bought my Disco they asked if I wanted the winter wheels as they were in such bad condition. Two tyres were flat and the powder finish on the hubs was chipped, bubbling or corroded away by the salt from the winter roads. The threads were ok so I took them. I had the punctures repaired and then set to work on the respray.
I am certain that many of you are much better at these things than I am however, I always find it encouraging to see how to guides and so I will add my attempt at a respray here. I know powder is better but I was not willing to spend that much on repainting, I would rather buy a new set.
So heres what I did.
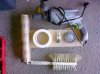
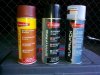
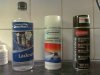
I bought a red base primer, black gloss colour and clear gloss finish (3 cans of each). I also bought 2 steel wire brush attachments for my power drill, various types of sandpaper from 280 to 340 and I had some 800. I also used paint thinner, a face mask, masking tape, old rags and newspaper.
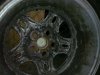
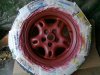
I removed the plastic centre inserts from the wheels to paint separately. I set to work on the wheels with the drill and steel brushes (I really needed the mask as the amount of dust coming off the wheels in the areas where the salt had corroded the paint was incredible. I stripped away the paint down to the metal on the inside as it was in such bad condition. On the outside I didn't want to use too much of the steel brushes as they cut quite deep and the external surfaces were not in as bad a condition. The rim on one wheel was very bad and I had to remove all the paint right down to the rim.
After many hours of work I had removed all the loose paint. I then sanded the outer surfaces with varying grades of sandpaper to create as smooth a finish as possible. The rim I had taken back to the metal needed the most attention to create a smooth finish.
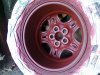
Once finished I wiped off all the rims with paint thinner and a rag to remove dust and grease. Using masking tape and newspaper I taped off the tyres and valves ready for spraying. I placed each wheel in turn on top of cardboard inside facing up. I coated the inside with primer and then flipped the wheel over priming the outer side. I then stored the wheel while I sprayed the next. I allowed the primer to dry for about 4 hours before applying the second coat. I left the wheels to dry for 24 hours.
Next, I repeated the process giving each wheel two coats of black gloss. I then let these dry for 24 hours. I then repeated the process with the clear gloss finish.
As a last touch I bought a can of tyre cleaner and sprayed this over the clean outer rubber surfaces to give a clean wax finish.
I painted the plastic inserts as follows. I removed the Land Rover logo from the plastic wheel inserts. Gave the surface a gentle rub down with 800 sandpaper. I sprayed these with a plastic primer, 2 - 3 coats to get good coverage. I then sprayed them with the same black gloss I used for the wheels, 2 - 3 coats and finished them with two clear coats. I used a strong adhesive to reattach the Land Rover logo inserts.
I spent two afternoons preparing the wheels and then three days for the painting process.
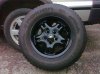
The finished product looks great but I have no idea how it is going to hold up to the -10 to -20 we get up here in the winter. I am sure it will chip like a bugger but with the dark primer I hope it will only need to be touched up after each winter season.
Hope this was helpful to somebody out there.
Regards
Here in Sweden we have summer and winter wheels due to the extreme winter conditions. When you buy a second hand car you usually get two sets of wheels. When I bought my Disco they asked if I wanted the winter wheels as they were in such bad condition. Two tyres were flat and the powder finish on the hubs was chipped, bubbling or corroded away by the salt from the winter roads. The threads were ok so I took them. I had the punctures repaired and then set to work on the respray.
I am certain that many of you are much better at these things than I am however, I always find it encouraging to see how to guides and so I will add my attempt at a respray here. I know powder is better but I was not willing to spend that much on repainting, I would rather buy a new set.
So heres what I did.
I bought a red base primer, black gloss colour and clear gloss finish (3 cans of each). I also bought 2 steel wire brush attachments for my power drill, various types of sandpaper from 280 to 340 and I had some 800. I also used paint thinner, a face mask, masking tape, old rags and newspaper.
I removed the plastic centre inserts from the wheels to paint separately. I set to work on the wheels with the drill and steel brushes (I really needed the mask as the amount of dust coming off the wheels in the areas where the salt had corroded the paint was incredible. I stripped away the paint down to the metal on the inside as it was in such bad condition. On the outside I didn't want to use too much of the steel brushes as they cut quite deep and the external surfaces were not in as bad a condition. The rim on one wheel was very bad and I had to remove all the paint right down to the rim.
After many hours of work I had removed all the loose paint. I then sanded the outer surfaces with varying grades of sandpaper to create as smooth a finish as possible. The rim I had taken back to the metal needed the most attention to create a smooth finish.
Once finished I wiped off all the rims with paint thinner and a rag to remove dust and grease. Using masking tape and newspaper I taped off the tyres and valves ready for spraying. I placed each wheel in turn on top of cardboard inside facing up. I coated the inside with primer and then flipped the wheel over priming the outer side. I then stored the wheel while I sprayed the next. I allowed the primer to dry for about 4 hours before applying the second coat. I left the wheels to dry for 24 hours.
Next, I repeated the process giving each wheel two coats of black gloss. I then let these dry for 24 hours. I then repeated the process with the clear gloss finish.
As a last touch I bought a can of tyre cleaner and sprayed this over the clean outer rubber surfaces to give a clean wax finish.
I painted the plastic inserts as follows. I removed the Land Rover logo from the plastic wheel inserts. Gave the surface a gentle rub down with 800 sandpaper. I sprayed these with a plastic primer, 2 - 3 coats to get good coverage. I then sprayed them with the same black gloss I used for the wheels, 2 - 3 coats and finished them with two clear coats. I used a strong adhesive to reattach the Land Rover logo inserts.
I spent two afternoons preparing the wheels and then three days for the painting process.
The finished product looks great but I have no idea how it is going to hold up to the -10 to -20 we get up here in the winter. I am sure it will chip like a bugger but with the dark primer I hope it will only need to be touched up after each winter season.
Hope this was helpful to somebody out there.
Regards
Attachments

Last edited:
