Series 3 Crank seal Advice

This site contains affiliate links for which LandyZone may be compensated if you make a purchase.
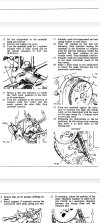
@steve2286w - is that the 5 bearing? I realise now that my official manual is 3mb only...

For interest, this is what it says. And it's interesting that yours says no regrinds.

AJFCJaWhv5lXoFuOX9BV5TgeHeLvsYkLkeBHuGgQGRAyinGqS9Cmine5ZgkbU92kjbK-eIYvm-D-2YjK2XDixvkR_KmG5FkL7Pfb7xzyalcl0HFJE_KiooyQcgsF43kBtjIM0cj-esg0qLIcs39uxXmCqYY3K3fBfHQ9cd5tskTCFI0tIYvQJ02gSyT0STC3CwgxAHACQ5T6YnQXBFbiKXw9QLTIXxy3PdjikM116tA1H_4JaZmsfGCJhetwlMWPXa7Sl2Hr9mSOyHZLaOgDQrRFHLogE6MR8FNbDykrcPhivsF0_Bfg_zbDD08yUPXRMYK1qDEQQi0pwLZIPQ4ujQ9hU-I5clewwrt8aF-RVil3uGDN3eOEL8F1Sv_uuI1RajDqp4LF12lPkZ1E33zAQkIsgs7mWUxM2J5tPvpJq2bGK75Tb8rsLGs78aOzJpMjUejlN-XeHGK-ekT4UVNbQKm8G_lUZNUsZXDYDO77runAUL-KOFYotJTymWYoHrT4AWiGa2LUr-w97TgBV-2cELTII3UNjiwXcEQdf-5kLVfBAzw709H4wvkNPFUSiEVDO9igcbiQaXKesgJBM7a48KzxD8mLqiXHrtqSSx2D1K_Xa3dwsBkqBfDSAcmmNhskDKXFj-edcN331NTFzjxED-UcfxfrqlQIyT5vnupUU1wXZ6f2n66OUN1P2tQTw96tW0Z3XBf3_o3j1UKBlTEH1K3G5j5Me9NR98qFNmK2n1AO3YQEuDKK5JMXhjwX715suoYQThdeb0FOqt1RbJz6BhDtFkUdN3HP9BN8kA78bFLs56Vao8RIhlTdqIrET7eLYGzZbiuXVxy_flb2ljNT4_Vk46NETeDw5WrIFHKxuZ9oNmuejNheYDRSNMAucBCVday2_qTrxq3pYHfinLZGci-lPN0F0remfgsYjIf9TDZc0eZOm71ZdCw5RSOdk0e4nRshao2YTA_OM4E2Id9nmtXfgaiQlFtLzSH3sZYMrLo-zSw25b0L1ziQ1NZ5XxdHQNDBNA=w575-h767-s-no

I have a paper copy of the green bible , the front end will be 3mb but the green supplement at the back covers the 5mb engine , both crank pin and main journals same diameter on all engines
you can regrind the petrol apparently but not advised to do the diesel although I would think some still get done and then fit the undersized petrol bearings
this link great for the various manuals

 
Help needed so tonight I have goto the point of replacing all the sprockets on the timing and went to line things up as per green book and I'm confused what I'm doing wrong.


Set crank to EP
I set the rocker Cap to10 tho

rotated the cam until it just started to push on the valve and marked cam wheel and engine block.

Then this is where I'm confused at this point it keeps going up on the dti and then starts to drop back down then just flicks over on the springs.

Then I start the whole process again I can see how you do this now?


I have also loosend all except valve 1 off and same issue.

What am I doing wrong??


I walked away before I started chucking spanners about just one of those nights....


Thanks
Richard
I'm completely puzzled. Where in the green book did you find this procedure? I did it as in 12.65 and the only bit I found tedious was choosing which keyway to be best choice on the cam sprocket.
 
I'm completely puzzled. Where in the green book did you find this procedure? I did it as in 12.65 and the only bit I found tedious was choosing which keyway to be best choice on the cam sprocket.
The official landrover workshop book. Its because I'm trying to find either side of the lope. I'm not sure why I can't just turn it until the dti stops dropping and levels out and then put the chain on or is that to risky.


Thanks
 
Sounds like you’re going wrong at step 16 onwards,


1684358523458.jpeg

rotated the cam until it just started to push on the valve and marked cam wheel and engine block
This is different to step 16
so what it’s saying is make your marks when valve nearly fully opened , then it goes past fully open and the dti reads the same again make your 2nd mark on chainwheel then split the differnce which should ring the very centreline of the cam lobe
 
Sounds like you’re going wrong at step 16 onwards,


View attachment 288472

This is different to step 16
so what it’s saying is make your marks when valve nearly fully opened , then it goes past fully open and the dti reads the same again make your 2nd mark on chainwheel then split the differnce which should ring the very centreline of the cam lobe
Ahh okay so I think that's me issue I was marking at the start of the increase and trying to find the other side so what I need to do is say mark it 4 marks before the tdc and then go back to the same place on the otherside so a fully very little movement In thr valve really.


Thank I will try again tomorrow
 
@steve2286w I think I have done it and only took about 15 mins. I will double and triple check tonight as it was a quick lunch break job but I turned the engine over and it came back to the EP and Valve fully open 3 times so I think its looking promising :).

Thanks for all your assistance.
 
Well done that man, I’ve got to do the same on my rebuild sometime soon
So tonight I turned the engine over another 3 times with all the valves set and as it came back to the ep mark exhaust valve was fully open and the dti stopped turning just as it came past ep mark the dti started spinning in the other direction.

I tried setting my dti to 0 at fully open but it seemed to stop about 3 / 4 lines shot of zero everytime unless I blew on the dti then it went to zero. I think this is because it's one of those cheap £30 sets anyone else had this issue.


Just to be clear marks all lined up at the same point and the valves never felt like they came into contact with the pistons 😁


Thanks
Richard
 
So the engine is back in and running sweat as a nut looks like a need to just tweak the fuel timing a tad but its running and nothing came out the sides of the block :)

And no oil at the moment seems to be coming out the front or rear crank seals :)

Thanks
Richard
 
I thought I would share a photo of my progress so far, electrics and bonnet catch adjustment next. :)

I tweaked the fuel timing yesterday and it only took me about 10 minutes to get it sounding spot on and the faint white smoke gone :) it a new record for me.
 

Attachments

  • IMG_20230523_210248.jpg
    IMG_20230523_210248.jpg
    339.4 KB · Views: 49
So she's all done thanks everyone for all your help and guidance along the way.

Ric
 

Attachments

  • IMG_20230525_210147.jpg
    IMG_20230525_210147.jpg
    361.9 KB · Views: 75
Well done😀 
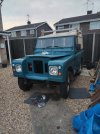
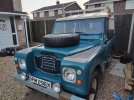
always good when you diy successfully, nice spotlights but they might be better moved a bit further out as they’re obstructing the D rings, you never know when you might need them
 
Back
Top